As you can see from my previous articles, I have been using DxO PhotoLab since version 4 as a Lightroom CC plugin for noise reduction of my high-ISO images. The AI-based DeepPRIME noise reduction process introduced with DxO Photolab 4 delivers much better results than the denoising algorithms implemented in Adobe Lightroom for high-ISO images with a lot of noise. DeepPRIME also performed better in my comparison with the competitor Topaz DeNoise AI.
Since then, the DxO PhotoLab Lightroom plugin ( currently in version 5) has become an integral part of my workflow for demanding high-ISO shots. However, I do not use the other extensive functions of PhotoLab 6 (so far). All further processing (exposure correction, color corrections, cropping, tagging, export) after noise reduction with DxO DeepPRIME is still done in Adobe Lightroom. I particularly enjoy using Lightroom’s extensive catalog features. My catalog dates back to 2003 and contains more than 200,000 images.
Therefore, in this article I will deal exclusively with the aspect of noise reduction with the PhotoLab 6 plugin.

DxO has added the advanced denoising process DeepPRIME XD (XD stands for “eXtreme Detail”) to the new PhotoLab 6 Elite edition. According to DxO, the results should be much better than before.
For DeepPRIME XD, DxO says it made use of a new neural network that has been trained with billions of image samples and is now said to allow improvements of more than 2.5 f-stops. This means that after processing with DxO DeepPRIME XP, an image with ISO 12,800 will have about as much noise as one with ISO 2,000-2,500 before. In my own test, DxO PhotoLab 4’s DeepPRIME algorithm already showed an improvement of about 3 f-stops with respect to the visible image noise of high-ISO shots.
Since DeepPRIME XD is an integral part of the RAW conversion process, it should also be able to further increase the dynamic range. However, the original DeepPRIME mode remains available in PhotoLab 6. It is intended for faster optimizations or for images that simply require fewer corrections. Unfortunately, this suggests that the new algorithm will be even more elaborate and require even more processing power. I was able to verify this, in my examples DeepPRIME XP needed about 1.5 times as much time as DeepPRIME, but this is still within reasonable limits - at least if your computer hardware is sufficiently potent.
Other changes in DxO PhotoLab 6 concern color management, retouching, and photo library management. However, these are of no relevance to me for the time being, since, as already mentioned in my review of version 4, I only use PhotoLab as a Lightroom plug-in.
Being initially very skeptical whether the already excellent result of DxO’s DeepPRIME could be further improved, I immediately downloaded the trial version - and after a short test, immediately purchased the update:
DxO DeepPRIME XD has actually gotten even better
For the test I again used the photo of our tomcat Tom, which I already used for the test of DeepPRIME in PhotoLab 4. The picture represents a real endurance test for the noise reduction. On the one hand it was taken with ISO 12,800 (I limited the Auto-ISO range of my camera to 100-12,800) and was still underexposed by a f-stop, so that it is basically a shot at ISO 25,600!
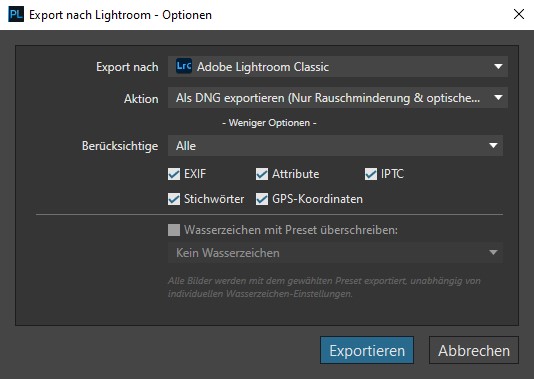
Image editing
As usual, I first processed the image in Lightroom (Exposure +1.05, Contrast +60, Highlights -100, Depths +100) and denoised it (Details|Luminance 60). The other settings remained at their defaults. Then I transferred the CR3 file to PhotoLab 6 and processed it with the default settings (though luminance was set to 75, which gave me the best results) first with the DeepPRIME algorithm known from the previous versions and then with the new DeepPRIME XD method. Then the images were passed back to Lightroom Classic as DNG files without any further changes using the Export to Lightroom function in PhotoLab 6.
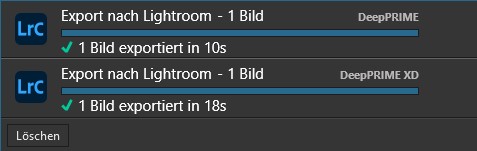
The processing time for the image of our tomcat on my laptop (i9-11980 HK, Geforce RTX 3080/8GB, 64GB main memory) was a bit increased with the new algorithm:
The performance of the DeepPRIME algorithms seems to depend heavily on the graphics card. Finally, I tested this again on my laptop (i9-11980 HK, GeForce RTX 3080/8GB, 64GB main memory), this time with a 48 megapixel image from my DJI Mini 3 Pro. To analyze it, I let DxO PhotoLab 6 render the image first using the GeForce GPU and then the CPU.
With the GeForce 3080 laptop GPU/OpenCL turned on:
- DeepPRIME: 0:22min
- DeepPRIME XD: 0:22min (really this time no difference)
With the CPU ( running with 8 cores at 3.5GHz):
- DeepPRIME: 1:39min
- DeepPRIME XD: 9:47min (almost 6times slower)
Since the DNG files created by DxO PhotoLab 6 looked a bit darker and had a minimal magenta color cast after re-importing them into Lightroom, I compensated this in Lightroom with Exposure +0.5 and Tint -4. The other settings were applied as specified in the Lightroom processing above (the noise reduction/luminance was set to 0, of course).
Below is an overview of the images created in this way:
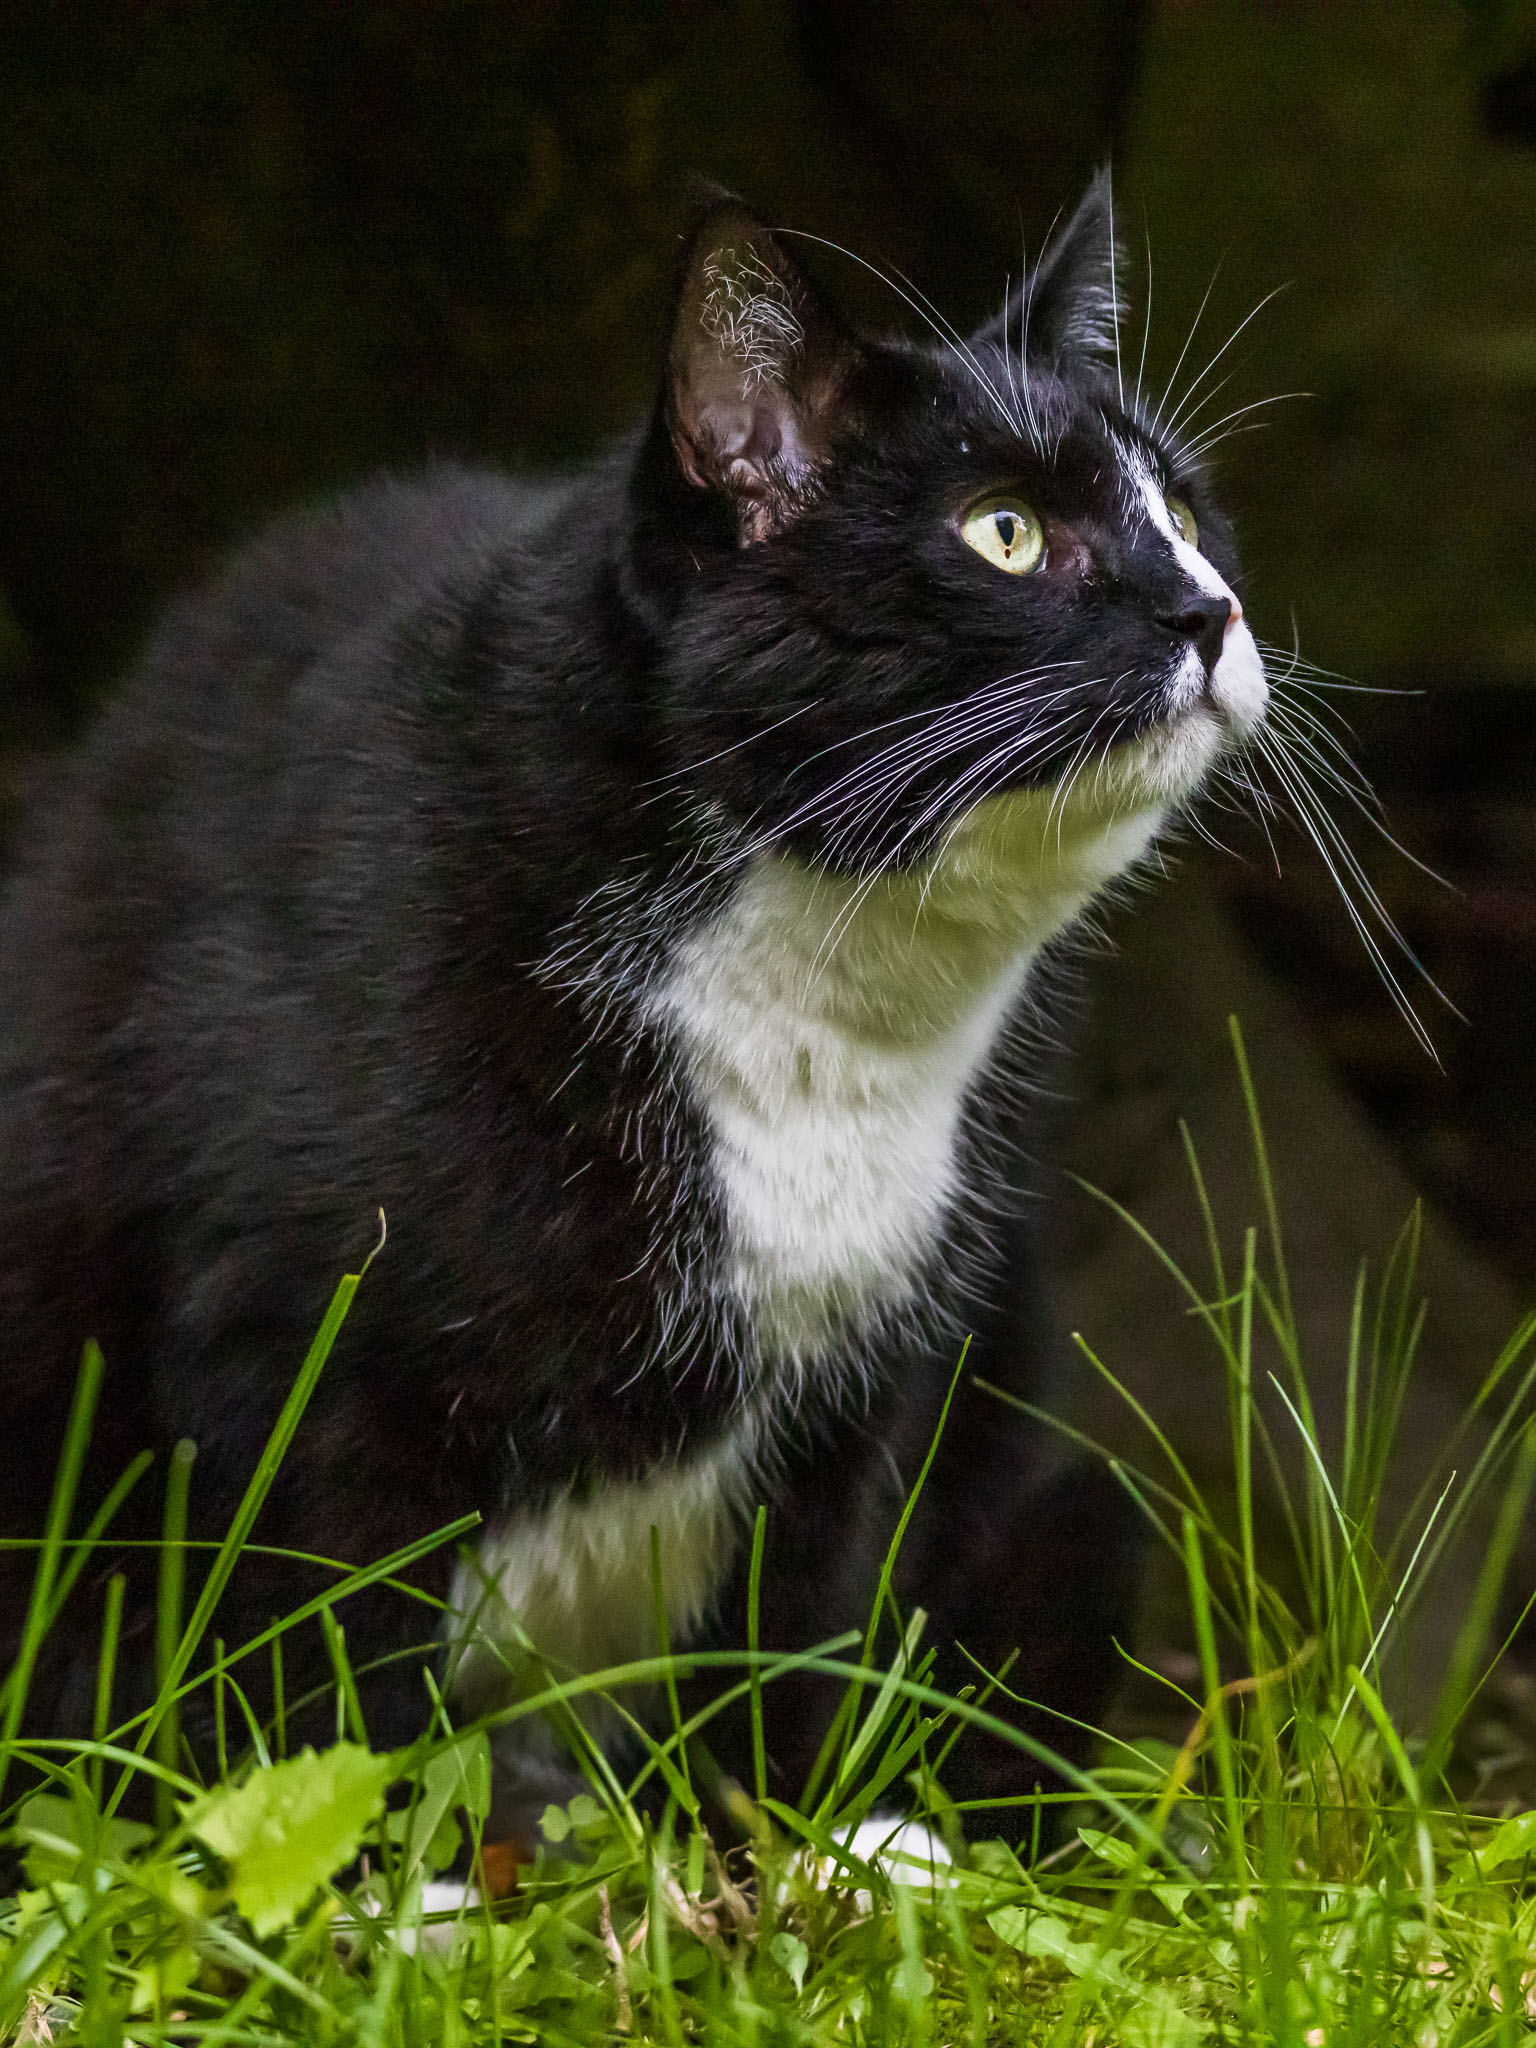
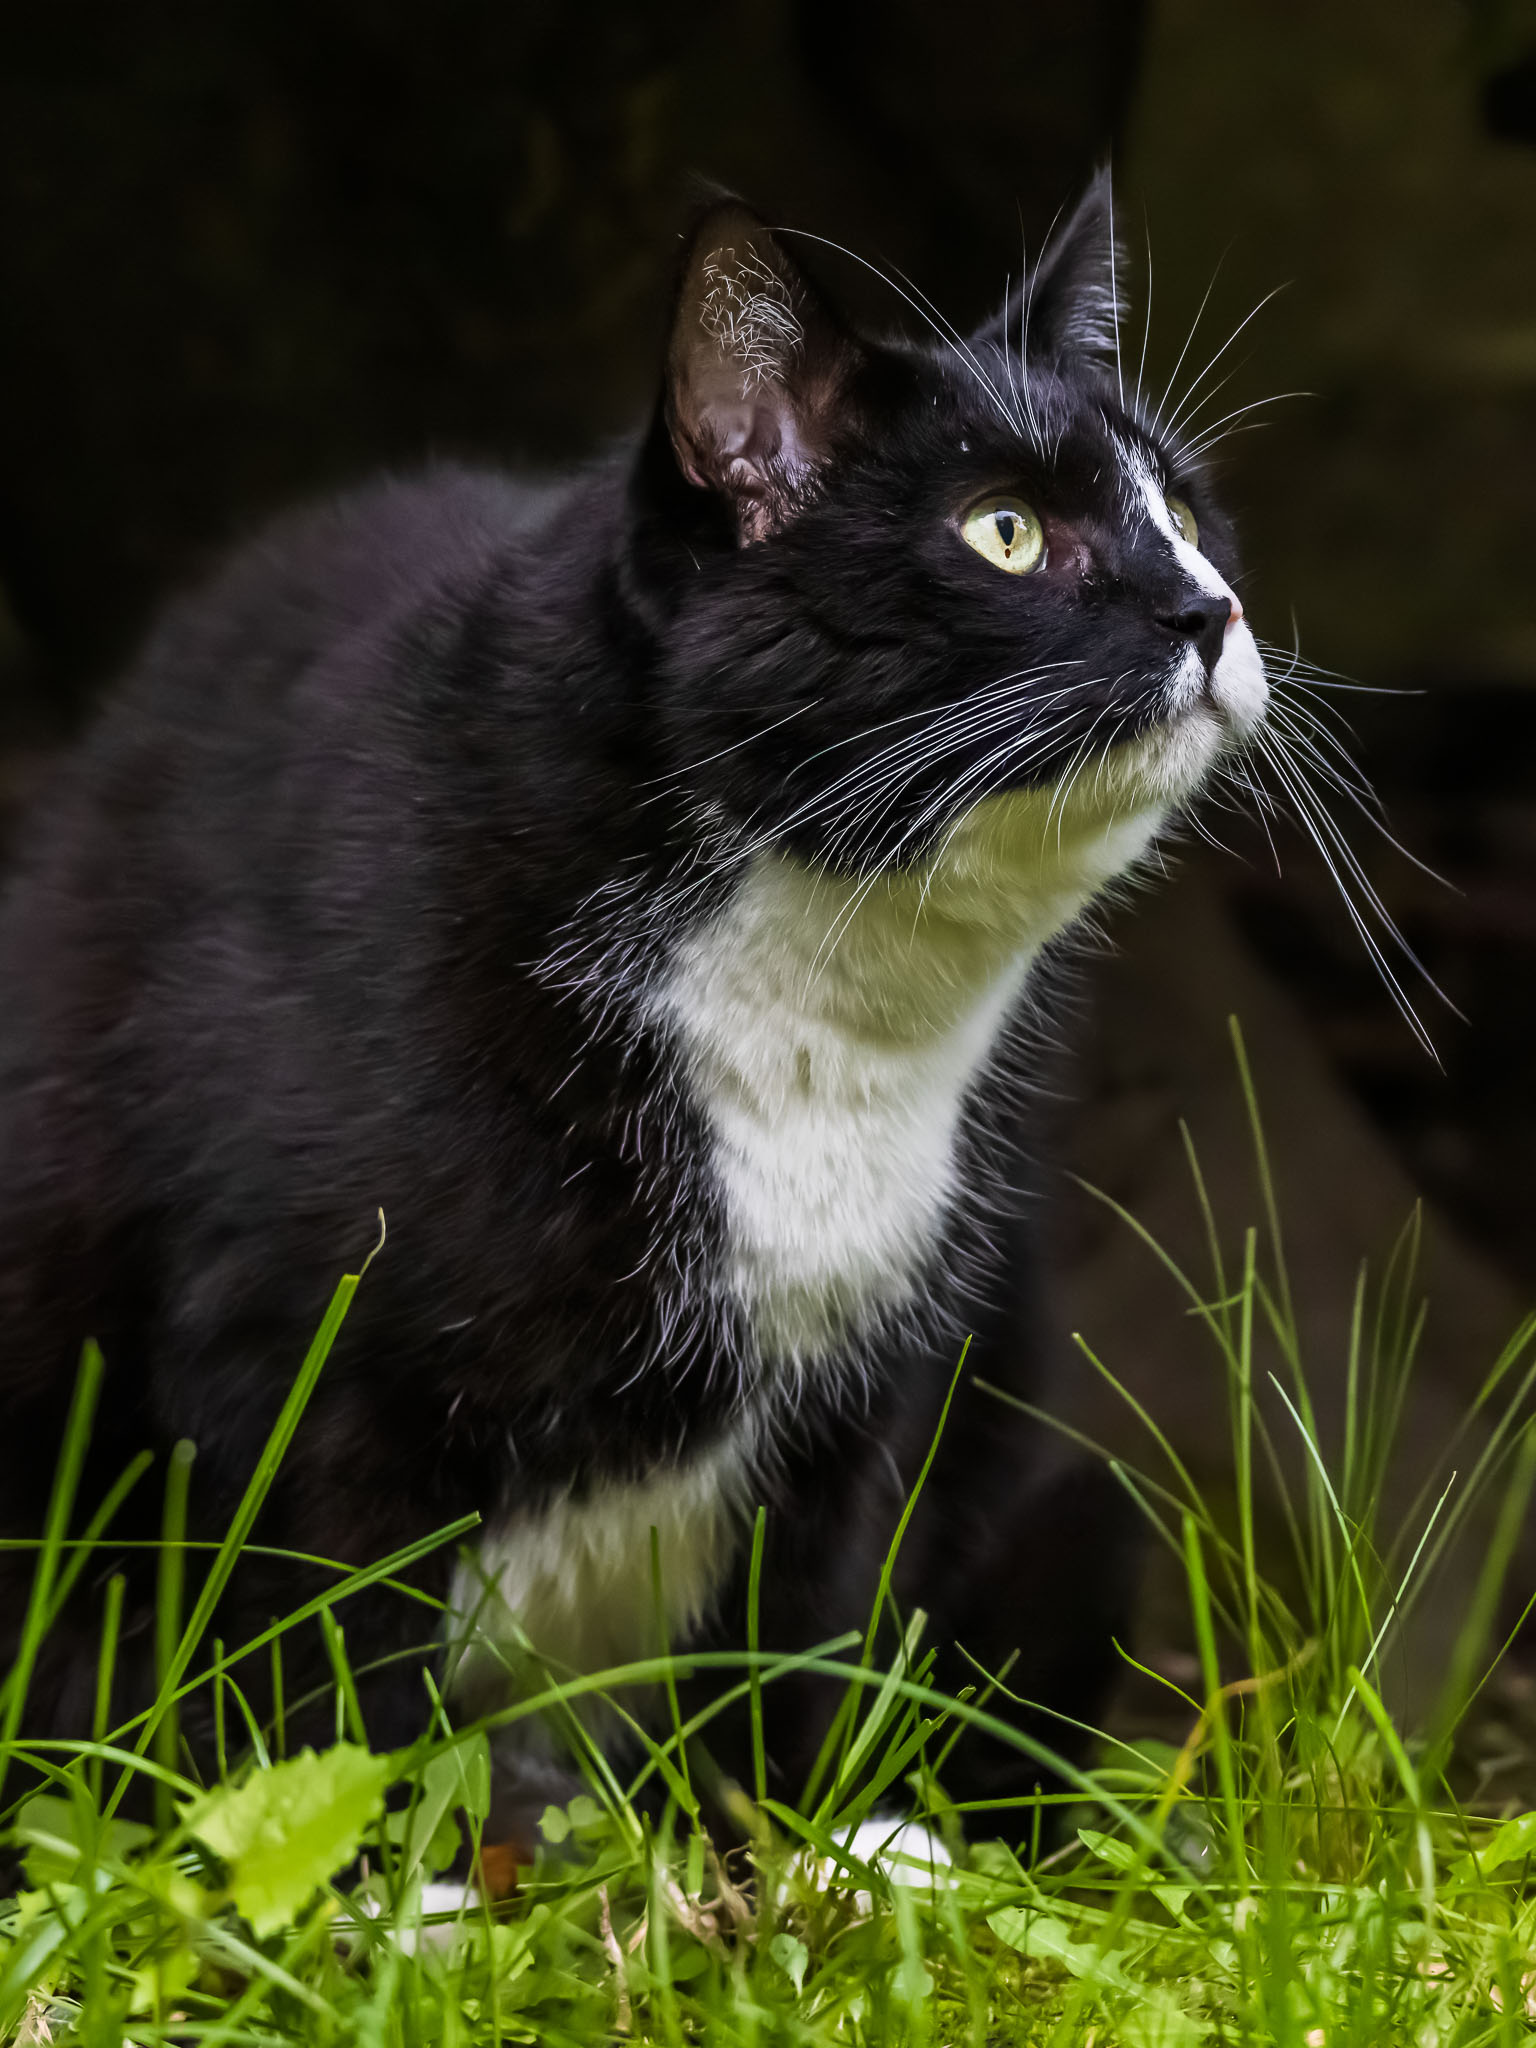

Admittedly, in the resized for the web overview images, the differences are hardly noticeable. Reducing the size of images is already a very effective way of reducing noise. Anyone who only presents his pictures in small size on the web therefore doesn’t really need any denoising 😊.
It is different if the images are intended to be printed or displayed on a larger scale as well. Then the difference becomes obvious. I have therefore created a few more crops from the image above in the following, which demonstrate the differences much more impressively.
DeepPRIME
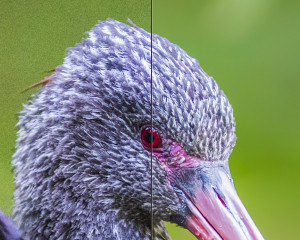
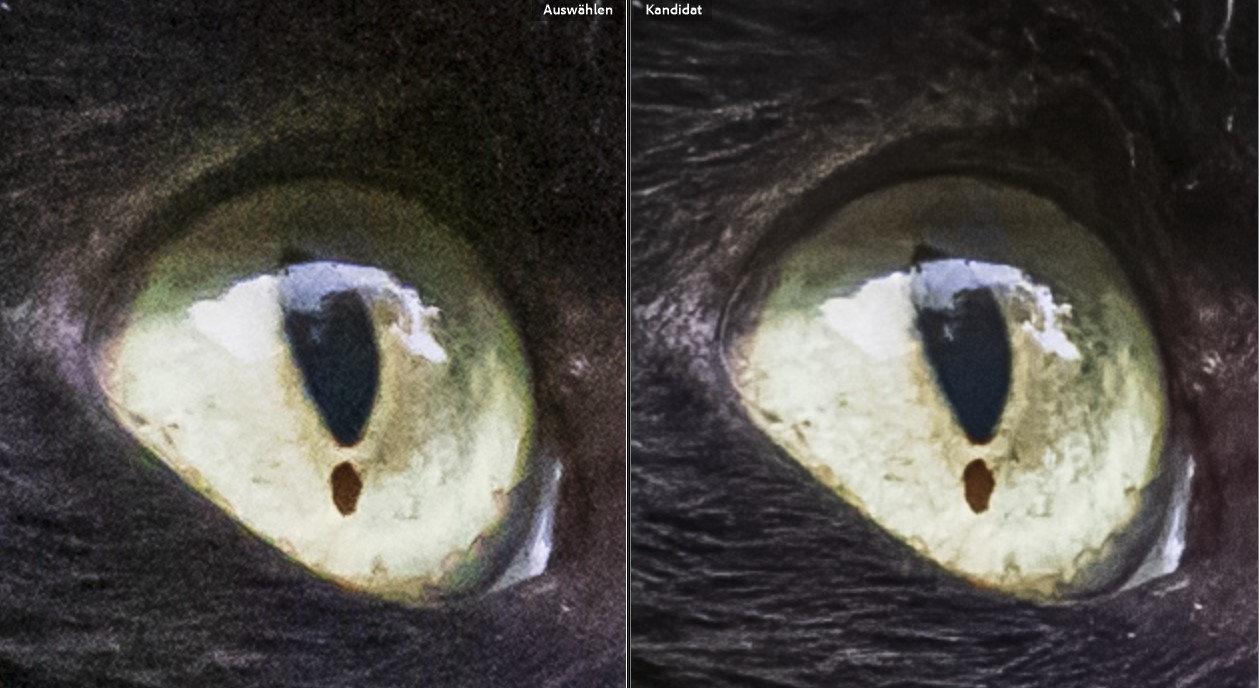
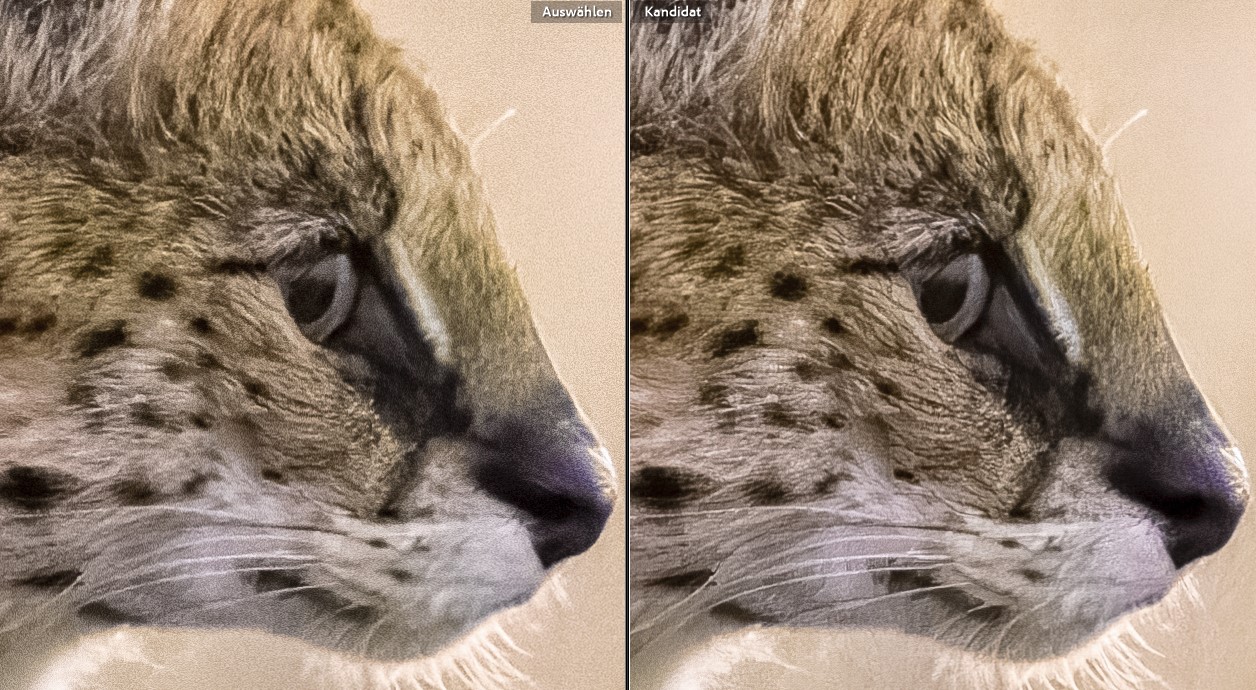
I’ll start with a detail of the right eye of our tomcat. I have enlarged it to 200% for better visibility. Here is a comparison of the development in Lightroom Classic 11.5 (left) with the additional denoising using the older DeepPRIME method (right):
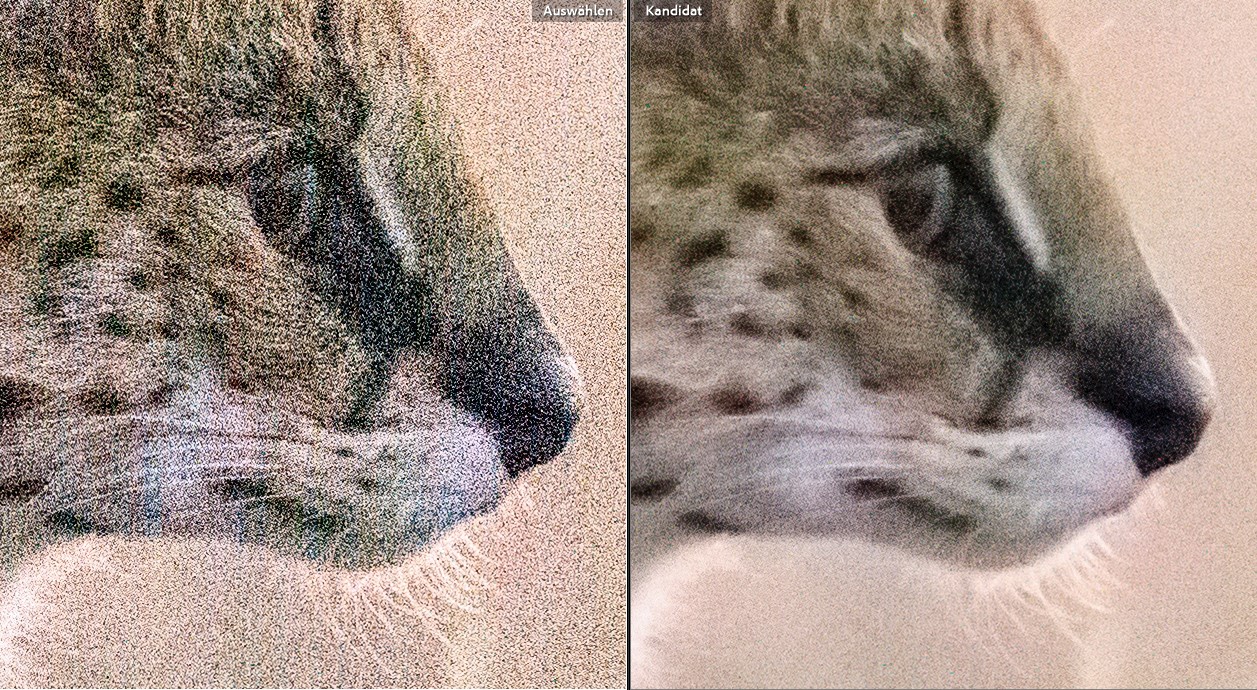
Next, another detail of our cat’s chin:
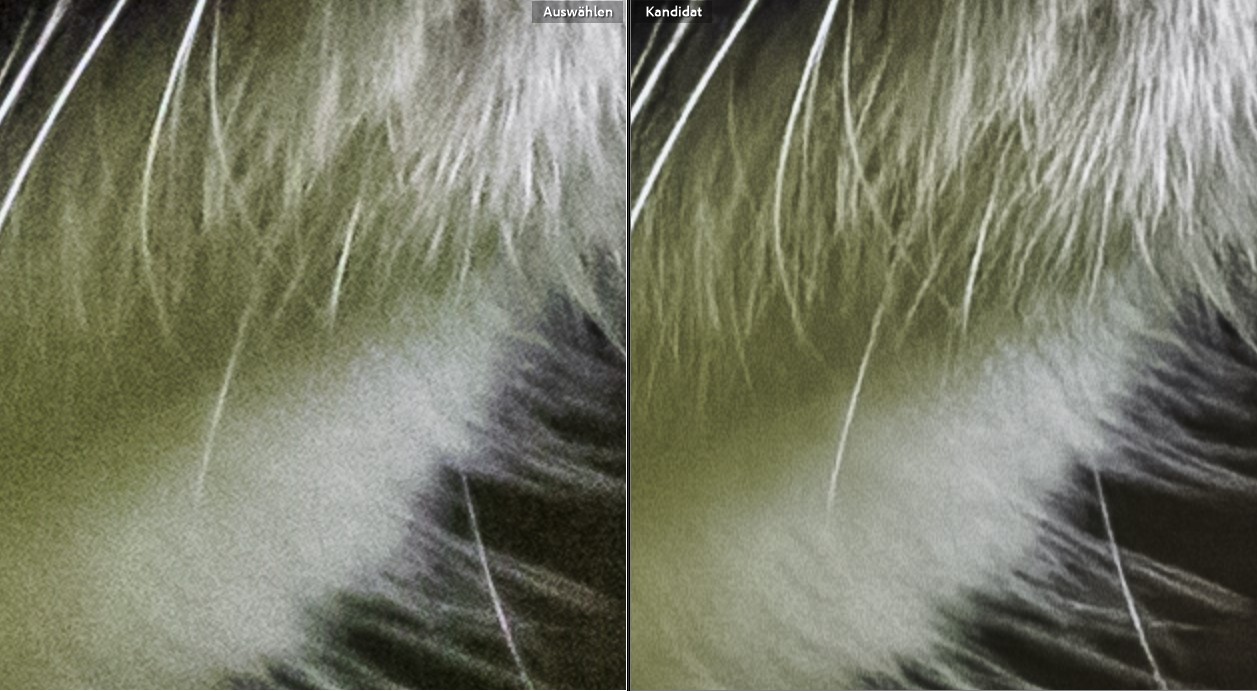
DxO DeepPRIME’s noise reduction is already much better compared to the result obtained with Lightroom’s built-in function, as I already found out in my review of DxO PhotoLab 4. However, some finer details seem to be lost in the processing, which can just be suspected in the noisy version developed in Lightroom. This can be seen in particular in the lower shot at the base of the throat. The area looks somewhat unnaturally washed out.
But now to the actually interesting topic:
Comparison between DeepPRIME and DeepPRIME XD
How do these areas now look in comparison between the familiar DeepPRIME and the new DeepPRIME XD? For this purpose, I demonstrate below the two sections comparing the two methods. The image on the left has been denoised using the above settings in the DxO PhotoLab 6 plug-in with DeepPRIME, while the one on the right has been denoised using the new DeepPRIME XD. At first, the eye:

And here is the detail of the chin of our cat:
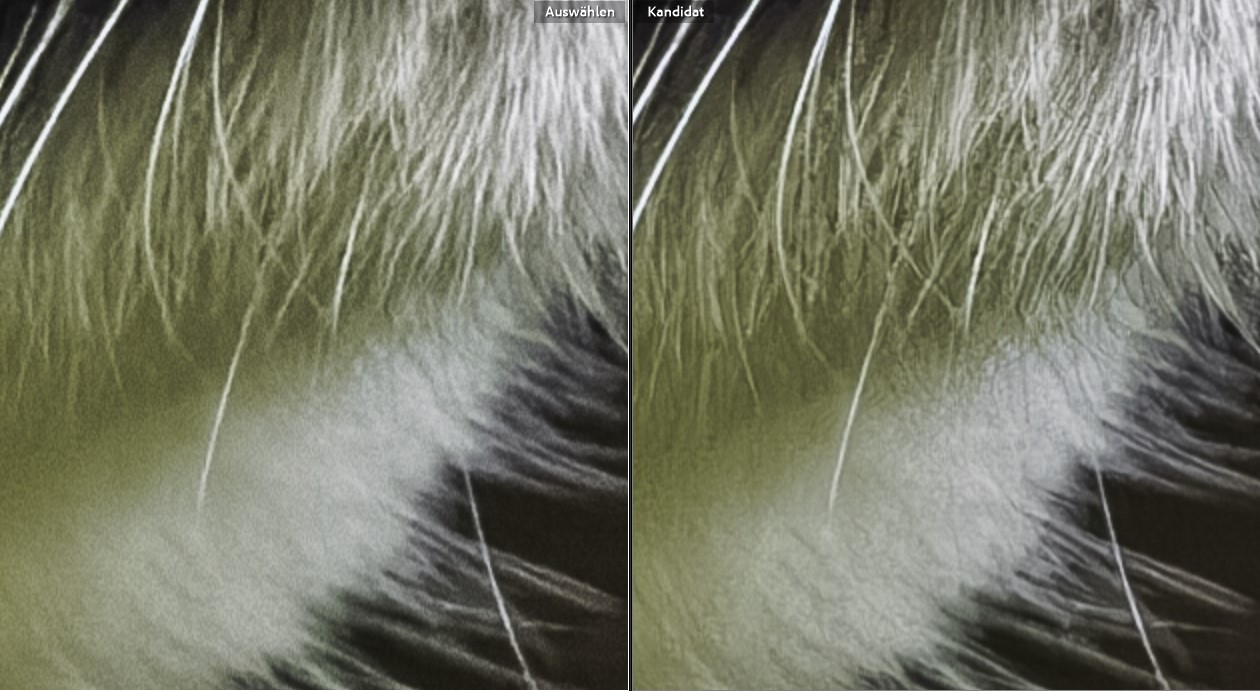
In the crops, you can now clearly see that the new algorithm actually reveals even more details. In the previously empty areas at the base of the neck, hair details are now visible again. In the eye, the pattern of the iris is clearly more detailed. The differences are certainly smaller than those between Lightroom and the older DeepPRIME process, but they are still visible and lead to a more natural-looking appearance of the image.
File size vs noise
The better noise reduction of DeepPRIME XP compared to the previous DeepPRIME version can also be estimated from another value, namely the file size.
Current cameras perform image compression even on RAW files. With my Canon cameras and also many others this is lossless, i.e. no information is lost. This is similar to .ZIP files.
Of course, the compression rate depends very much on the subject. Large uniform areas (e.g. the blue sky) can be compressed pretty well. On the other hand, a lot of details lead to lower compression rates. Noise, however, is particularly difficult to compress. The extreme case, the so-called “gray noise”, cannot be compressed at all.
The poor compressibility of the noise also means that RAW files from our cameras with high ISO values are larger than files with low ISO values. Thus, the file size also gives an indication of the degree of noise.
The rule is:
- low noise - small file
- strong noise - large file
So I took another look at the file sizes of the above example image of our tomcat in File Explorer where I found the following file sizes:
| Original CR3 file | 57.993 KB |
| DeepPRIME DNG file | 126.286 KB |
| DeepPRIME XD-DNG file | 111.653 KB |
Generally, the DNG files exported with PhotoLab are always significantly larger than the original RAW files. But the file created with the new DeepPRIME XD process is a good 12% smaller than the file created with the older DeepPRIME process. My other comparisons of the two processes show a similar ratio. In each case, the DeepPRIME XD file is 10-12% smaller than the DeepPRIME file generated from the same original, which actually gives another measurable indication of the improved noise reduction with the new process.
But now back to the topic and the practical results:
Example 2
Aber es geht noch extremer:
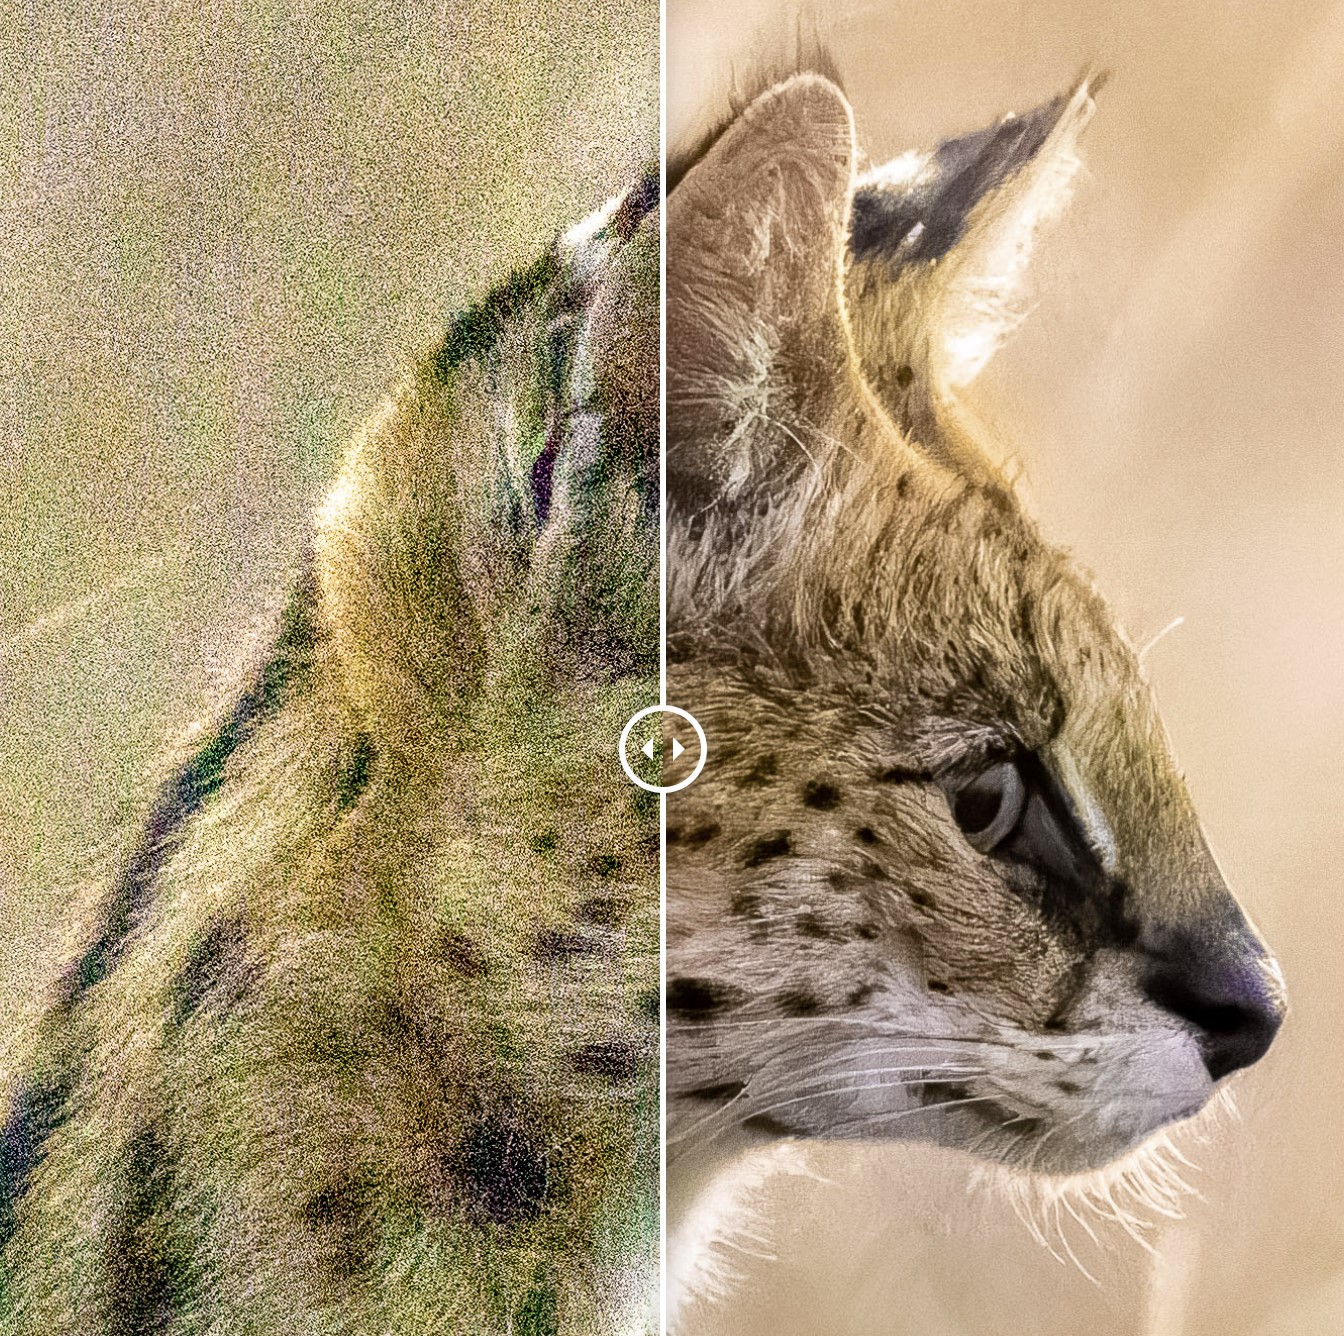
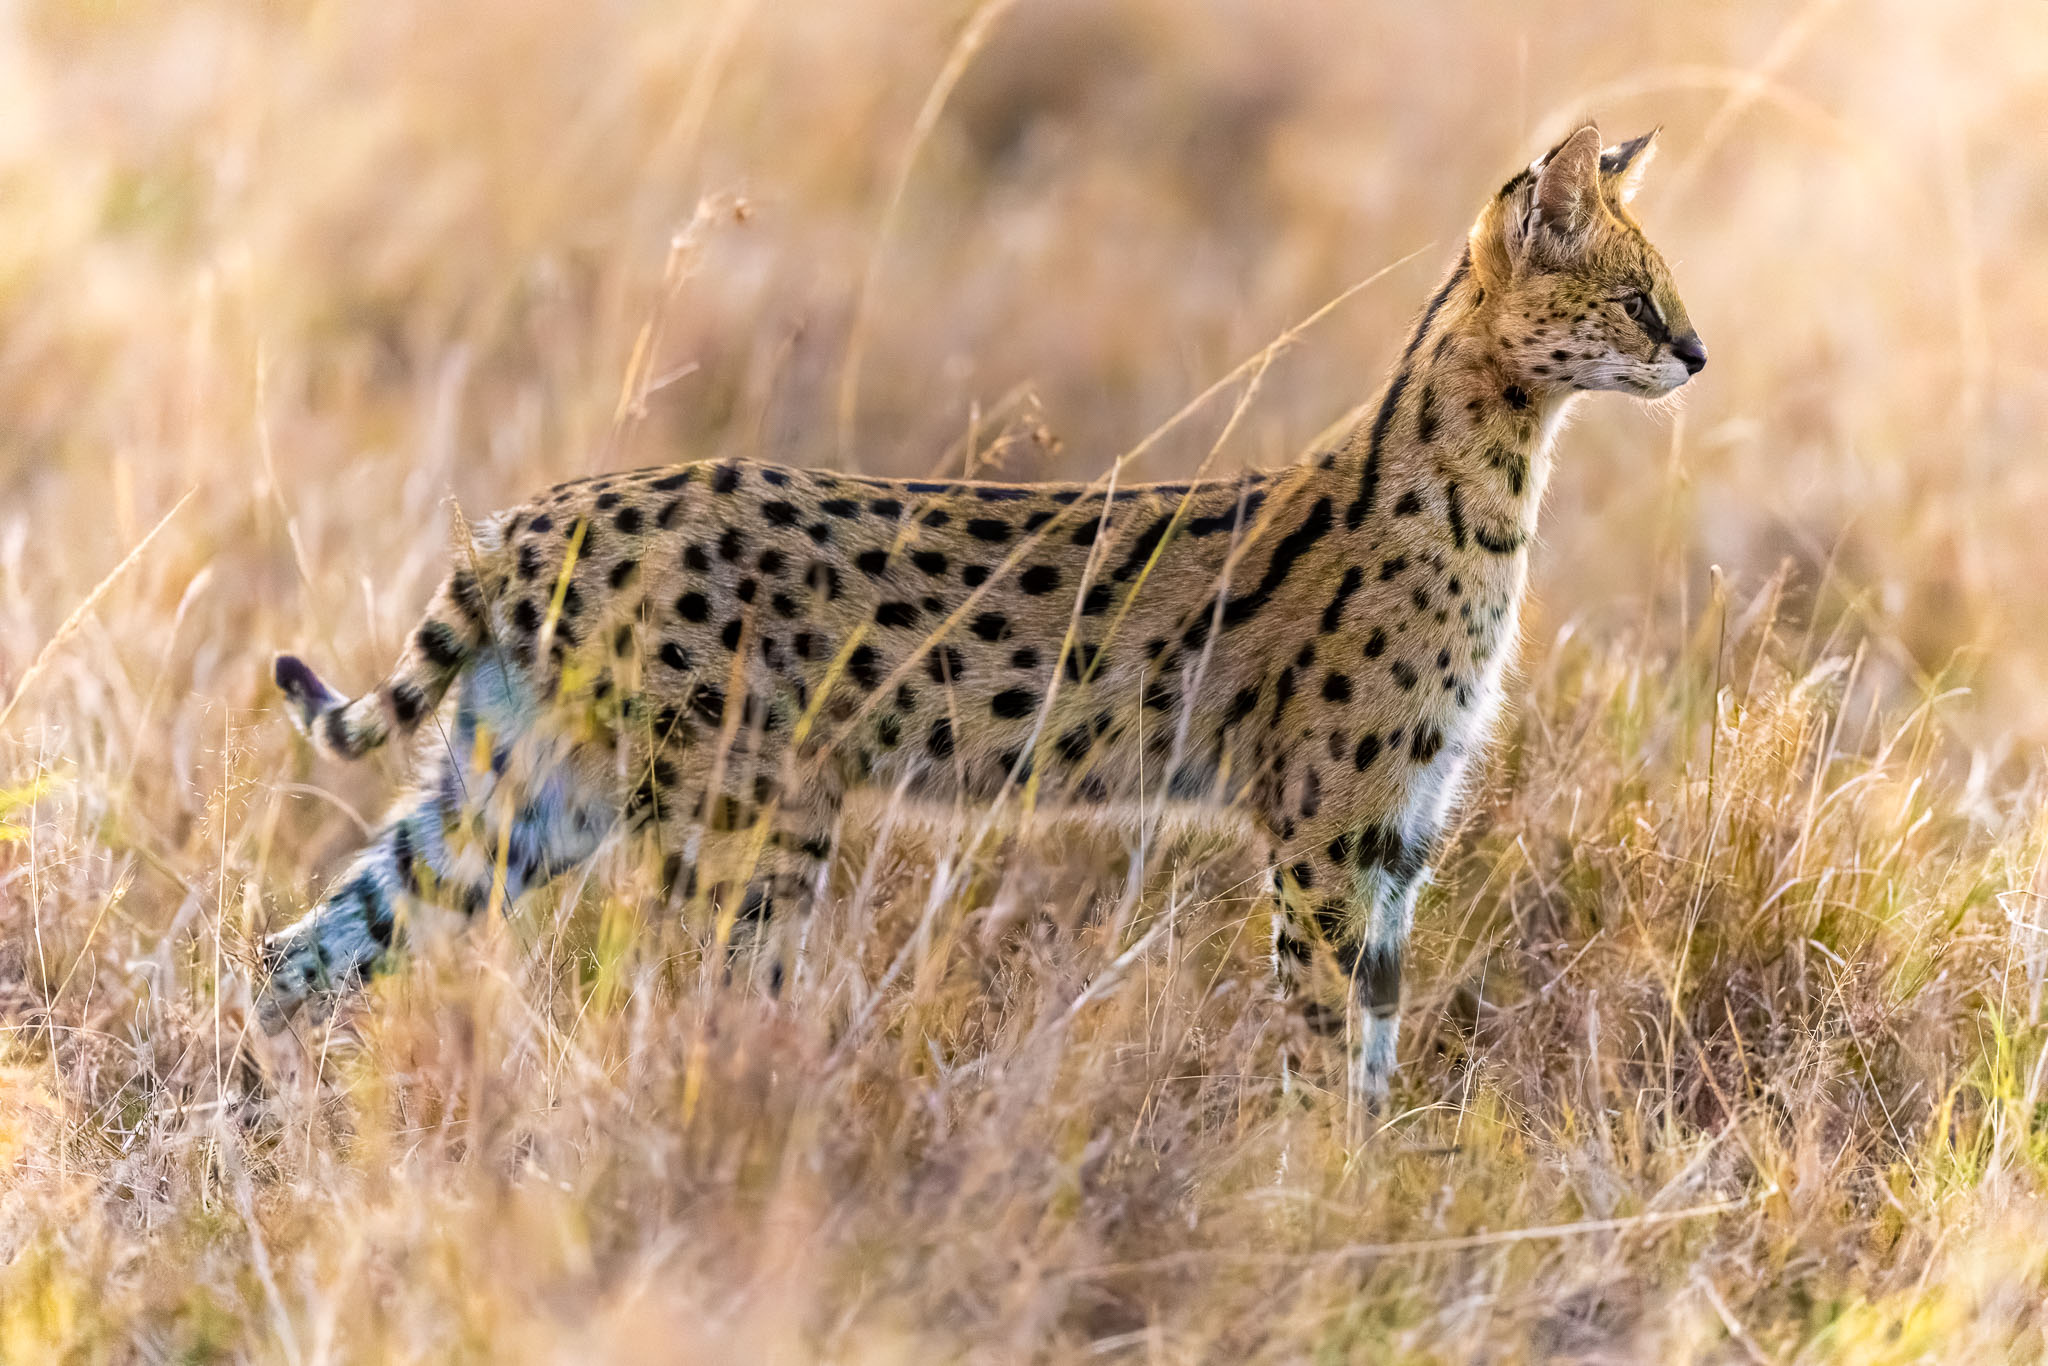
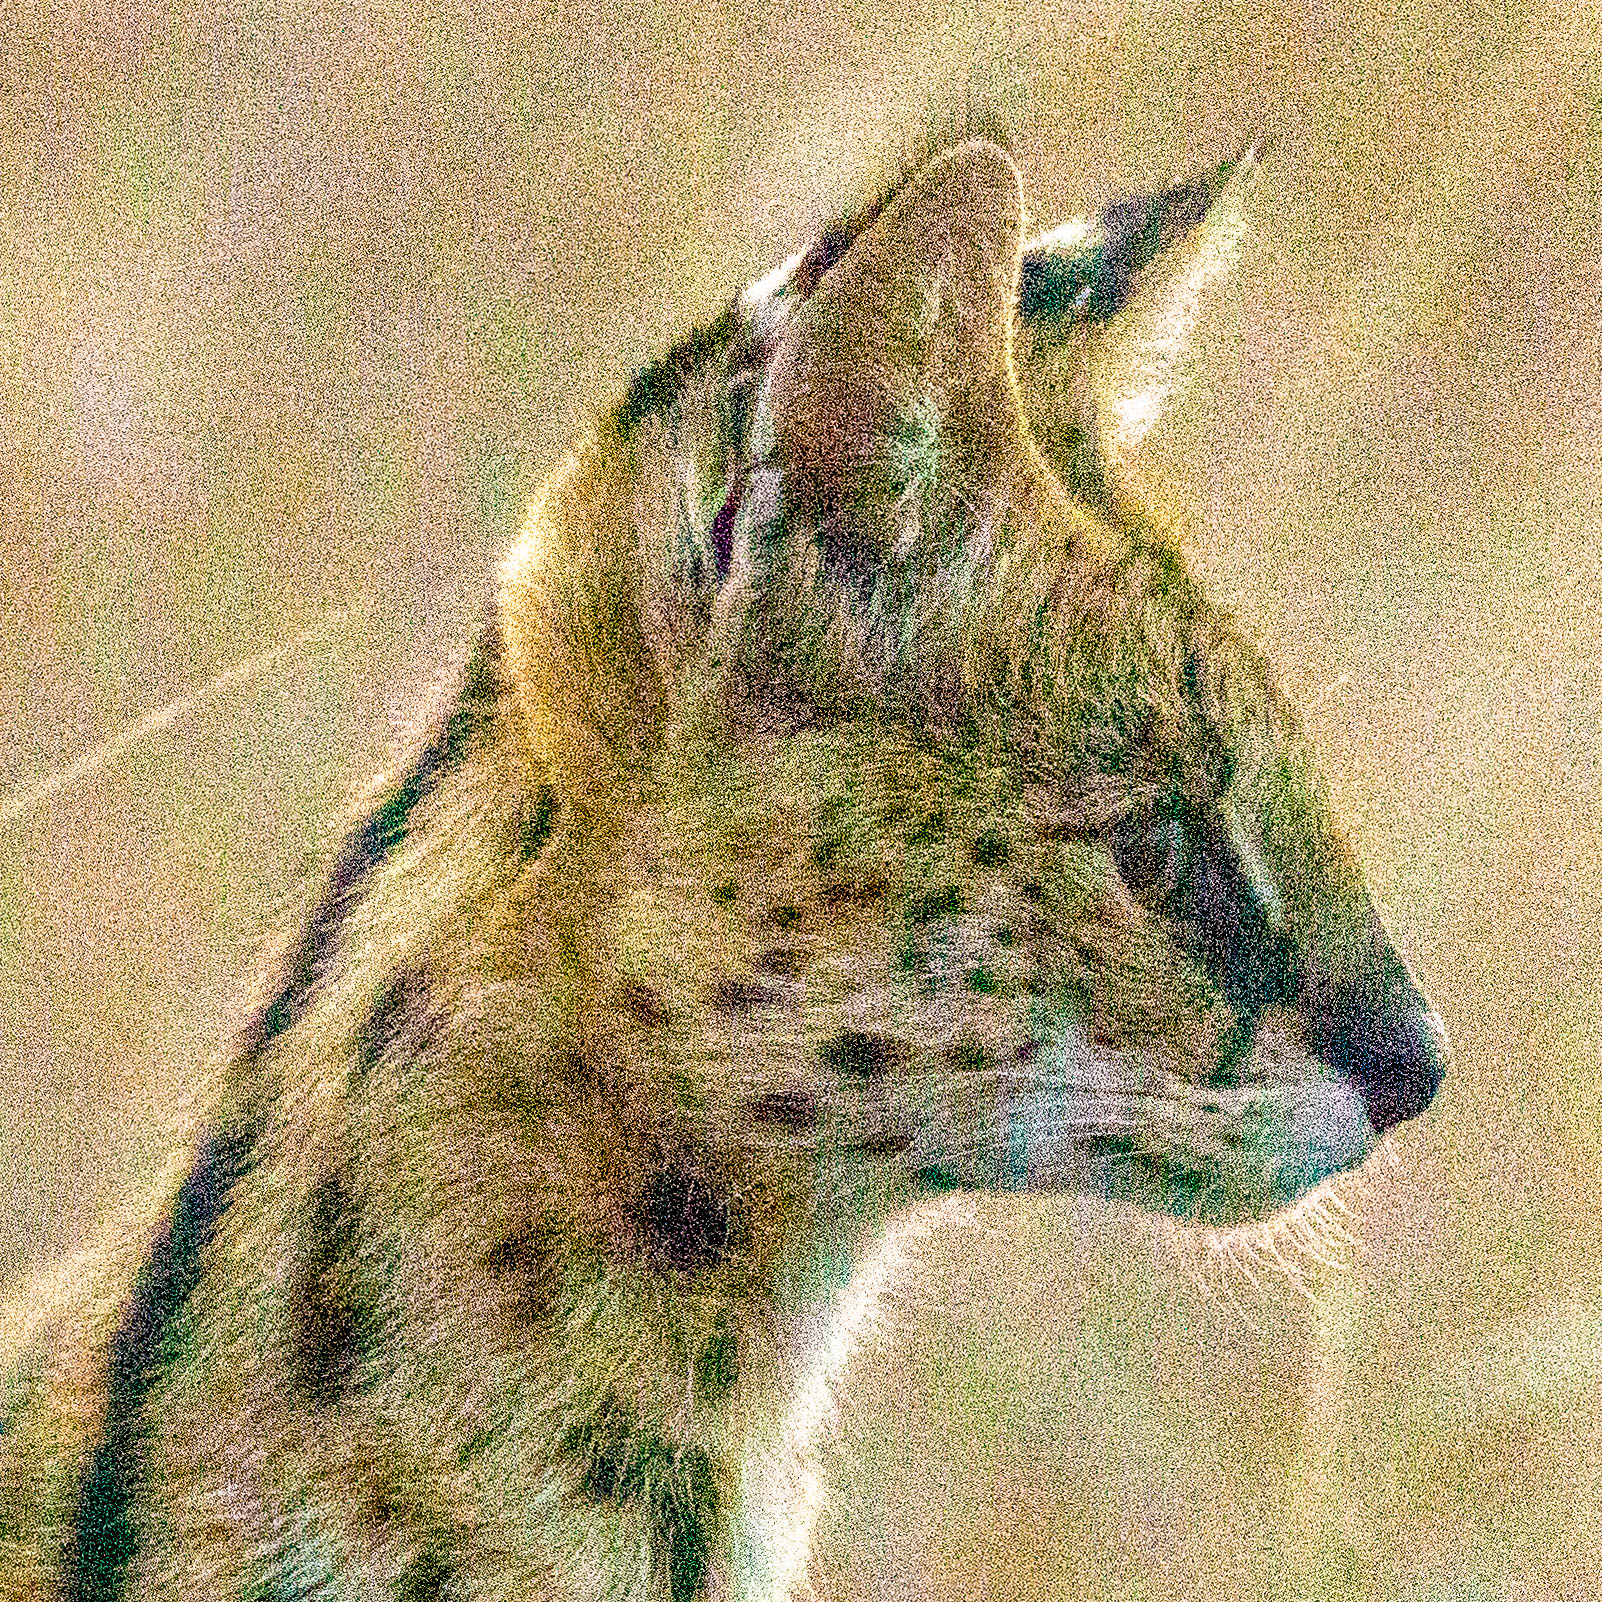
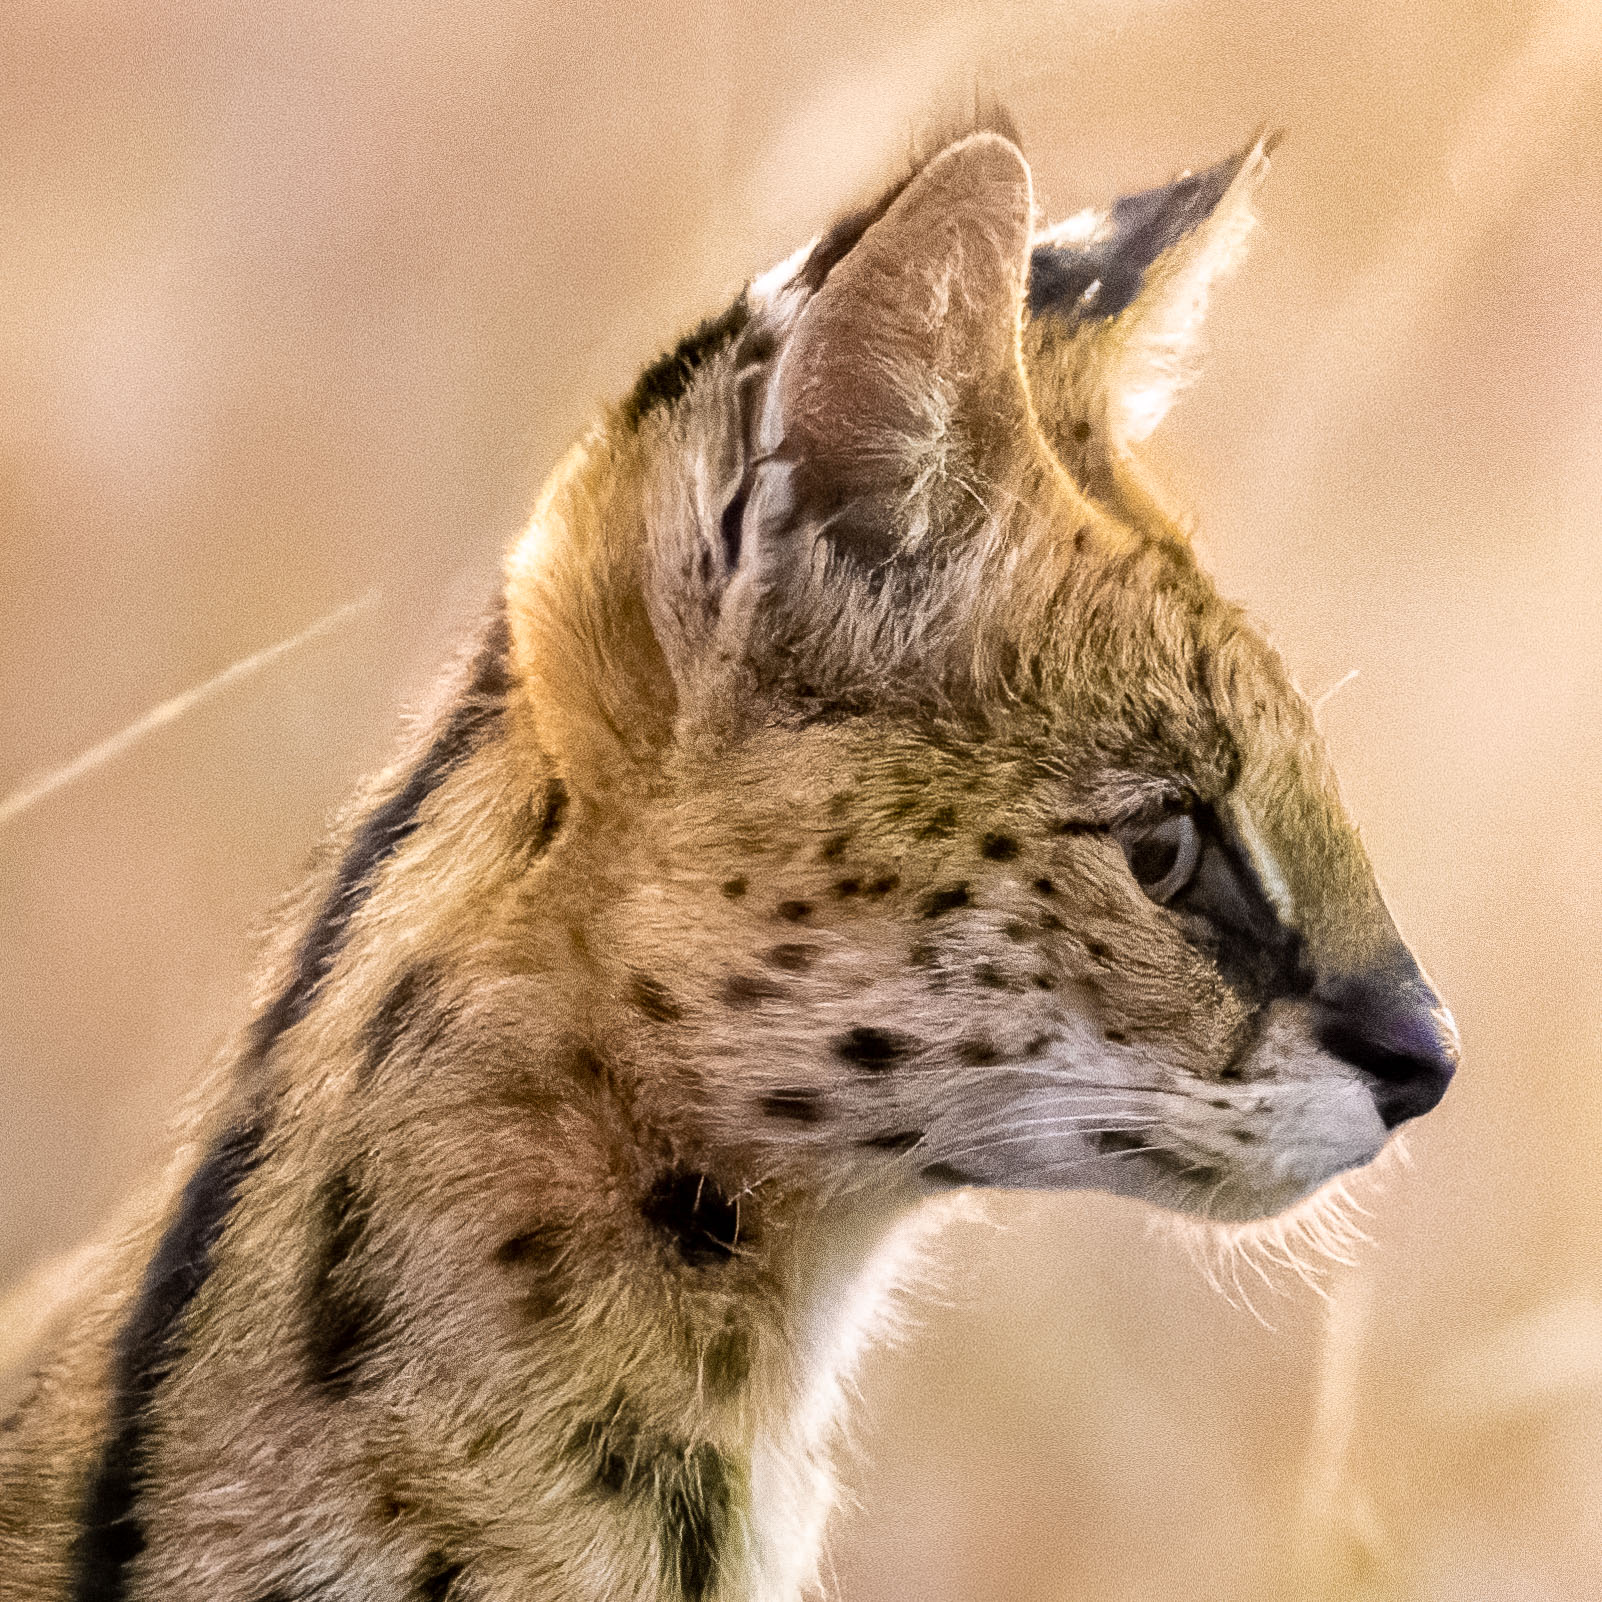
During our safari in Kenya in December 2021, we had noticed some movement in the grass in half darkness one evening on the way back to our camp in the Masai Mara and stopped. It turned out to be a serval walking around in the dimness. With the naked eye it could be seen only very schematically. Since I still had my equipment ready (according to the safari slogan “always be prepared”) I was able to take some shots of the cat with my 400mm f/2.8 on the R5.
It was already very dark, so the following shot was taken at 1/125s, f/2.8 and ISO 12,800. It was still underexposed by 2 f-stops. I have calculated it: this corresponds to an lighting intensity of 2-3 lux, i.e. the light of 2-3 candles at a distance of 1m!
First of all, here is the RAW file developed in Lightroom Classic WITHOUT any denoising:
This doesn’t look bad at all, does it?
In the downsized image this is indeed the case, but the 100% crop reveals the brutal truth. Below on the left is the image in Lightroom Classic without any denoising and on the right with massive noise reduction (luminance 70, color 60):
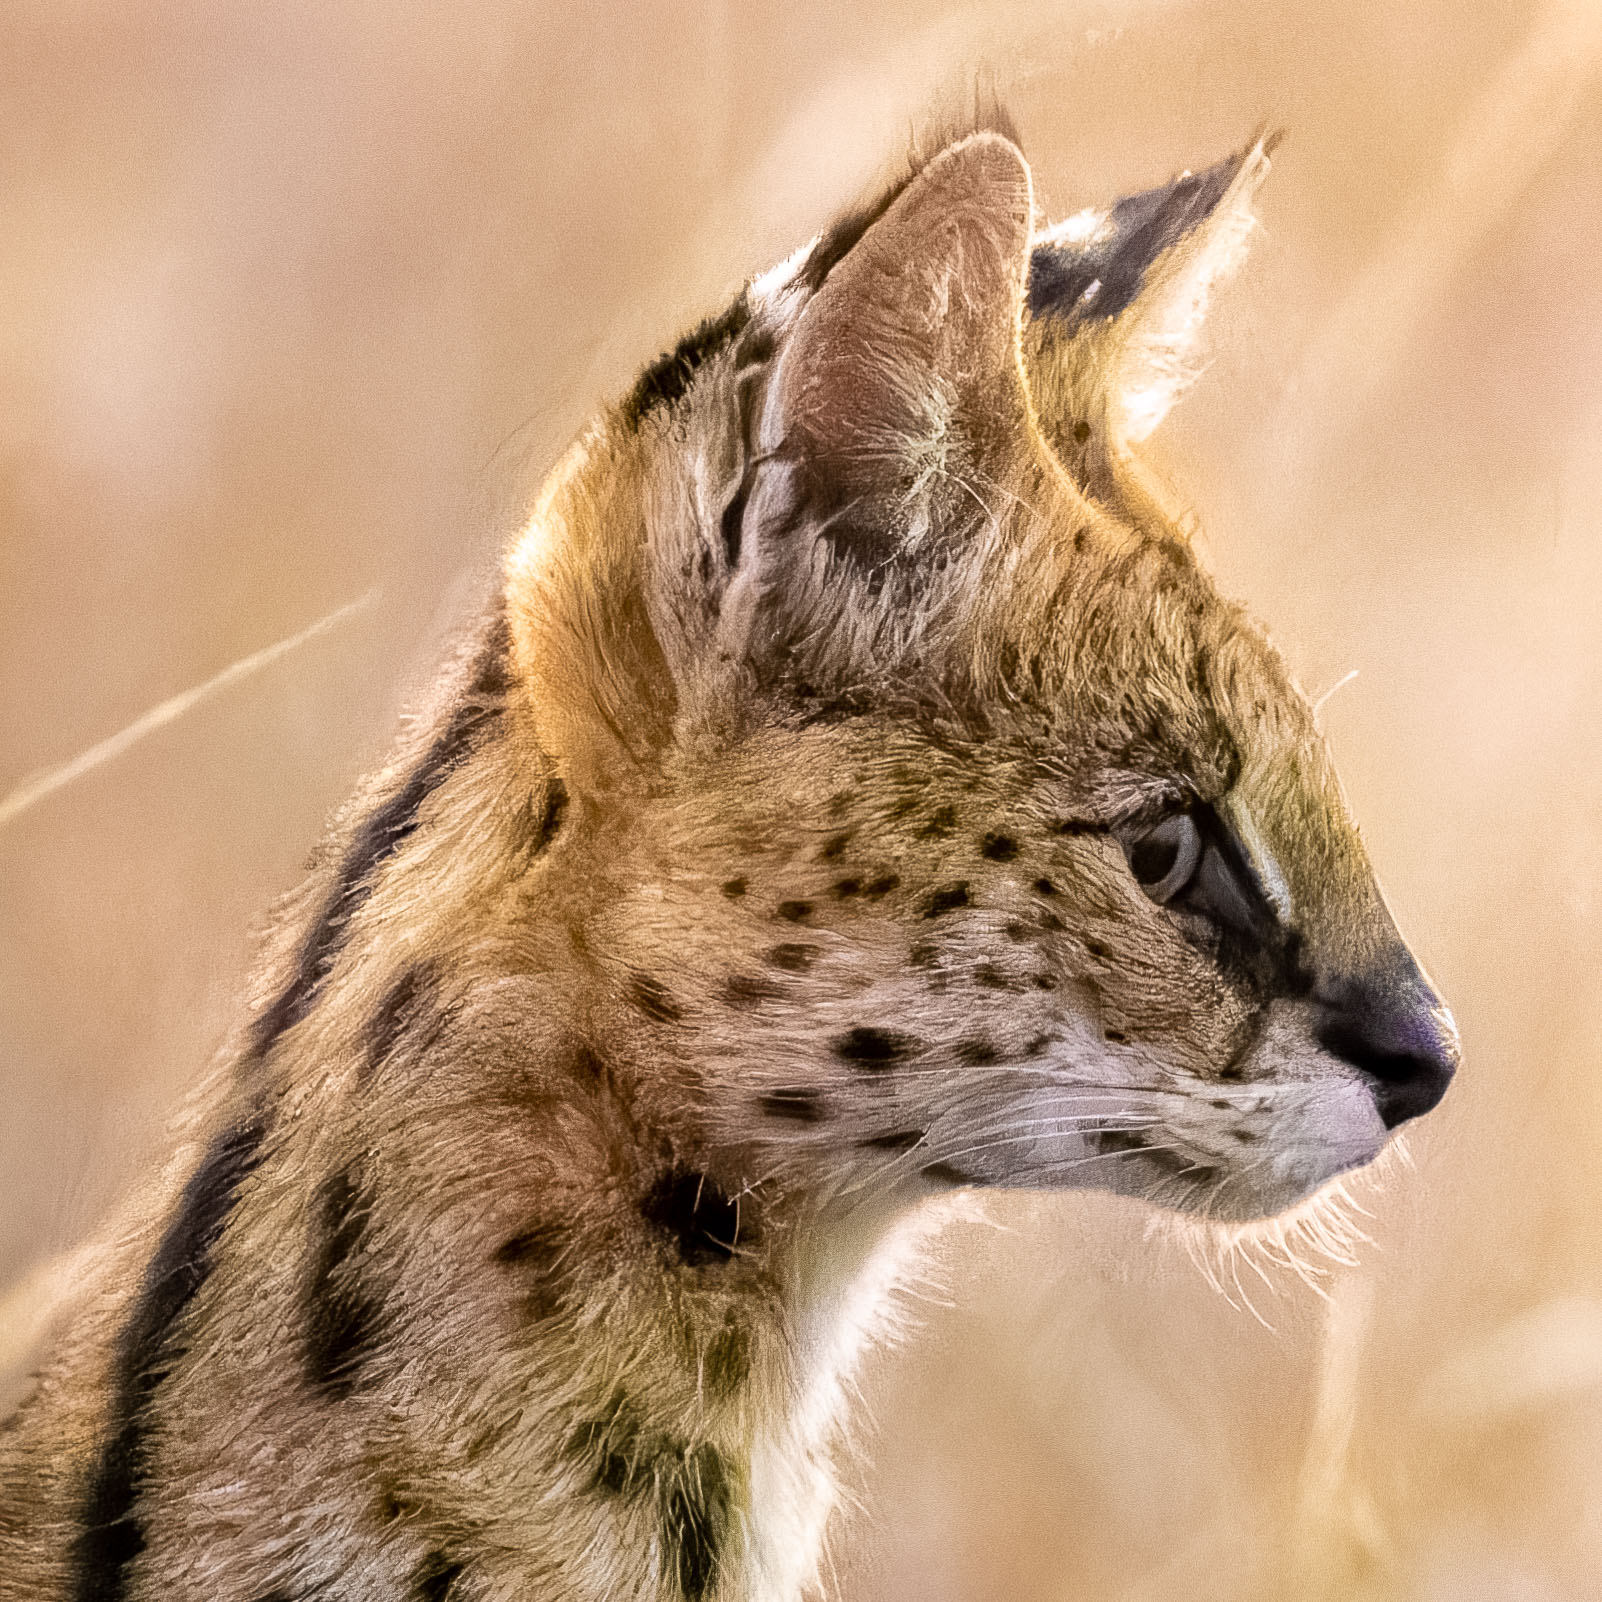
The noise reduction in Lightroom is quite effective at removing the grainy noise, but unfortunately it also removes the details. So the image as a whole is unusable for anything except greatly reduced presentation on the web. But you don’t really need it for that either, as the overview image above shows. But there’s still DxO DeepPRIME. Here’s a comparison of the image above, this time developed with DxO DeepPRIME (left) and DeepPRIME XD (right):
Yes, this is really the same shot! It’s amazing what DxO DeepPRIME can get out of that image. And the new DeepPRIME XD is actually even better!
Below is a more illustrative comparison of the unprocessed image with the image treated with DeepPRIME XD:
The following is a direct comparison between DeepPRIME and DeepPRIME XD:
Prices and availability
The ESSENTIAL and ELITE editions of DxO PhotoLab 6 (Windows and macOS) are now available for download* from the DxO website at the following prices:
- DxO PhotoLab 6 ESSENTIAL Edition: 139 €
- DxO PhotoLab 6 ELITE Edition: 219 €
The DeepPRIME XD algorithm tested here is unfortunately only available in the more expensive Elite version. However, owners of DxO PhotoLab 4 or 5 can take advantage of a special upgrade price:
- Upgrade price for DxO PhotoLab 6 ESSENTIAL Edition: €75
- Upgrade price for DxO PhotoLab 6 ELITE Edition: €99
If you would like to test PhotoLab 6 for yourself, you can download the trial version here* now and try out all the functions for 30 days without any restrictions.
Resumée
For me, the result of my tests caused me to buy the update immediately, despite the rather high price of €99. Still, DxO’s DeepPRIME algorithm is, in my opinion, exceptionally good. But good things can indeed get even better. Subjectively, I estimate the improvement of the new version at about another f-stop.
Admittedly, the examples shown here are absolute extremes. I have already photographed intensively in analog film days where all ISO values above 400 were largely unusable. The extreme was B/W films pushed to ISO 1600, where the coarse grain structure was presented as an aesthetic feature. Apart from the large film grains, details were hardly recognizable.
With the current digital cameras, on the other hand, ISO values up to 1,600 can now be used without any problems. Thanks to sophisticated software - and here I’m currently thinking of DxO in particular - the limits have now been pushed even further. Those who already use DeepPRIME in PhotoLab 4 /5 or PureRAW 1/2 will have to decide for themselves whether the improvements of DeepPRIME XD compared to the previous version are worth the rather high surcharge.
I have decided to do this…
If you don’t use DeepPRIME or DeepPRIME XD yet and you frequently use high ISO values, I strongly recommend you to try the trial version for yourself.
I look forward to comments and feedback from you.
*=affiliate link