Note:
In the meantime, DxO has released version 6 of its new RAW converter, DxO PhotoLab*. This article still refers to the previous version 4, in which artificial intelligence was introduced for the first time. What is presented here also applies to the current version; the results when denoising with DeepPRIME are practically identical in all versions, so everything presented here continues to apply. The few changes in version 5 can also be found in a follow-up article here. In version 6, DxO has improved denoising even further and introduced the new improved AI-based DeepPRIME XD algorithm. More details about that can be found in my updated review.
DxO has integrated a new denoising technology, called DeepPrime, in DxO PhotoLab 4 for the first time, which is supposed to be able to denoise images much more efficiently, based on Deep learning. The demosaicing of the Bayer matrix of the sensor has been fully integrated into the process.
I was now particularly interested to see what the highly acclaimed DxO noise reduction method “DeepPRIME” actually does in practice.
How has it been up to now?
Although my new Canon EOS R5 already has a very photosensitive sensor that produces relatively minimal noise, in higher ISO ranges you still have to denoise the images in post-processing regularly. For years, I have been using the RAW format for my cameras to have maximum freedom in editing my images.
Therefore I have to “develop” all my pictures before I can use them. I have been using Lightroom from Adobe, currently Lightroom Classic Version 10.0, for this purpose and for archiving and tagging my images for many years. Over the generations of Lightroom, Adobe has continuously improved its ability to reduce the noise of high-ISO images.
In my post-processing with Lightroom, I have made the experience with the EOS R5, that ISO values of up to about 5000 can be used without significant compromises. Even up to ISO 12,800, the images are still usable, albeit with compromises.
An example
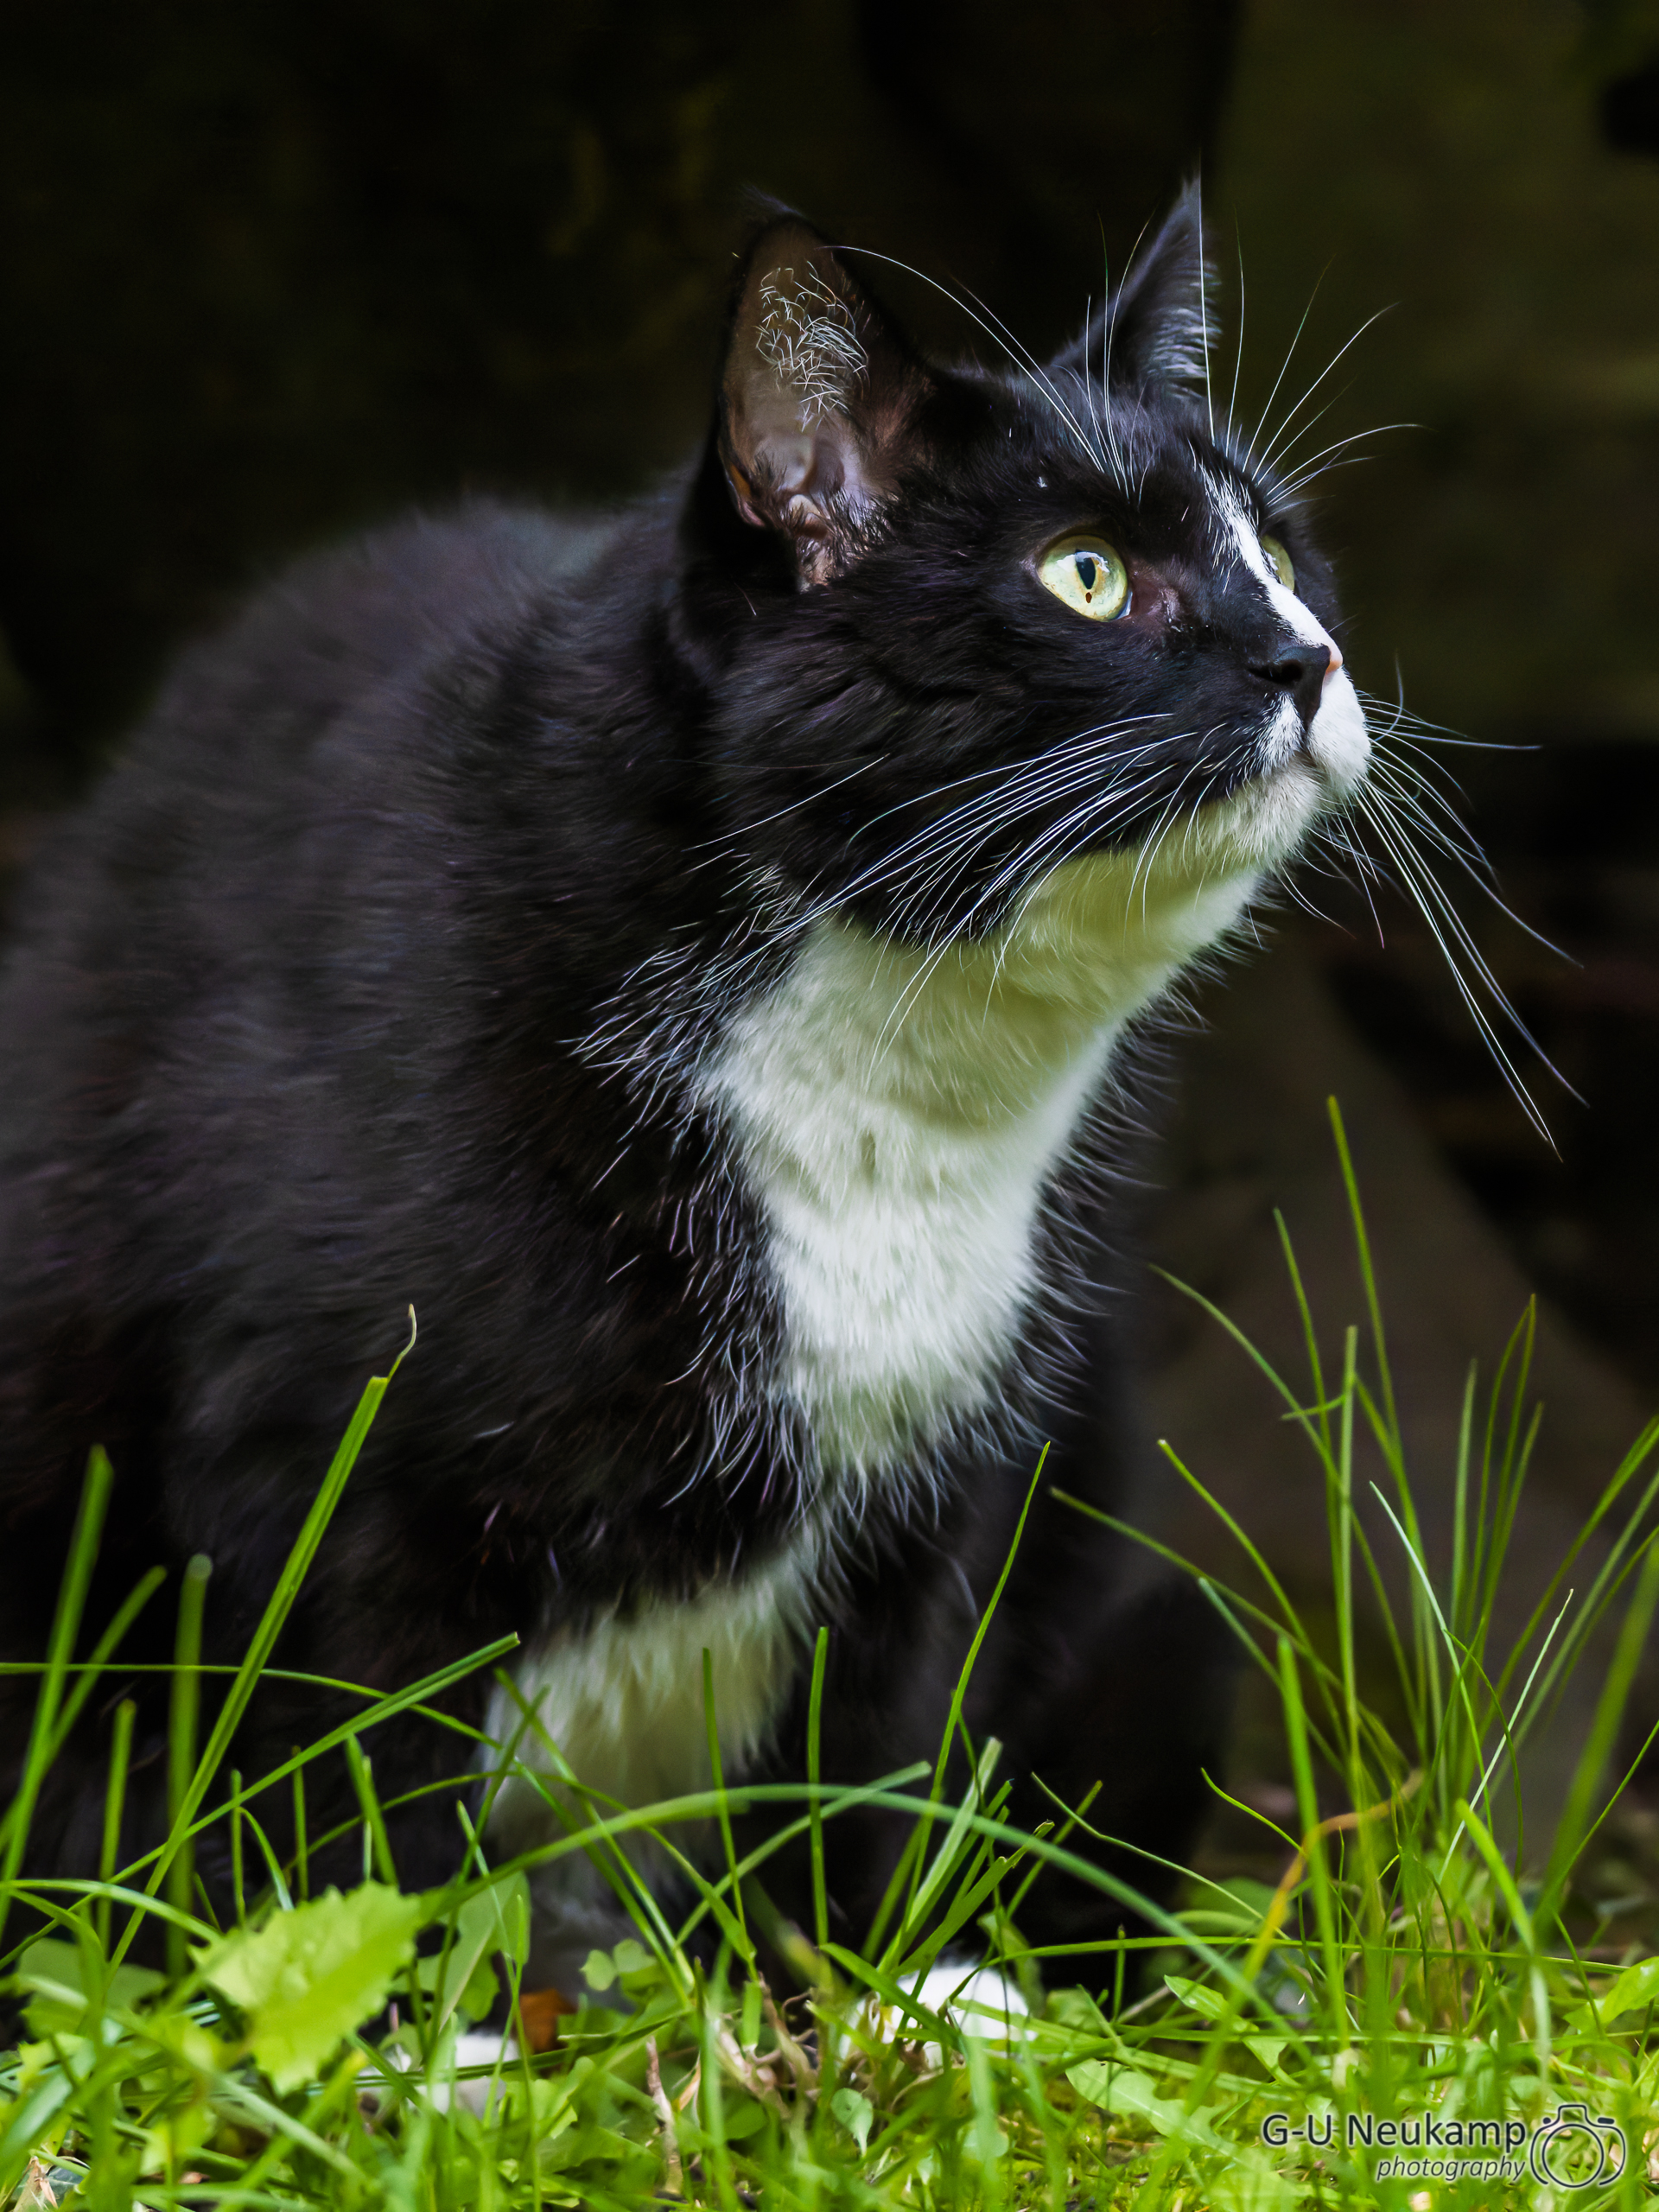
I spontaneously took the following picture of our cat Tom a few days ago with the Sigma 60-600 at the EOS R5 with ISO 12800, reworked it in LR and especially denoised it according to my personal taste. You always have to find an individual compromise between low noise and rich details. It’s a crop (portrait from landscape with 4098 x 5464 pixels) and looks quite passable at first glance:
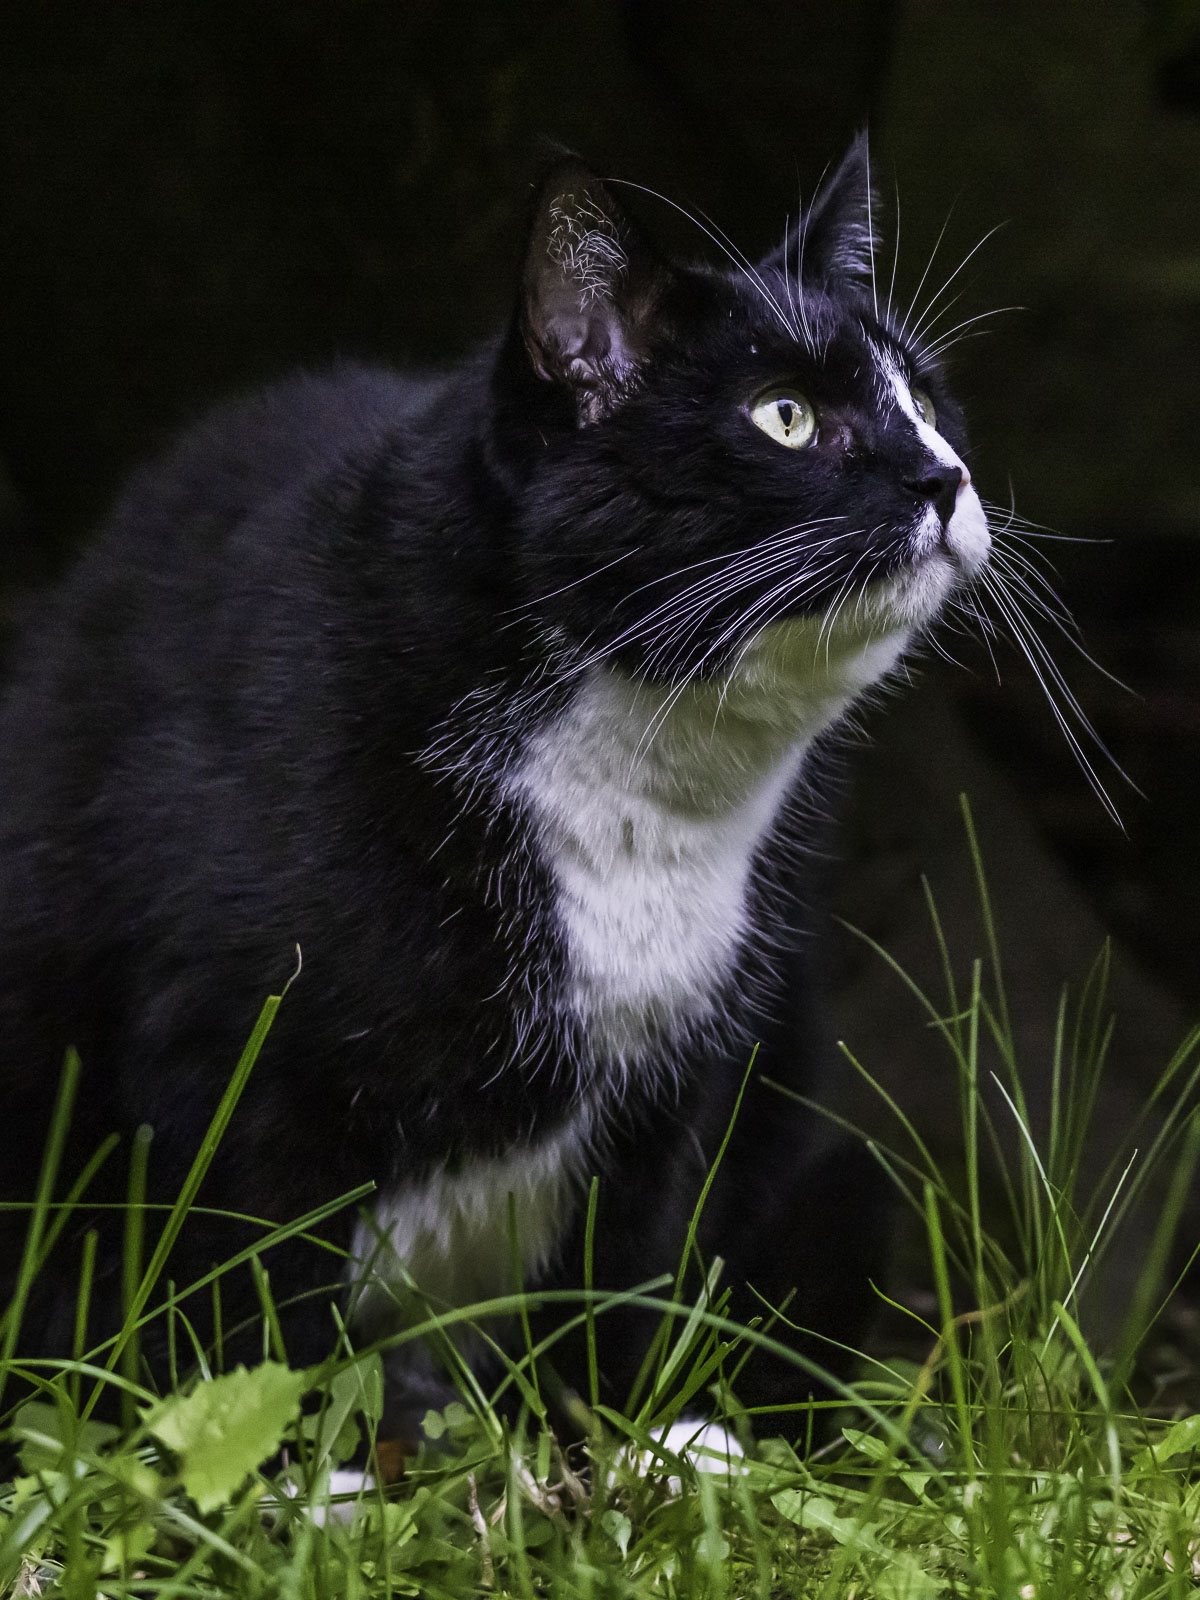
However, if you look at the image at pixel level in 100%, you can already see the noise very clearly regardless of the post-processing in Lightroom.
So I wanted to see, if DxO PhotoLab could do it even better with its new DeepPRIME AI denoising technology. I downloaded the trial version of DxO PhotoLab 4. It can be used for 30 days without restrictions. During installation, the program also automatically integrated itself into Lightroom and can be started from there via the
File| Plug-in Extras | Transfer to DxO PhotoLab 4
manu. I marked the raw image of our tomcat in LR and passed it to DxO Photolab 4. There, I simply selected the Detail tab in the right-hand control panel and chose the new DeepPRIME process in “DxO Denoising Technologies”.
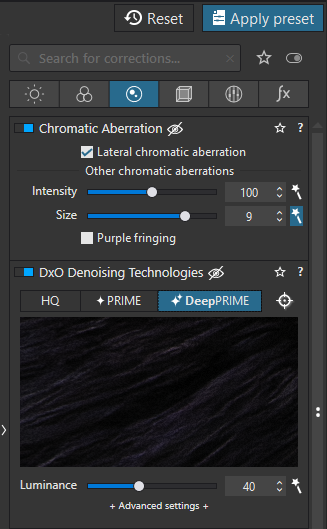
I completely omitted any further editing, as I want to continue editing in Lightroom. I then clicked the “Export to Lightroom” button at the bottom right and selected “Export as DNG (Denoise & Optical Corrections Only)” in the dialog box that appeared:
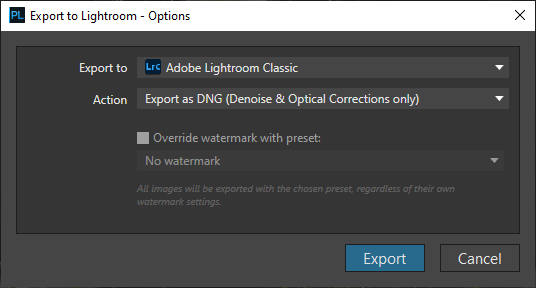
The denoising takes about 30 seconds on my computer (16 Core AMD Threadripper 2950x, 32GB RAM and Geforce RTX 2080TI), then the image appears in Lightroom as a dng-file and can be processed there. Is the result really better than using Lightroom alone?
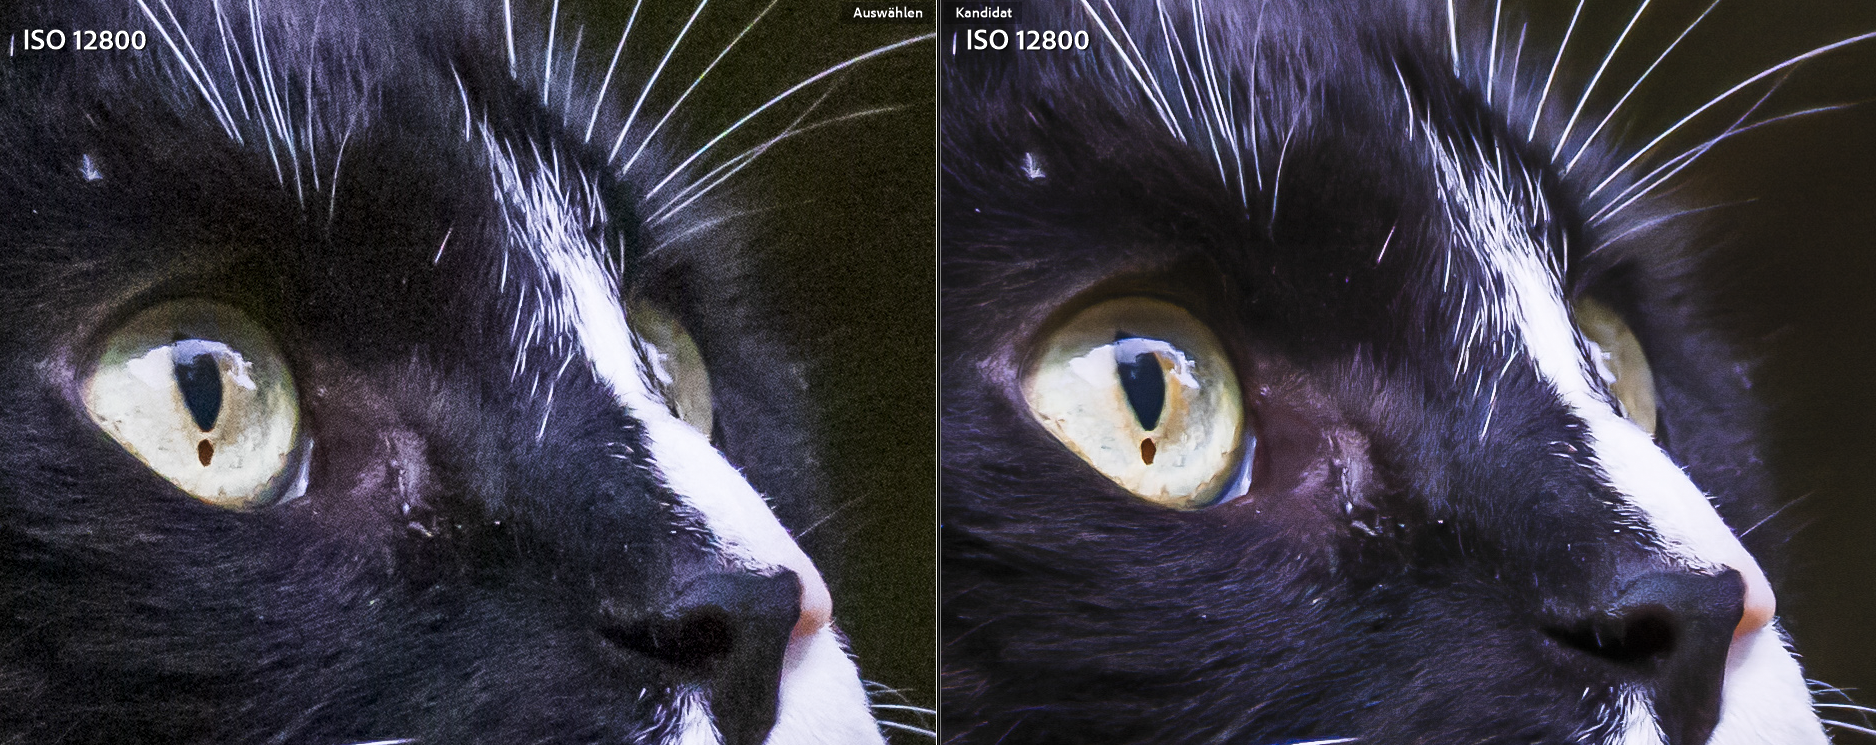
And, yes, indeed, DxO’s DeepPRIME actually denoises much better than I can manage for myself inside Lightroom. In the Lightroom Classic screenshot above (100% zoom level), you can see the Lightroom section on the left (Noise Reduction setting: Luminance 60, Details 50, Contrast 0) and the DxO PhotoLab 4 section on the right. The difference is really impressive. The noise in the background is almost completely eliminated and the image shows even more details than the Lightroom version. Here you can see the whole image finally in the DxO version:
One more example
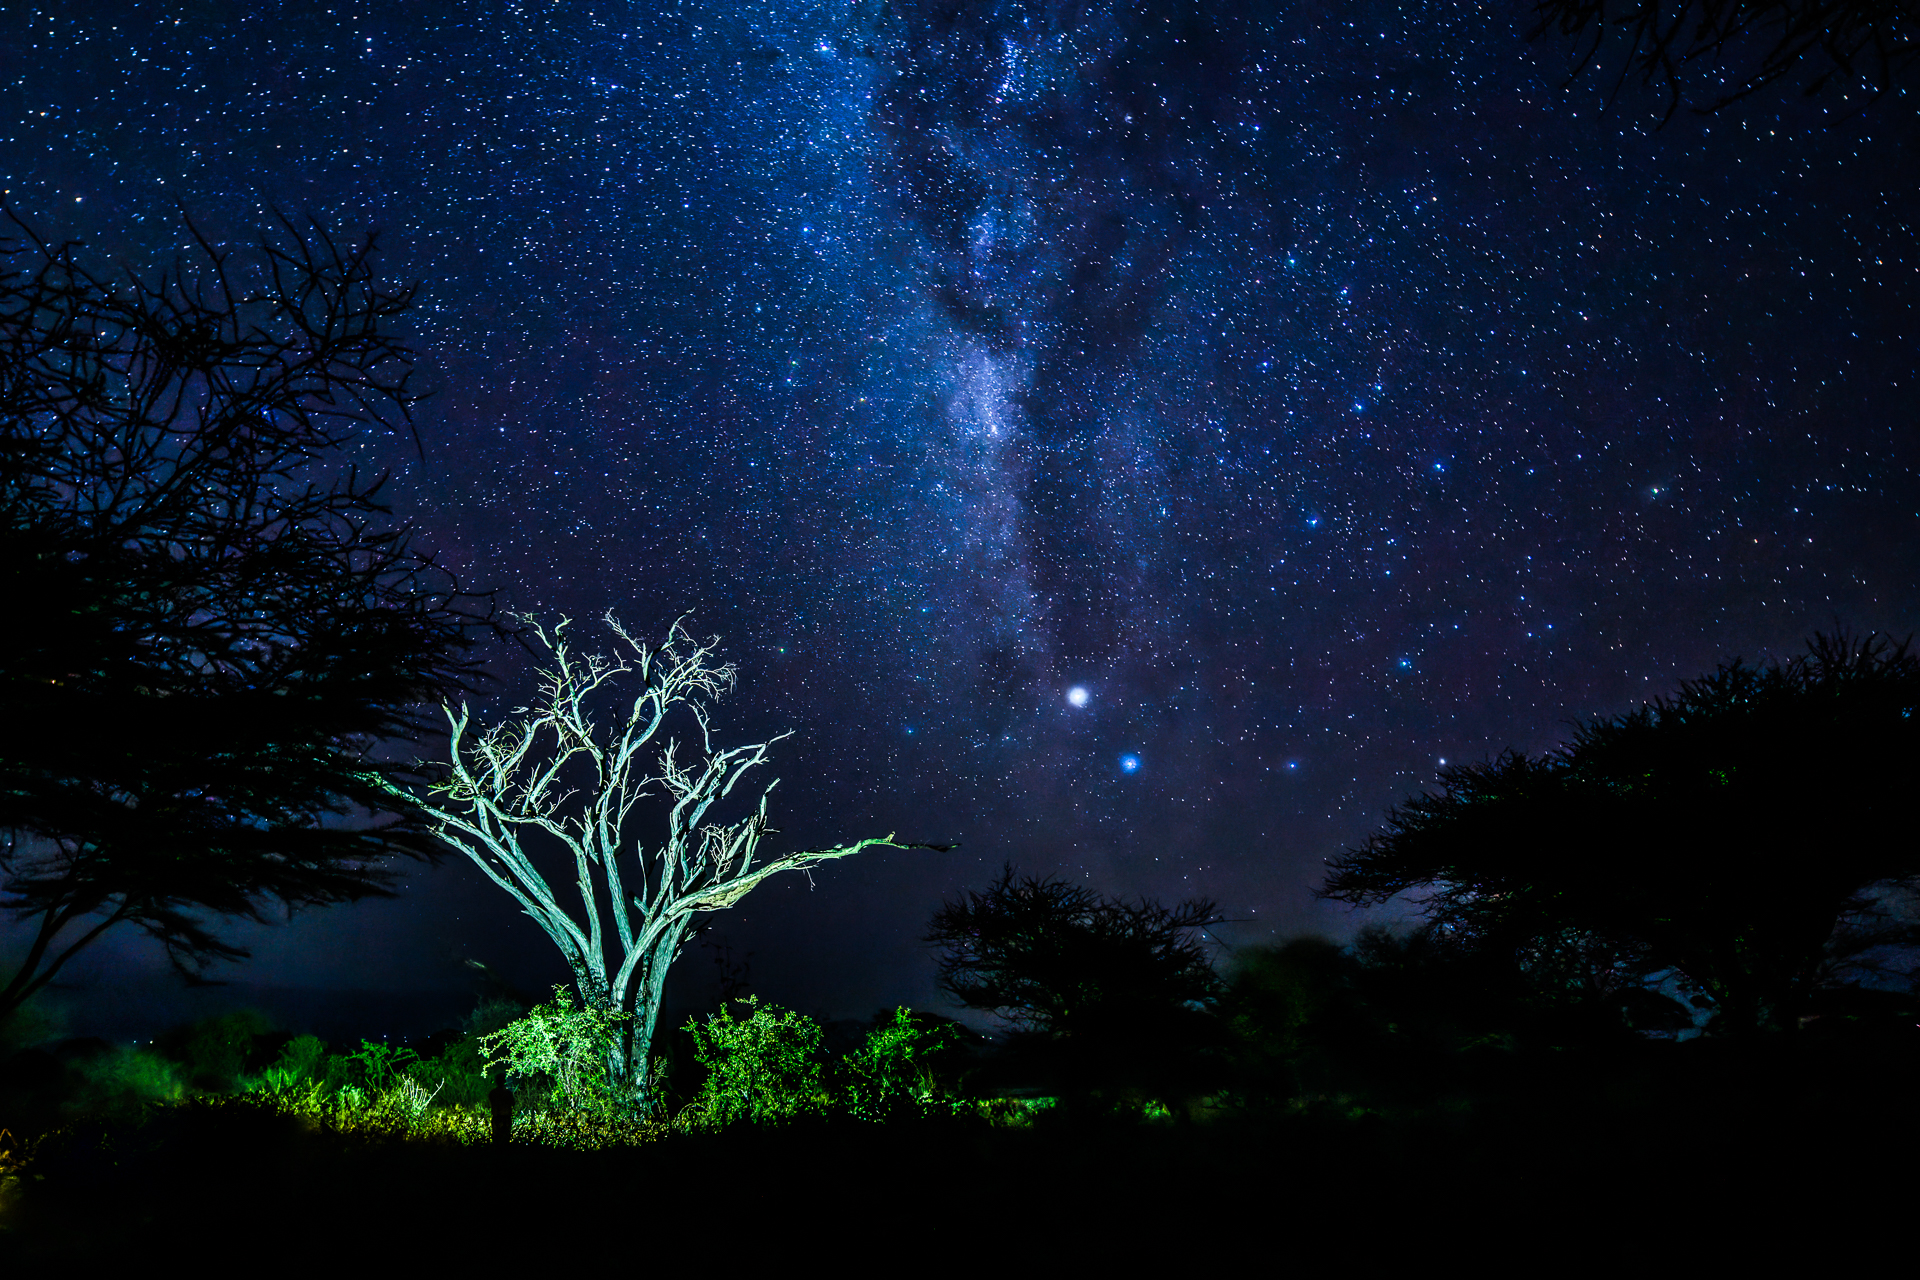
So I browsed through my archive and picked out an older image that showed massive problems with noise at that time: a picture of the Milky Way in Kenya taken in 2015. At that time I took the picture with the Canon TS-E 17mm f/4L on the Sony a7R at ISO 640 and had to brighten it by about 4 f-stops in post-processing and correct highlights and depths massively. DxO PhotoLab 4 can now handle this much better than before:
Here is a direct comparison with the noise reduction in Lightroom. On the left, noise reduction in Lightroom Classic (luminance 29) and on the right in DxO Photolab 4 with the default settings:
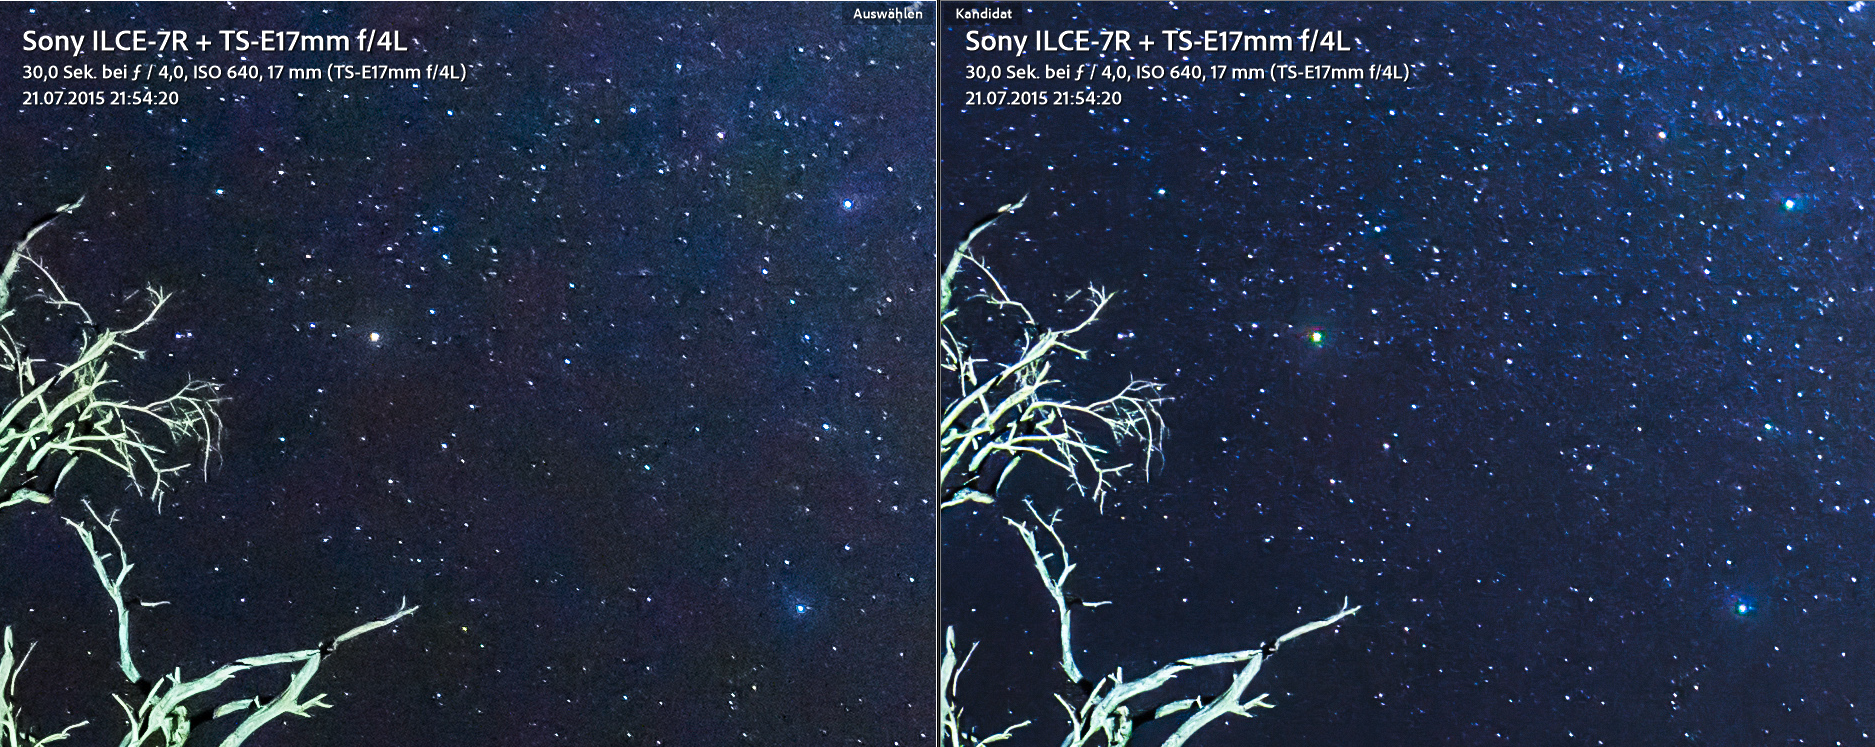
Overall, the move to DxO PhotoLab 4 shows a significant improvement in noise reduction. So far, I would estimate the improvement at about 2 f-stops: An image processed in DxO PhotoLab 4 at ISO 6400 would have a similar noise behavior to an image processed in Lightroom Classic at ISO 1600. But I wanted to investigate this more systematically.
A third example
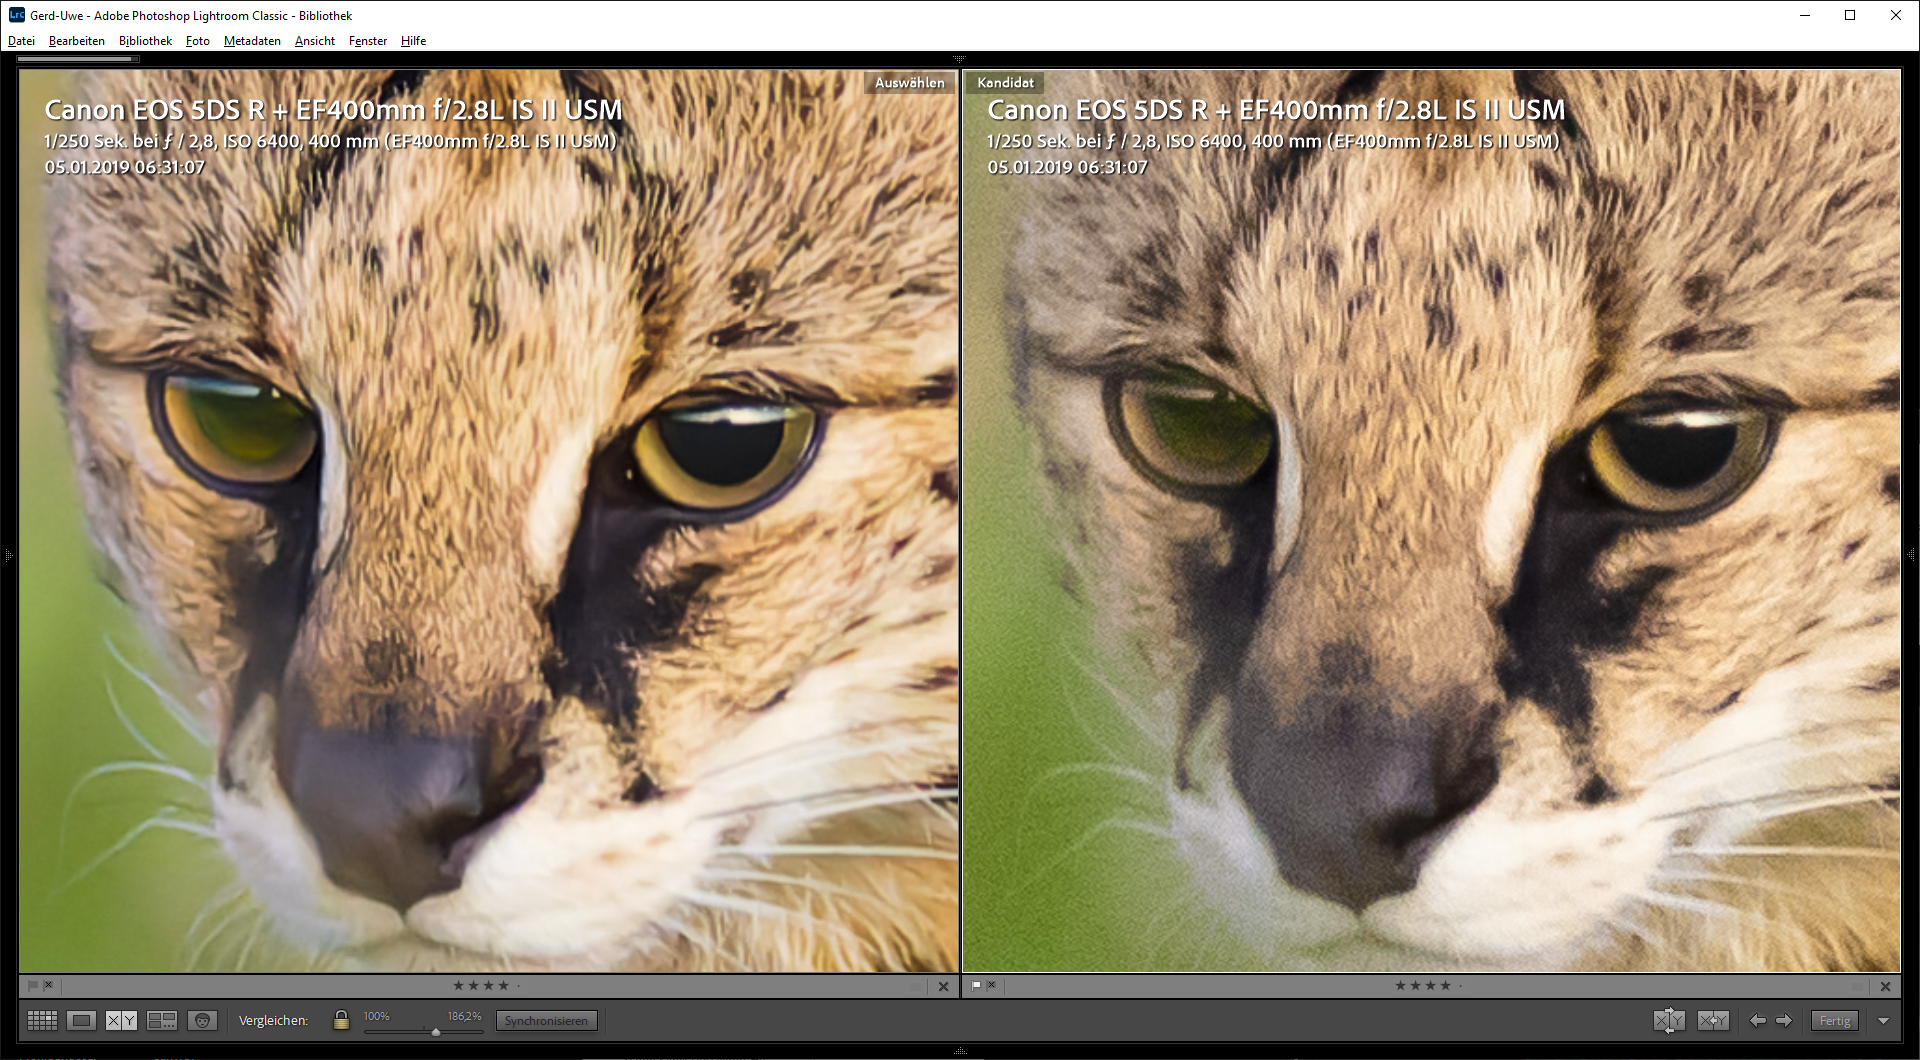
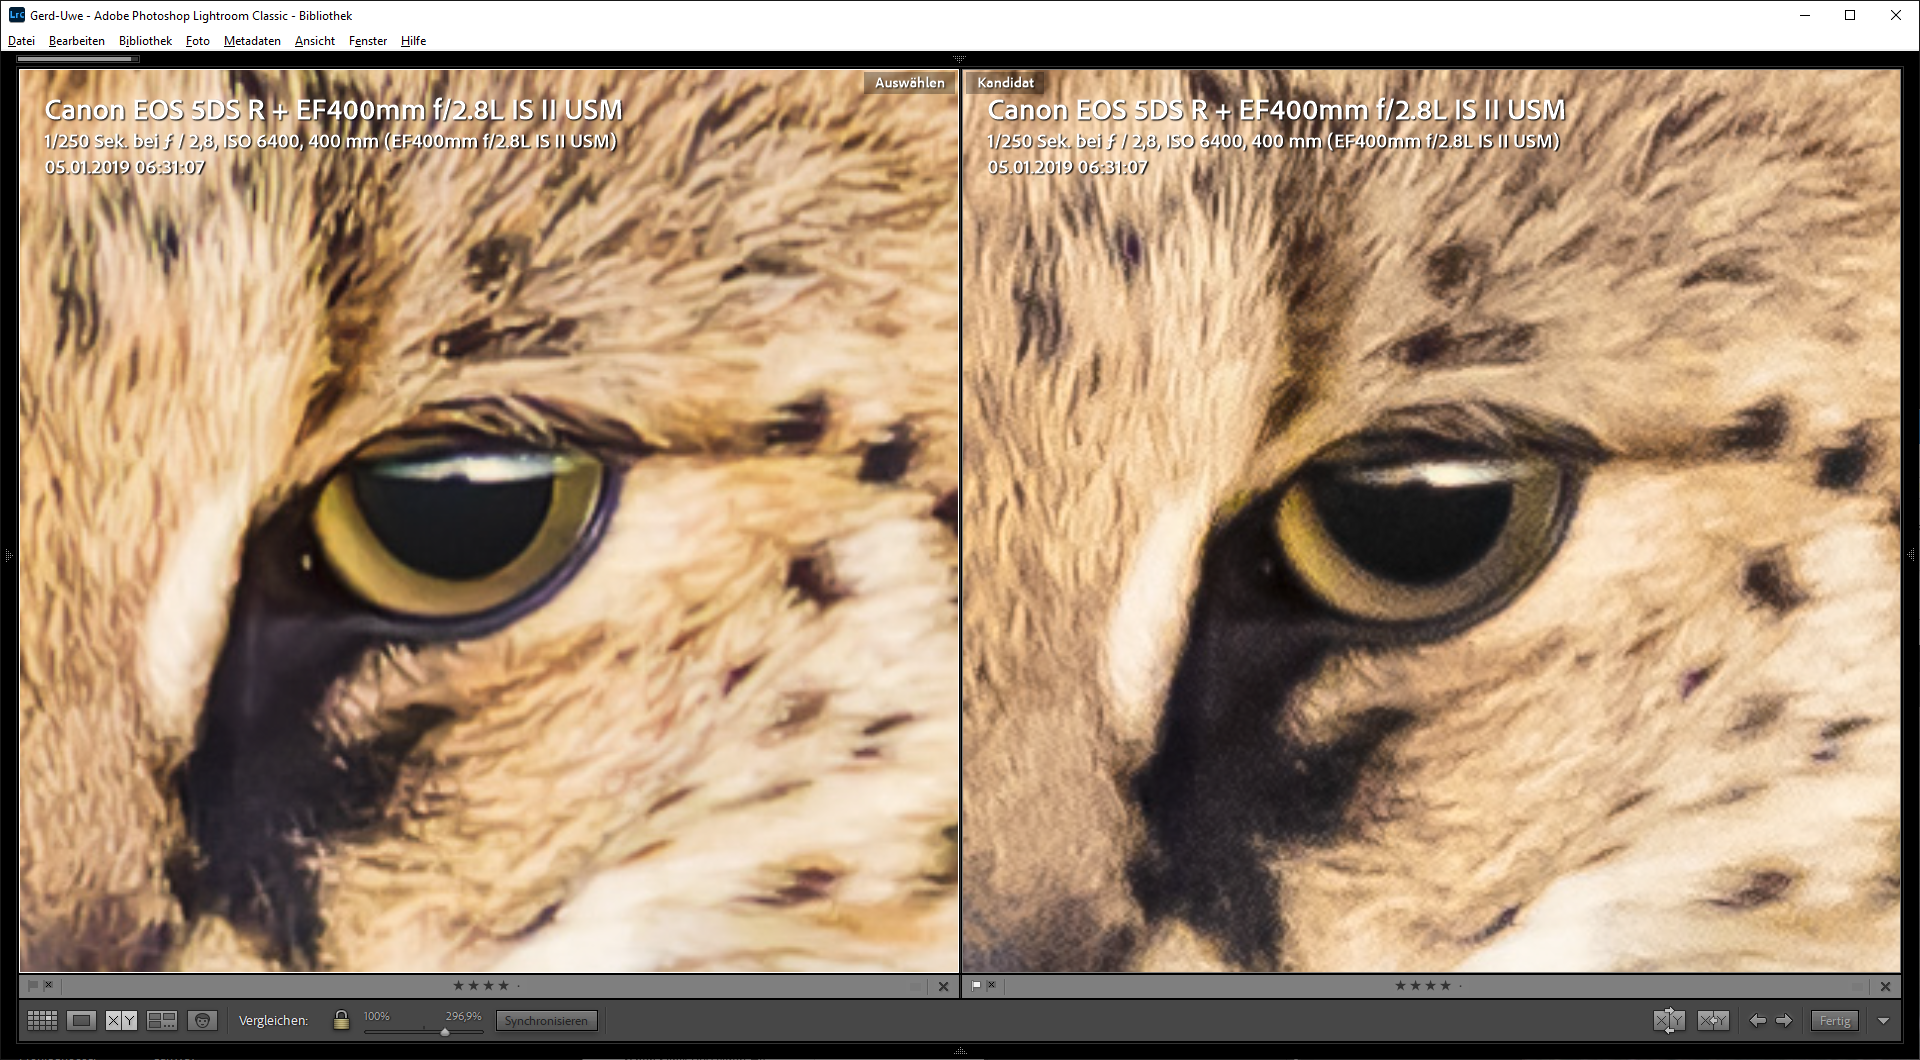
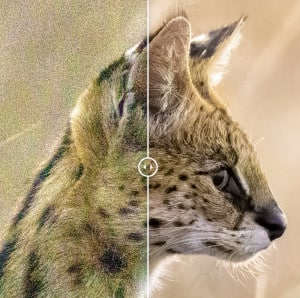
On our safari in Kenya at the turn of the year 2018 to 2019, we discovered a Serval cat running through the steppe on our last morning gamedrive - just before the sunrise. More information and pictures of the beautiful cat can be found in my travel report.
However, in the dark it was a real challenge. With the 400mm f/2.8 at wide-open aperture and a critical slow shutter speed of 1/250s on my 5DS R, I still had to raise the ISO value to 6,400. Up to now, I was very satisfied with the results after editing in Lightroom, but PhotoLab 4 really gets a lot more out of it, as the following two side-by-side images show:
A systematic investigation
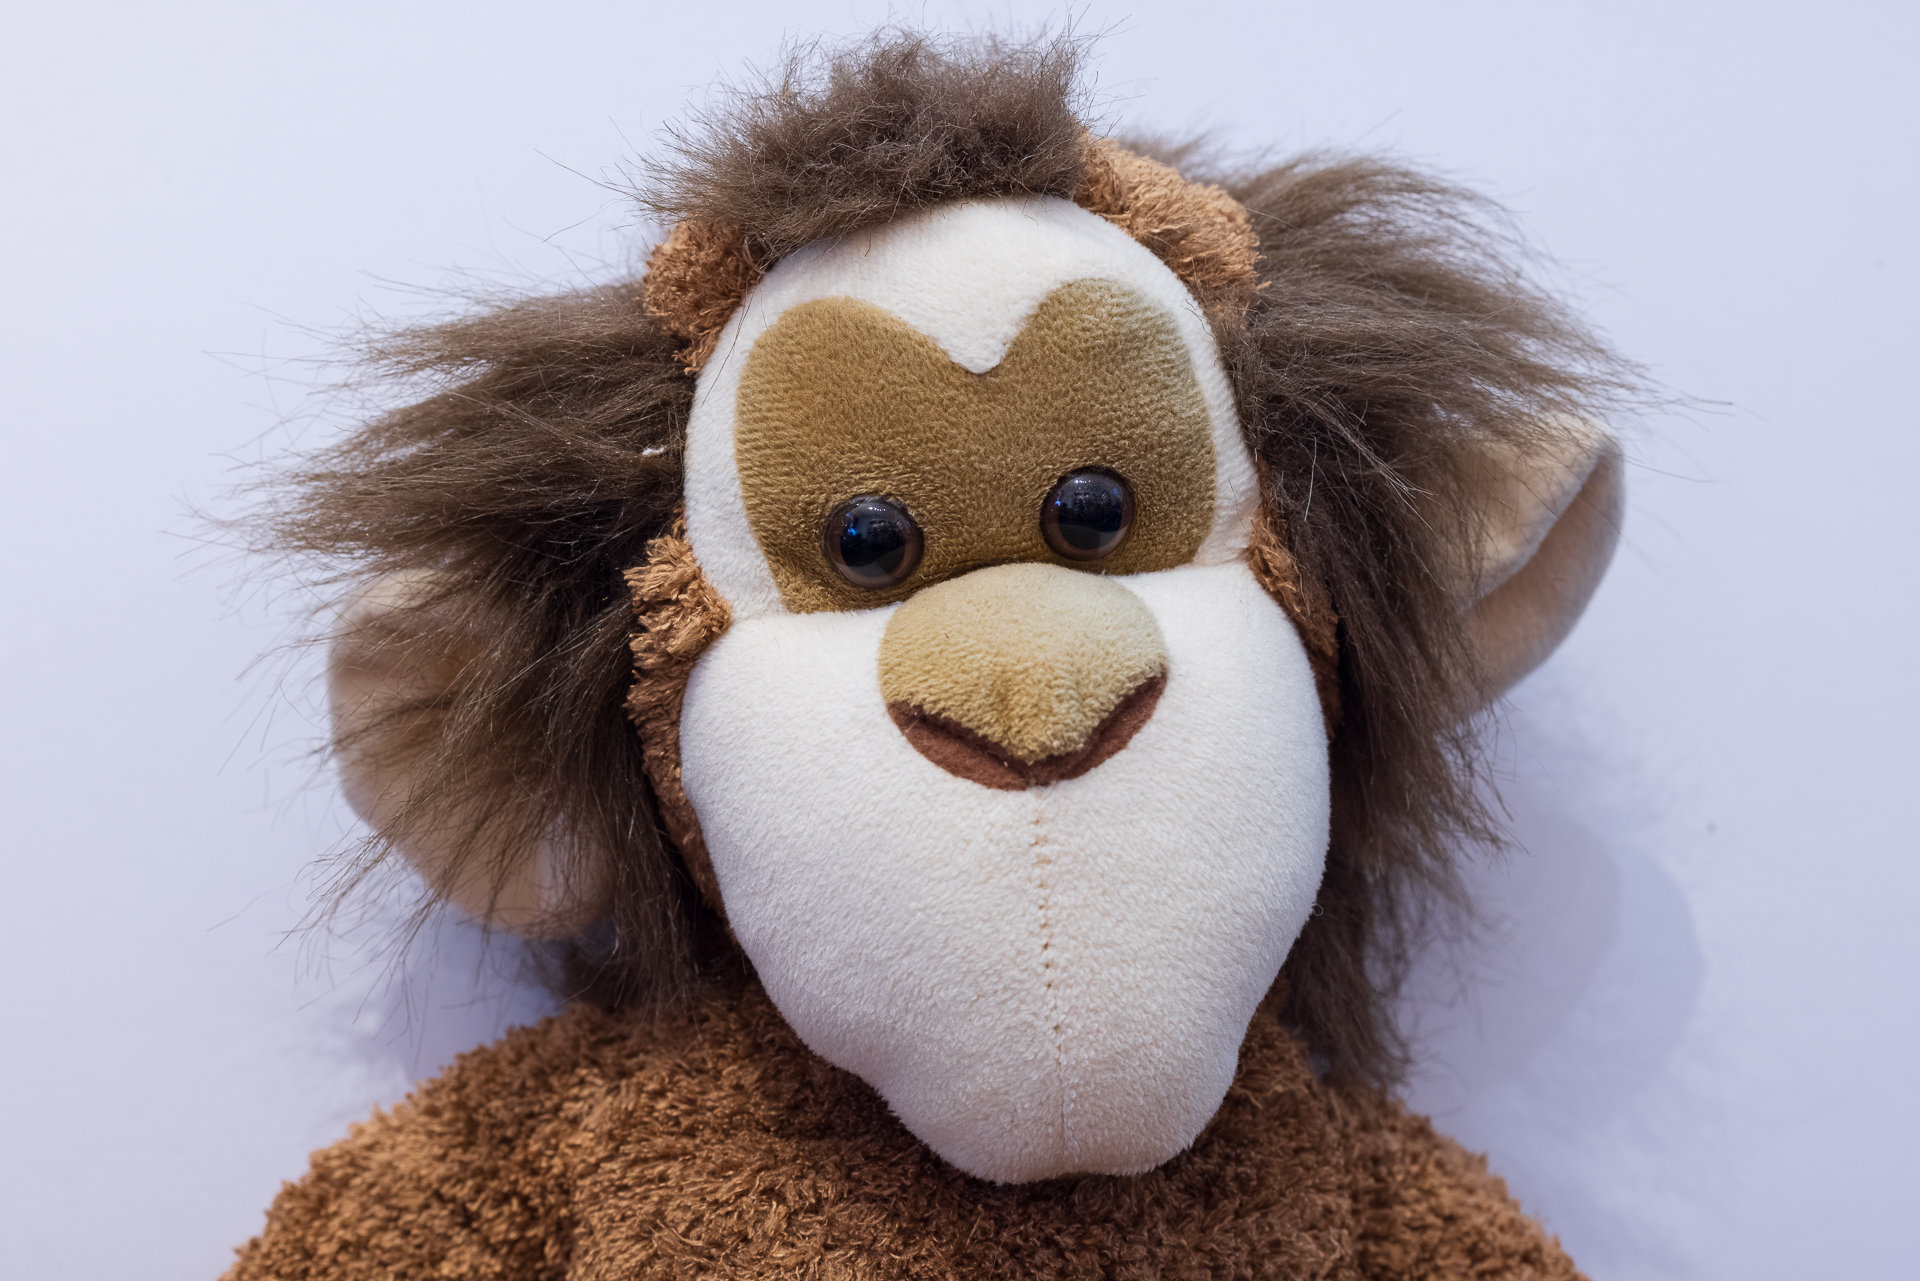
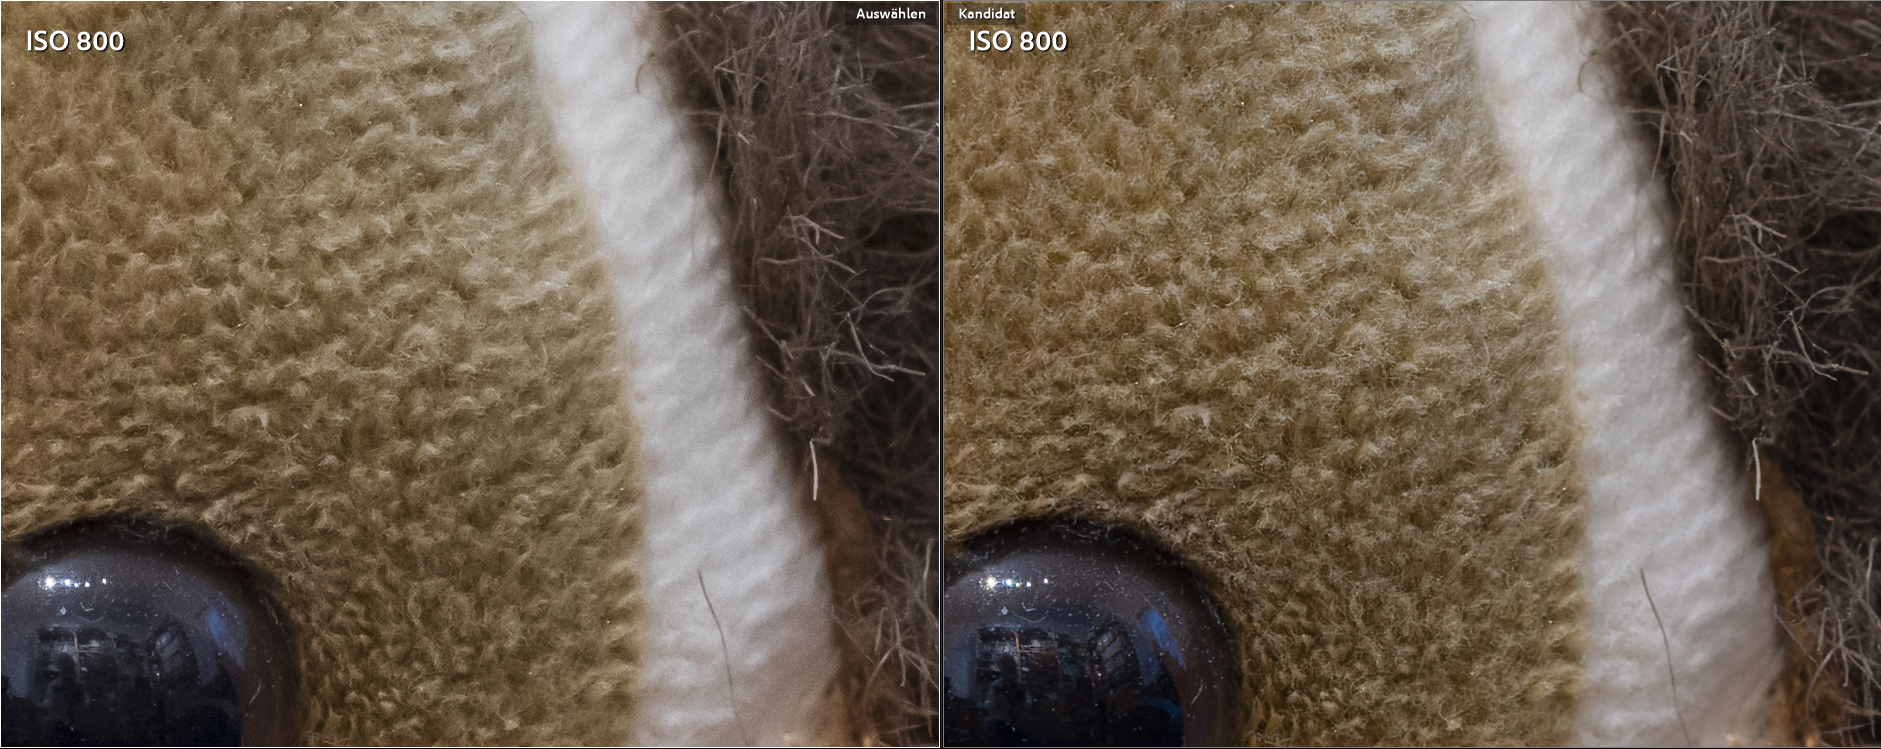
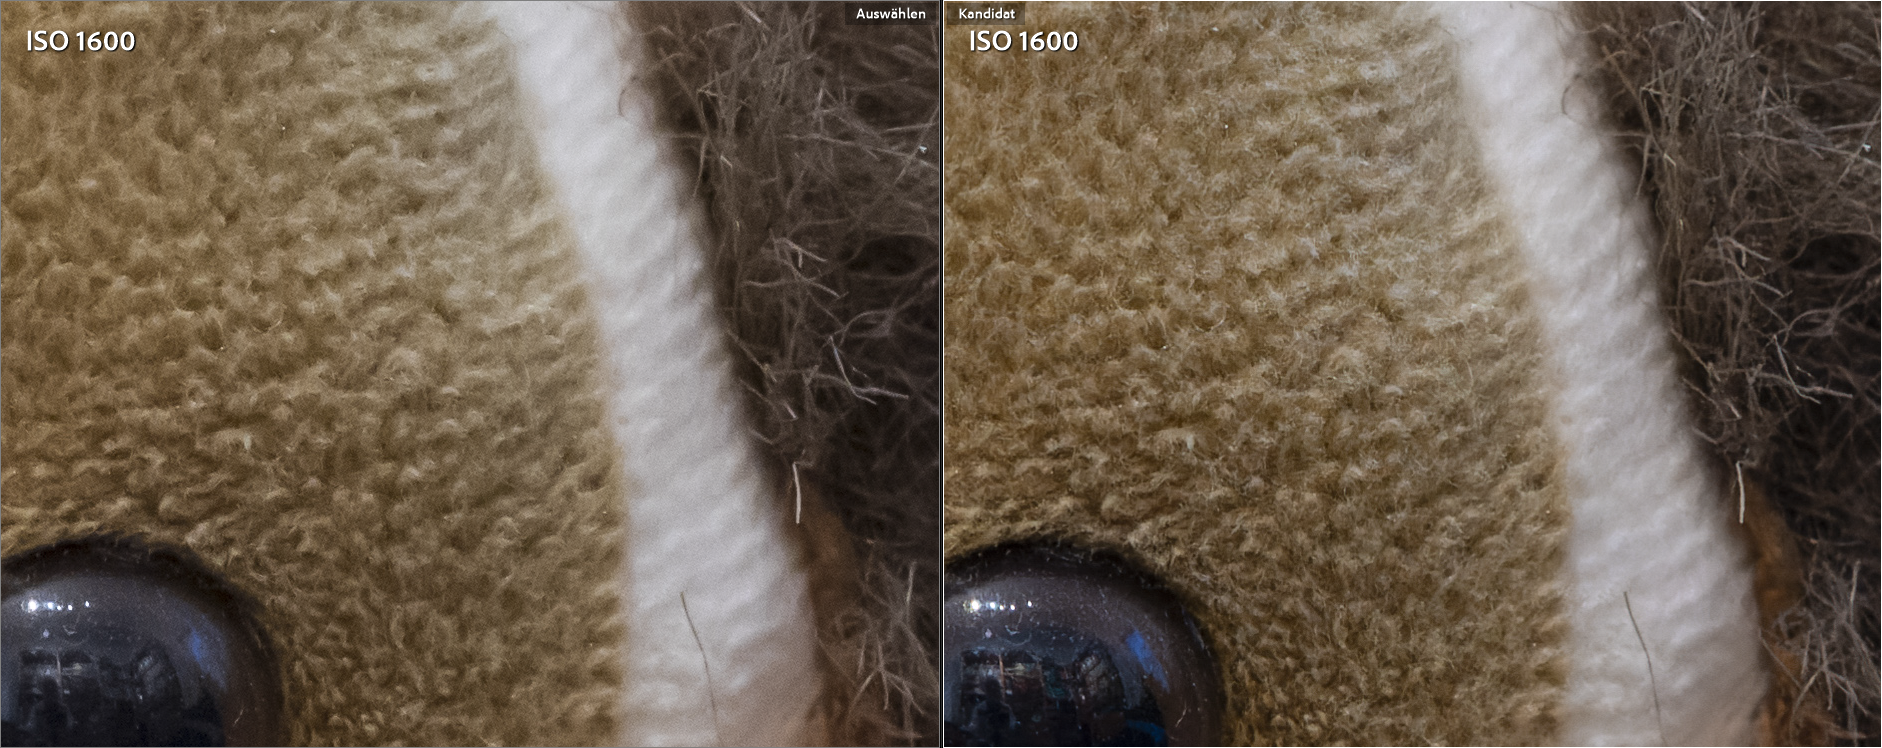
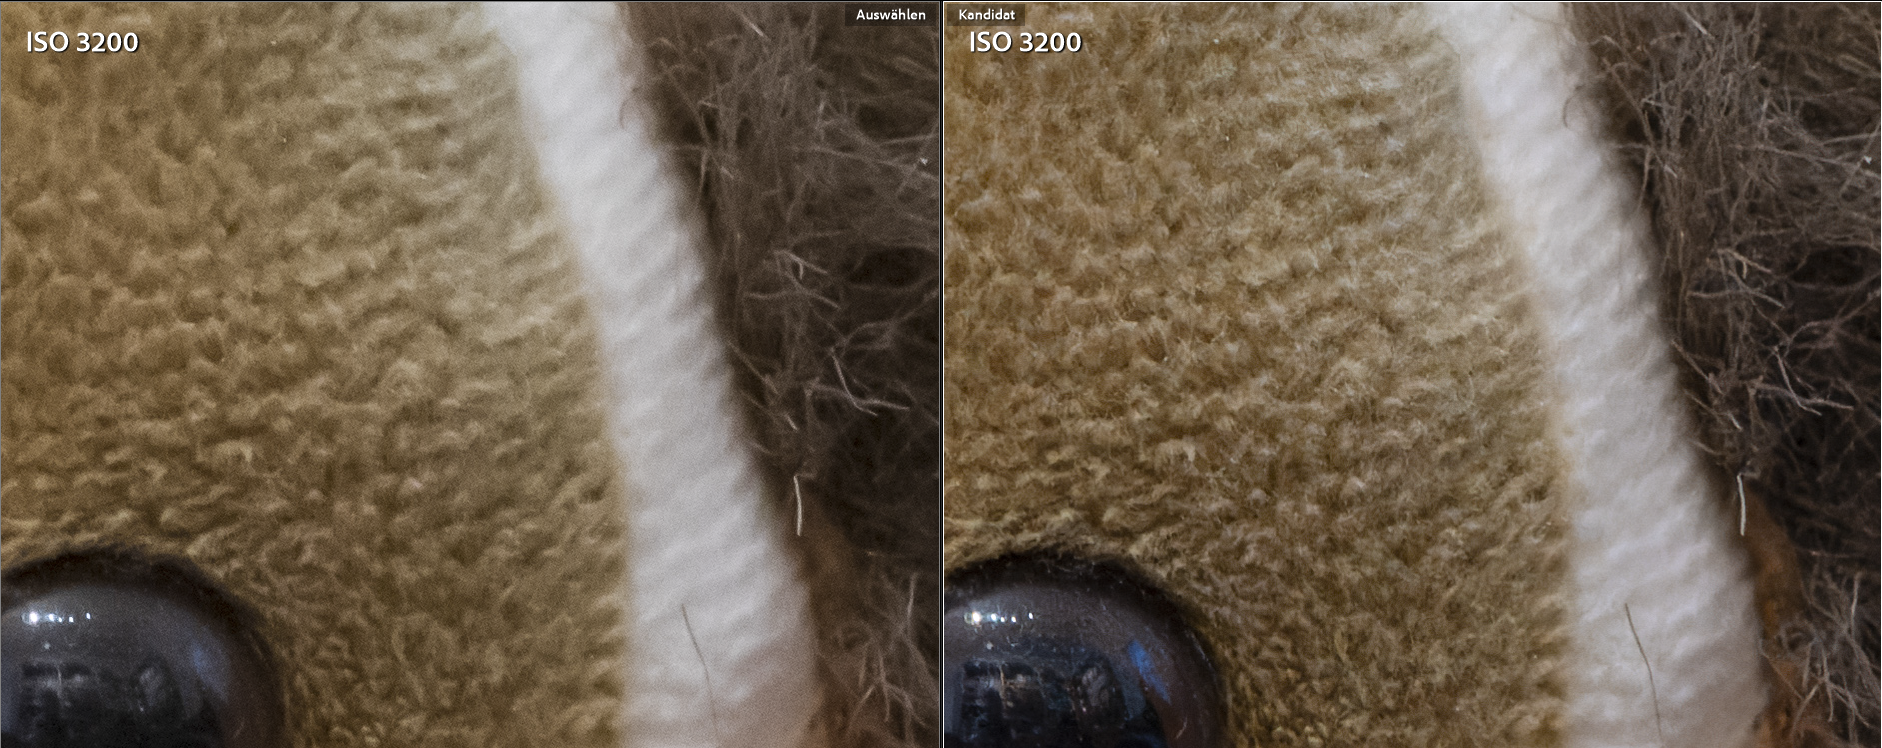
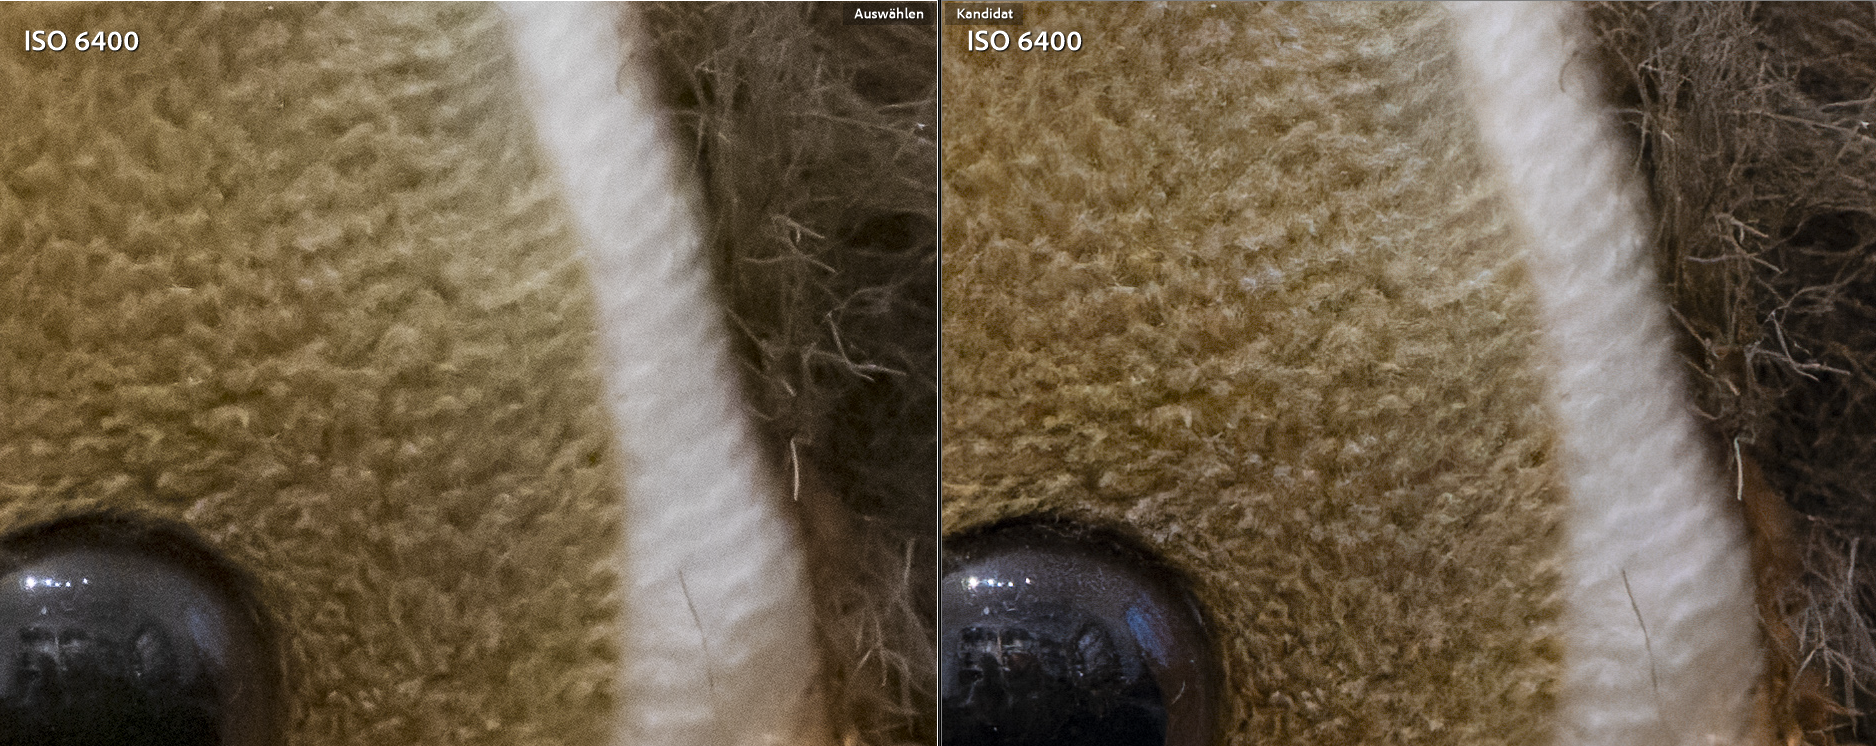
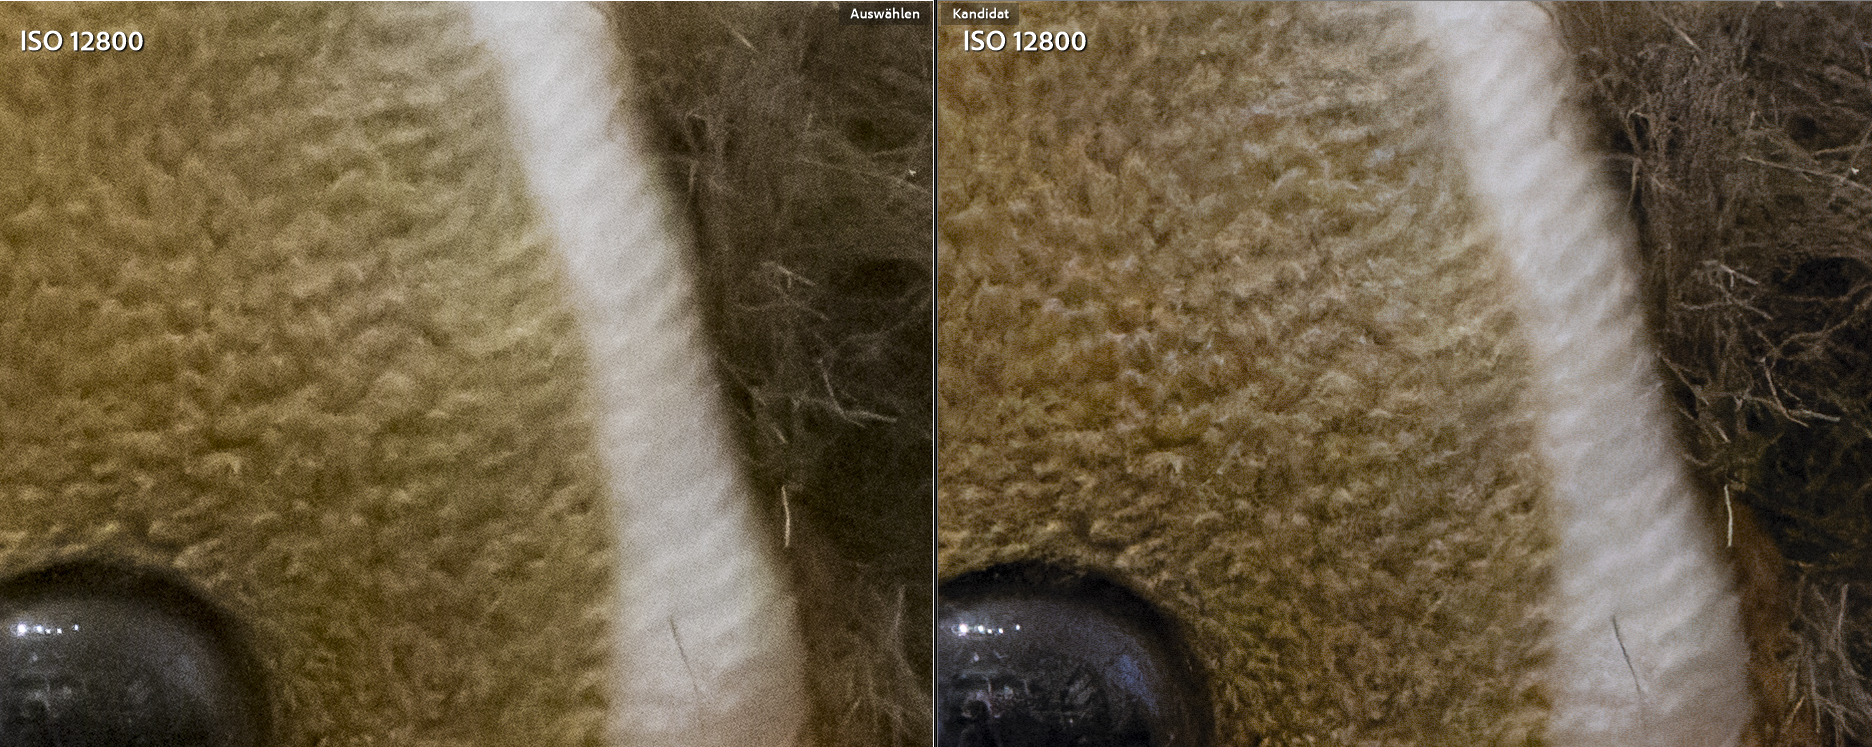
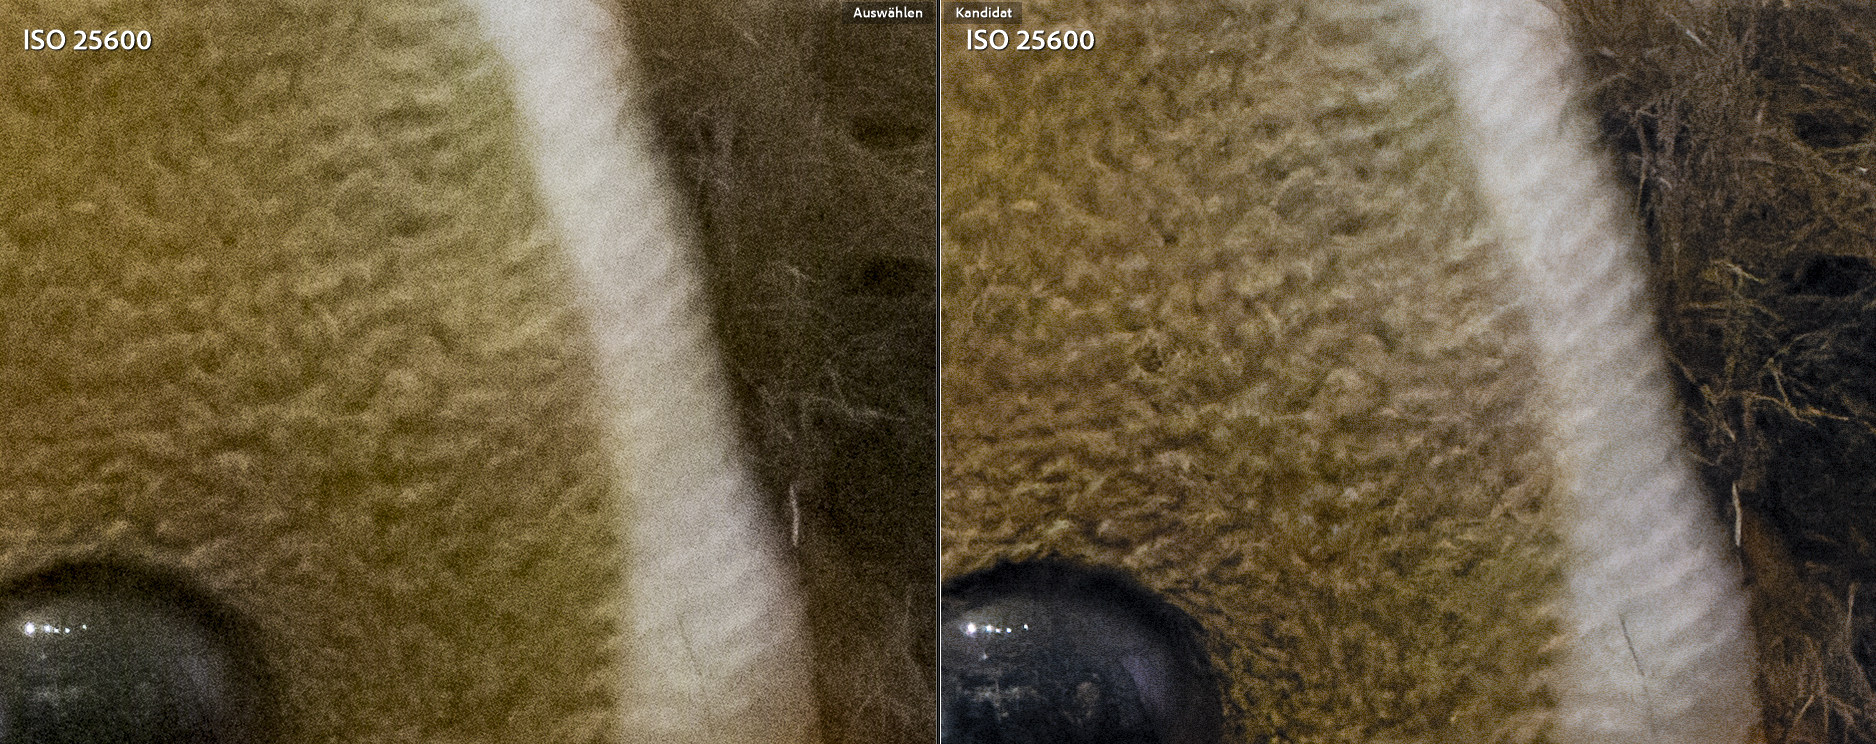
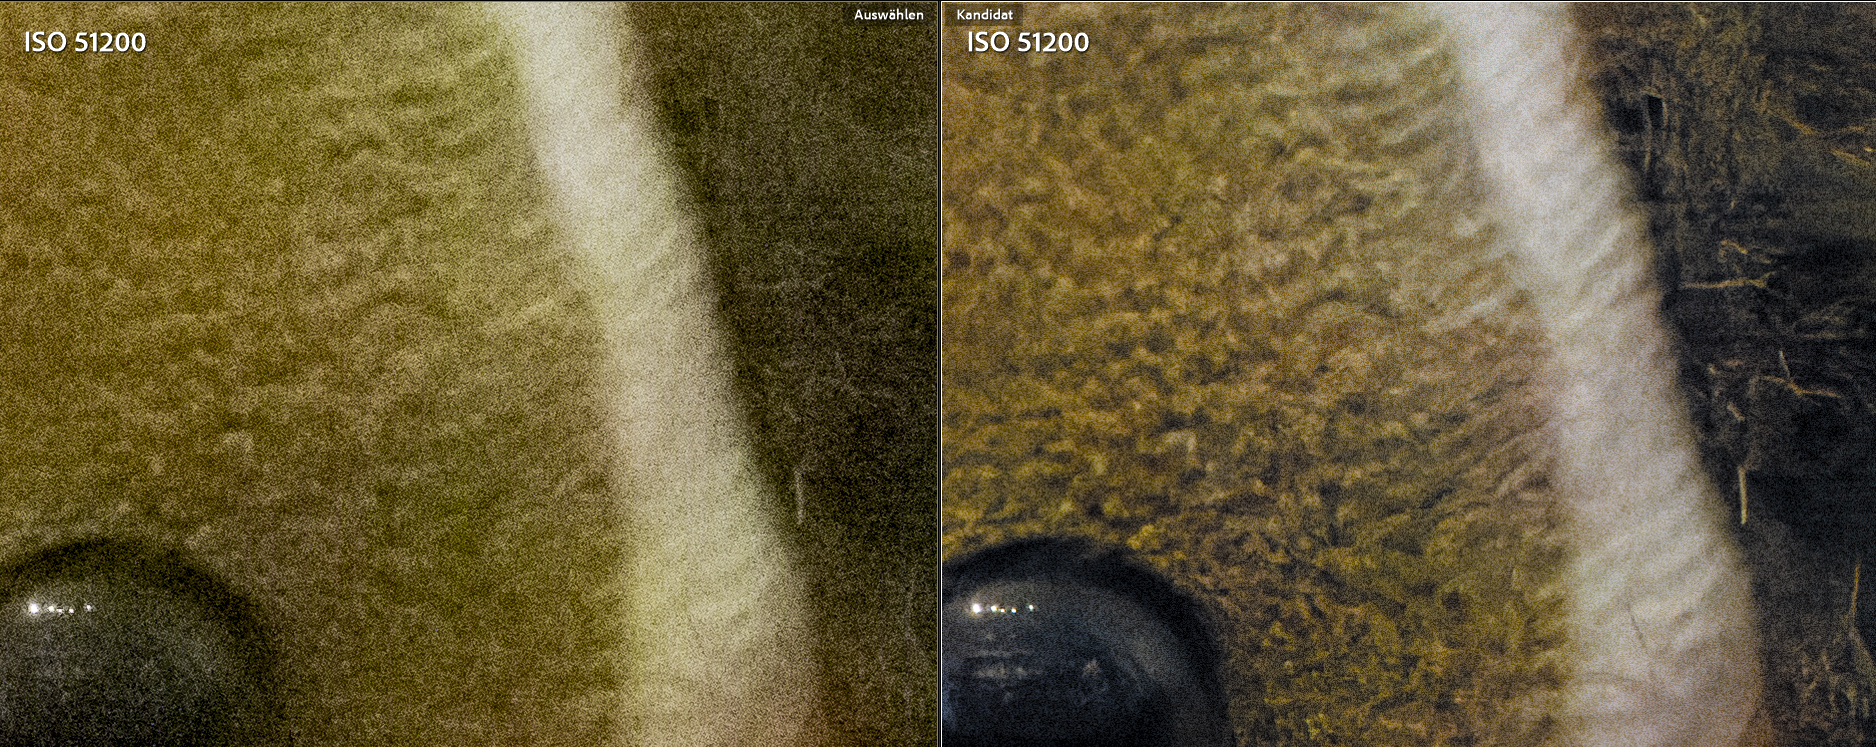
I planned a series of exposures with ISO values of 100 - 51200 from one and the same subject and wanted to compare the images using Lightroom and DxO PhotoLab 4 for noise reduction. Since our cat didn’t want to sit still, I had to use a stuffed monkey as the subject:
Résumé
At all ISO levels, the image denoised by DxO PhotoLab 4 looks much better than the version processed in Lightroom alone. Of course, the noise reduction in Lightroom could have been “fine-tuned” a bit, but in DxO, as I said, I didn’t change any settings at all, the automatic adjustment works perfectly. I am thrilled!
In direct comparison, I think that DxO, regarding the noise level, is now even a good 3 f-stops better than I can manage in Lightroom alone, as the following two comparisons demonstrate:
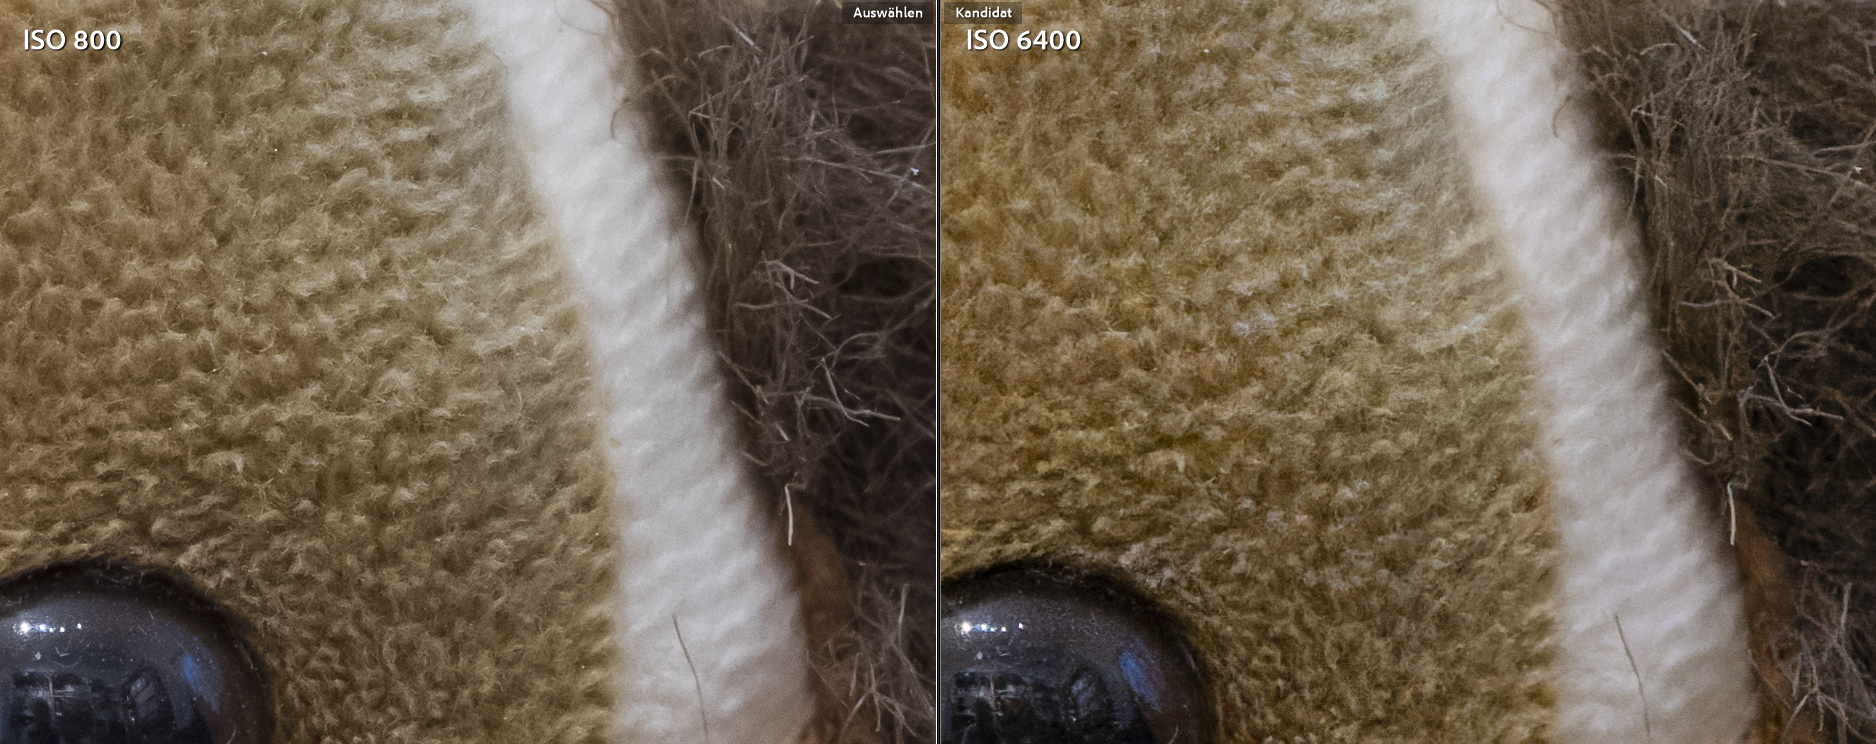
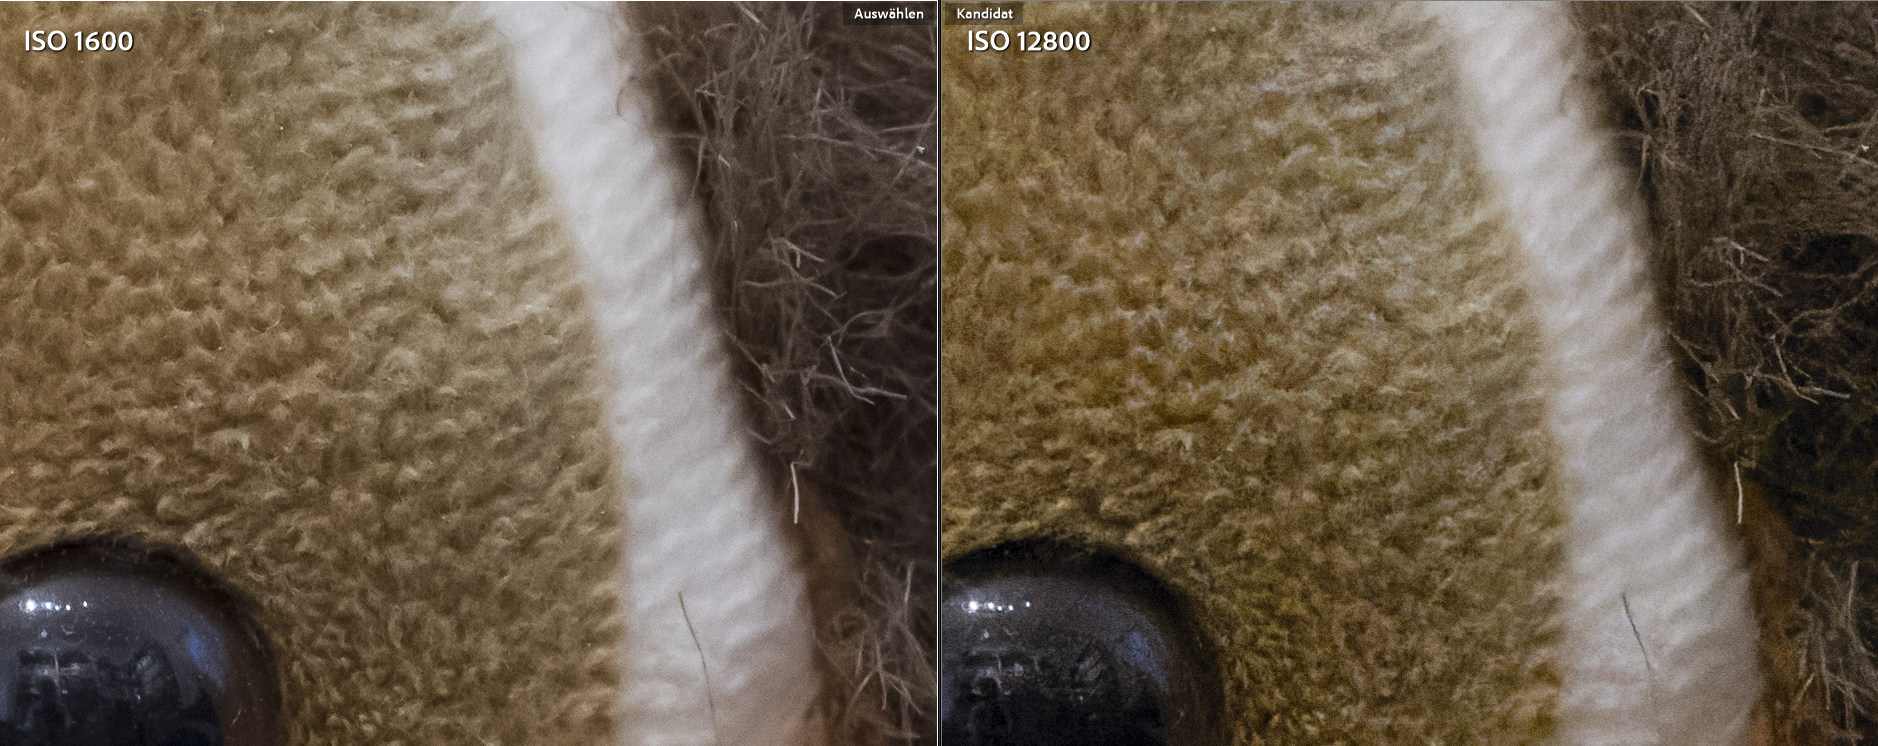
I consider the detail and noise levels in the above comparisons to be quite comparable, what do you think? Comments and suggestions for improvement would be highly welcome.
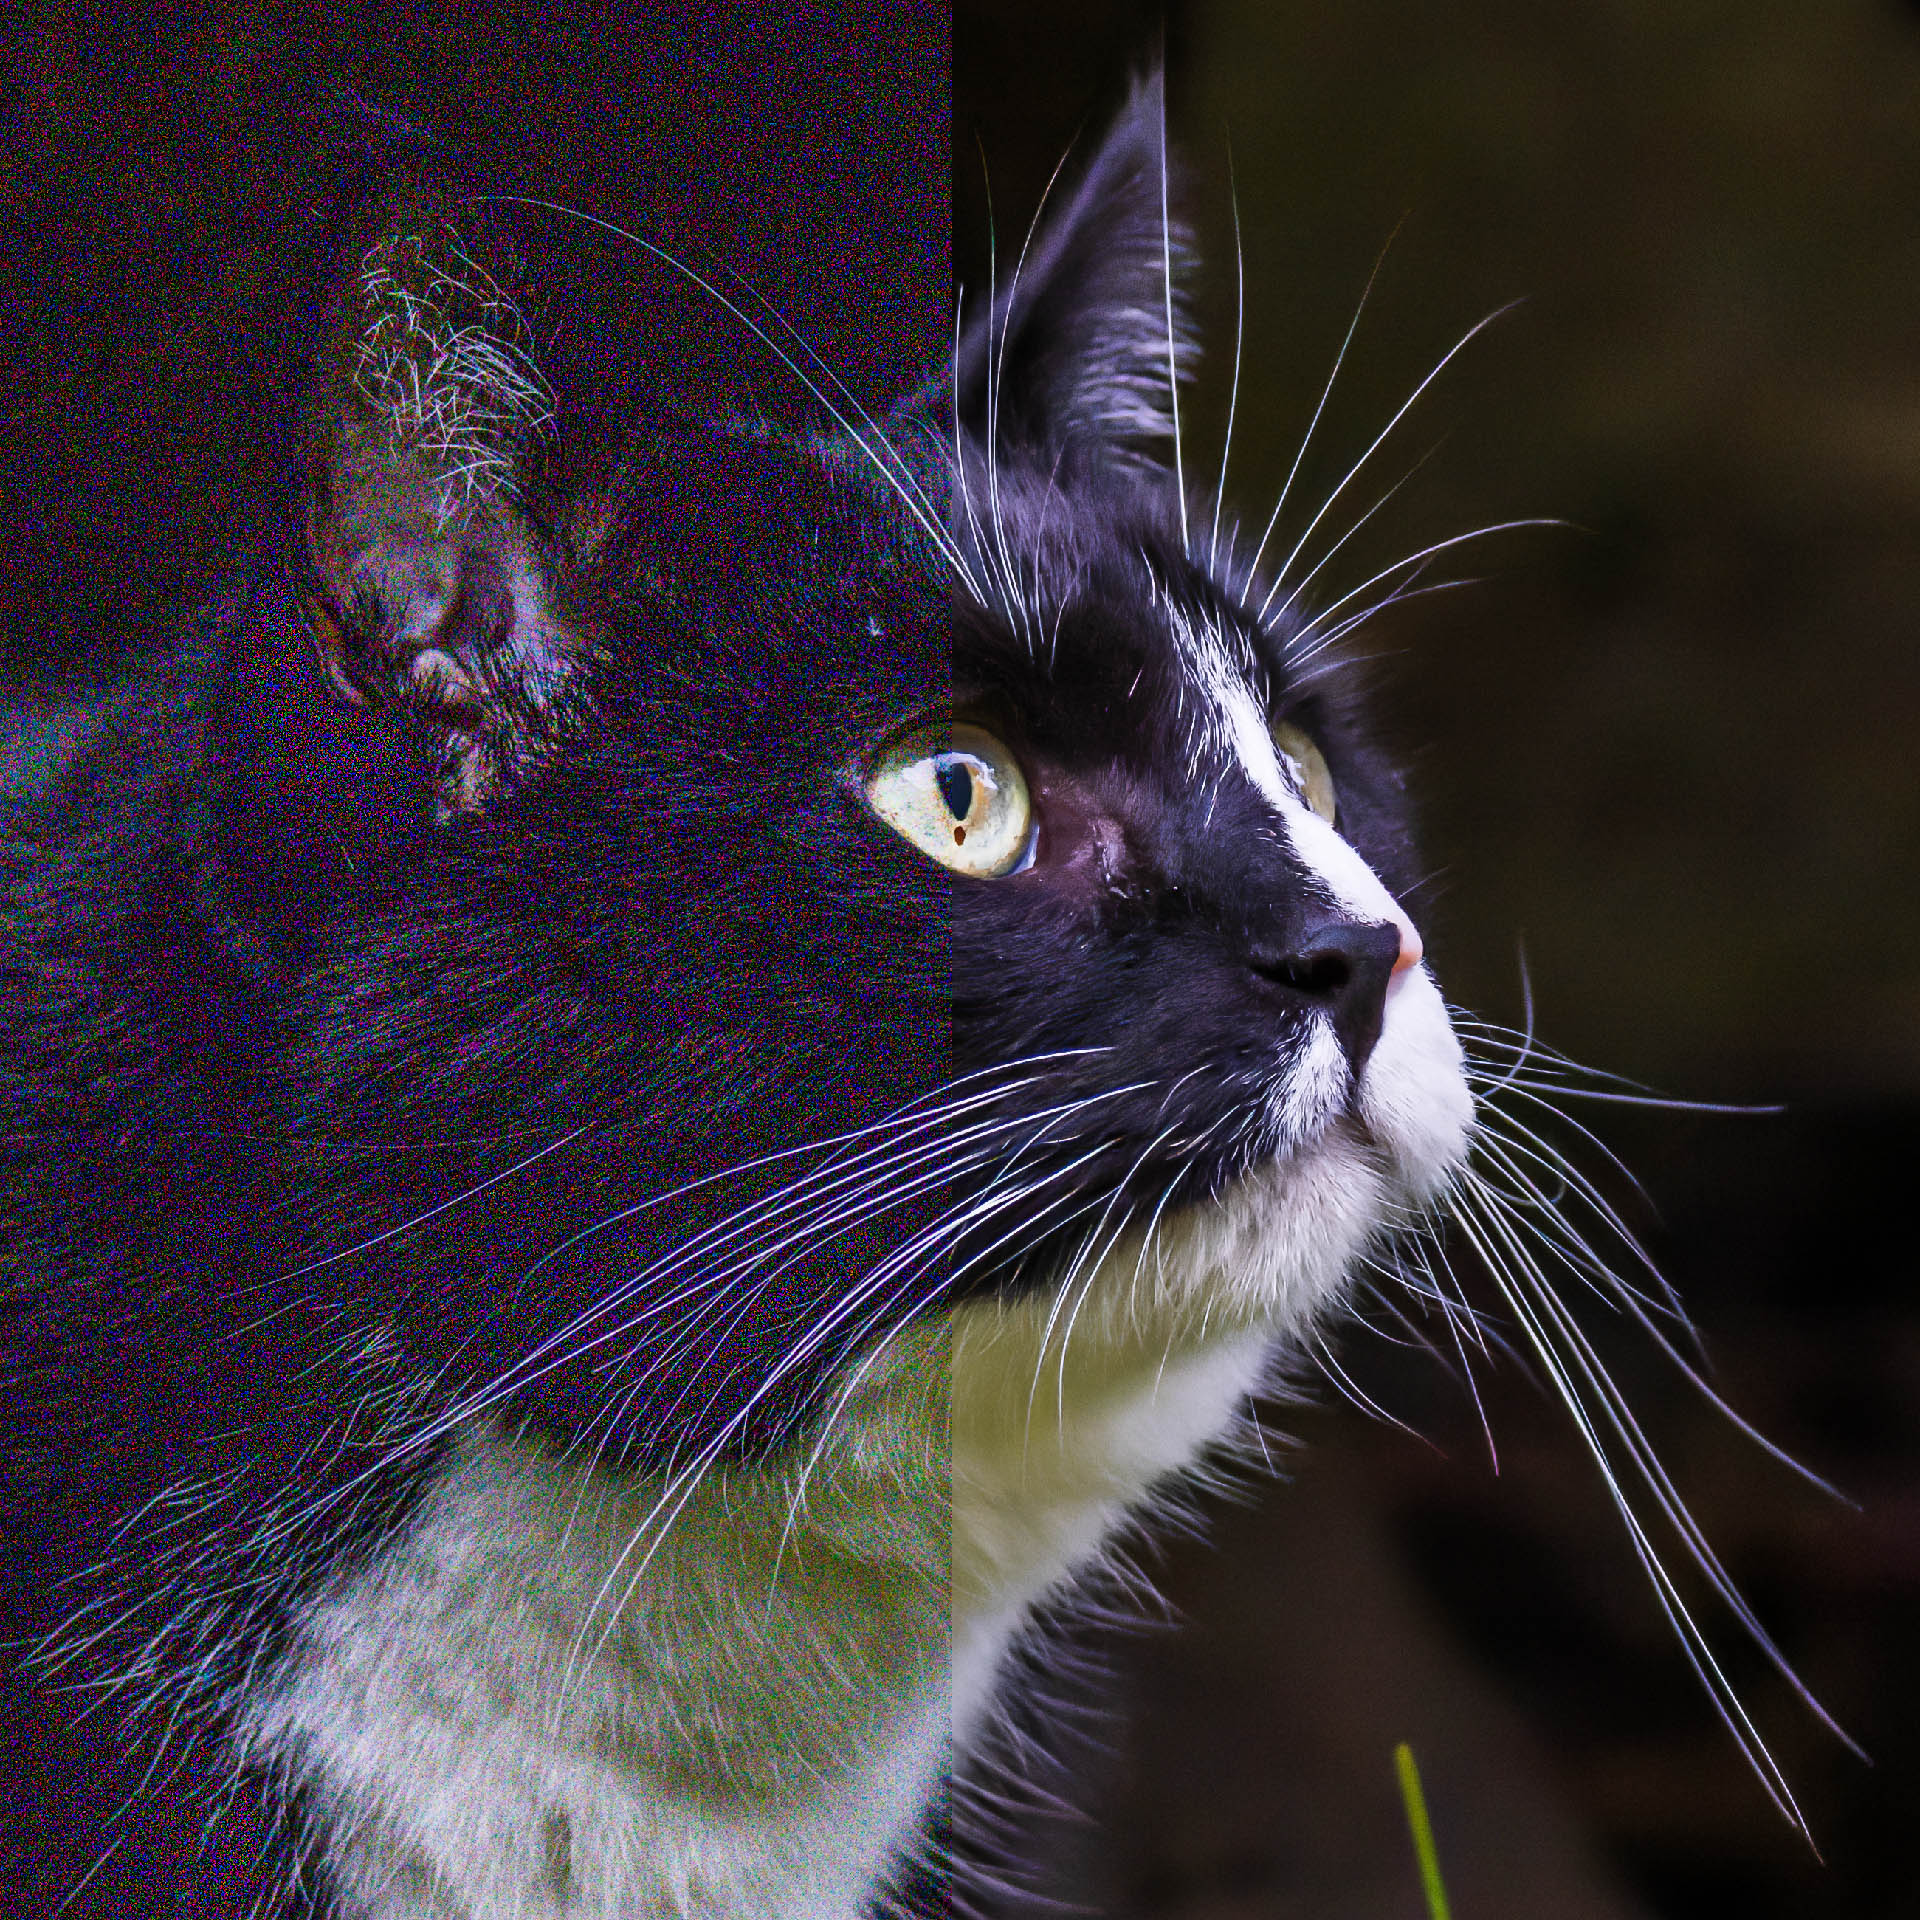
After extensive testing, I was completely convinced by DxO’s noise reduction, and the results are sensational - better than anything I’ve been able to achieve in Lightroom before. I’ve since reworked many of my old images taken at high ISO and was always impressed by the extra detail DxO PhotoLab 4 was able to reveal.
However, as a long-time Adobe Lightroom user, I could not get used to further editing my images with PhotoLab 4. I miss the database module, the ability to work with my add-ons and PhotoLab 4 is also much slower than Lightroom. Furthermore, many cameras and lenses are not supported in PhotoLab 4.
I therefore use PhotoLab 4 exclusively for denoising problematic high-ISO images, while I continue to edit all other images with Lightroom Classic. I export the problematic images from Lightroom to PhotoLab 4, denoise them with DeepPRIME and export the DNG back to Lightroom with the option “Export as DNG (Noise reduction & optical corrections only)”.
The settings from Lightroom that were changed before are applied to the DNG file, as long as they were previously saved as XMP files. This is my default setting in Lightroom. However, the result of these settings in the DNG files is not always identical to the Lightroom original. Fine corrections are often necessary. The latest version of DxO PhotoLab 4 now also turns sharpening and noise correction in Lightroom off when the DNG file is transferred back to Lightroom, so that these corrections are not performed twice.
Everything else (exposure and color corrections, cropping, tagging, etc.) is done in my usual Lightroom editing steps. But even if I only use noise reduction, the results have convinced me so much that I have bought DxO PhotoLab 4 just for this purpose, although I don’t use the other functions at all.
By the way, DxO has meanwhile reacted to the demand and now offers DxO PureRAW, a standalone program that only provides noise reduction with DeepPRIME and optical lens corrections, and can then pass the images processed in this way as DNG files to other programs for further editing. A short review can be found here.
Whatever the case may be, DxO PhotoLab is a significant step forward in terms of noise reduction and is worth an absolute recommendation.


Pingback: DxO PureRAW 3 - G-U Neukamp photography