DxO has now introduced the 5th version of its AI-based denoising tool PureRAW. This features a further improved denoising AI called DeepPRIME 3.
PureRAW is, so to speak, the little sister of DxO’s big RAW image processor DxO Photolab. PureRAW concentrates fully on AI-based denoising and the correction of lens distortion. All other corrections, such as exposure, color or contrast corrections or cropping, must be carried out in other programs. PureRAW 5 can be used either as a stand-alone program or as a plug-in for Adobe Lightroom.
As a longtime Adobe Lightroom Classic user, I use DxO’s DeepPRIME denoising exclusively via the integrated Lightroom plugin, which is also included in DxO PureRAW 5*. The following therefore focuses on this approach.
What’s new?
According to DxO, DeepPRIME version 3 includes a third component compared to its predecessor: the simultaneous correction of the remaining lateral and longitudinal chromatic aberrations at sub-pixel level. The AI model was also trained with a ten times larger image data set than the previous model. The list of supported camera/lens combinations has also been extended. Of particular relevance to me is the support of the dual cameras of the DJI Air 3s drone.
The new version also includes the option of AI-controlled denoising of images from Fuji cameras with X-Trans sensors as a “technology preview”. However, this will initially only work with older X-Trans sensors. The current 40 megapixel sensors are not yet supported. However, I can’t provide more details here as I have no personal experience with Fuji X-Trans.
As I already wrote in my review of DxO PhotoLab 8 with DeepPRIME XD2s, I now often use the quite good AI denoising already integrated in Lightroom Classic. For “difficult” cases and especially for the shots of my DJI drones, however, the denoising in DxO DeepPRIME is still absolutely unbeatable in my opinion. I was curious to see whether this could be improved even further in the new DeepPRIME 3 version.
Installation
There is actually not much to say about the installation. After downloading the installation file from the DxO server, you start it and, after accepting the obligatory legal terms and conditions and selecting the installation directory, it installs both the standalone PureRAW 5 program (which I won’t go into any further here) and the plug-in for Adobe Lightroom, which is the subject of this article.

After installing DxO PureRAW 5, the next time you start Lightroom Classic, it will notify you that a new plugin is available.

If you take a closer look in the add-on module manager of Lightroom Classic, there are even two plug-ins installed:

The first transfers the file selected in Lightroom to DxO PureRAW 5. The second then integrates the file edited in PureRAW back into Lightroom.
My workflow
I have been editing and managing my images in Adobe Lightroom Classic for years, as I have already described in detail here and here. I use several steps to do this.
After a shoot, I first briefly view all the images in the library module and immediately delete all obviously unusable images (blurred, grossly underexposed, out of focus, etc.).
I then usually go through the remaining images again in chronological order in a second run in the development module. I make the first short editing steps (cropping, rough exposure corrections, white balance).
If there are several similar images in a series, I synchronize the editing to all images in a series. During this first edit, the images are marked. The images that I want to keep and edit further are marked with a flag (button ‘P’ for ‘Pick’). Images that I definitely don’t want to edit are marked with the ‘X’ button for later deletion, the rest remain unmarked.
In the third step, I then only take a closer look at the marked images by selecting only these. Usually, I then only have around 15 to 30 percent of the original images left. These are then processed in more detail using all the options of the Lightroom development module. I now usually rate images that I really like with one star.
Since the integration of AI-based denoising in the Develop module (Detail / Denoise…) in Lightroom, I usually edit slightly noisy images directly with it:

For special images that still have a lot of noise or for images from my DJI drones, which the Lightroom algorithm has not yet been able to handle very well, I now use DxO’s DeepPRIME plugin.
Integration von DxO DeepPRIME 3 in Lightroom
The image in question is now transferred from Lightroom Classic to the DxO plug-in for processing with DeepPRIME. The transfer is done unintuitively via the menu item Plug-in extras in the File menu. Three options are now available:

With “Preview and Process”, the image to be processed is displayed as a preview in PureRAW 5 after transfer. The result of the denoising can be checked very precisely in a before/after comparison via a central movable bar. You can zoom far into the image with the mouse wheel or directly by entering the magnification scale and also move the frame with the mouse.

The “Process instantly” option omits the preview and only displays the processing options. This allows a faster workflow if you already know which settings you need.
If several similar images are to be denoised, the menu item “Process directly using last settings” carries out the denoising immediately without further prompting.
After starting PureRAW 5 with the first two options, which takes a moment, you can first select the recognized camera and optics modules if they have not been loaded before. In my example below, my EOS R5 with the EF 400mm f/2.8L IS II USM:

If you do not want to carry out the optical corrections in PureRAW and instead want to do this in Lightroom afterwards, you can simply select “None of the above” to skip these modules. Afterwards, the options window will appear. Depending on the selected menu item with (see above) or without image preview as shown here:

The preference settings are divided into two selectable areas.
Corrections
When the “Corrections” area is clicked, a new window appears on the right which allows you to select the correction parameters:

The new and improved DeepPRIME 3 process is preset. The Luminance setting influences the strength of the noise reduction. The image is sharpened with “Force details” and “Lens Sharpness Optimization”.
This is best checked directly in the preview window if the image was transferred to PureRAW 5 with the “Preview and processing” option. The settings here are a matter of taste and depend on the individual motif. I recommend simply trying out a few settings.
When choosing the optical corrections, everyone has to decide for themselves whether they want to do this in PureRAW or later in Lightroom.
Output
After clicking on the lower “Output” area or the symbol ![]()
![]() in the preview window, the output format of the edited image can be selected.
in the preview window, the output format of the edited image can be selected.

As I still want to edit the images in Lightroom, I always choose DNG as the output format, as this produces the highest quality.
However, as this is a linear DNG format, you have to accept that the resulting file is a good three times as large as the original RAW file from the camera.
This is because the linear DNG format contains the computed color values red, green and blue (i.e. three values) for each image pixel, while the camera’s original RAW format only stores one color value that corresponds to the Bayer color filter in front of that particular pixel (i.e. red or green or blue).
The image can be written to the same directory as the original image. This is the default option that I use.
To distinguish it from the original, the suffix “DxO_DeepPRIME 3” is added to the file name by default. I have left it like this, but the renaming can be extensively customized to your own taste using the “Edit” button.
If desired, the edited image can also be saved in a subfolder of the original folder or in a completely separate directory.
Finally, you can specify where the edited file should be exported to. This is only necessary if DxO PureRAW is used as a stand-alone program. If you use the Lightroom plug-in as described here, the edited file is automatically transferred back to Lightroom as specified above. If desired, it can also be added to a Lightroom collection.
And off we go…
After selecting the options, the actual processing can now be started. Depending on the hardware installed in your computer, more or less patience is required here.
The graphics card installed in the computer is of particular importance. On my laptop with Intel Core i9-11980HK and an Nvidia RTX 3080, processing a 45 megapixel file from the Canon EOS R5 with the RTX 3080 only takes around 10 seconds. However, with the UHD Graphics built into the CPU, PureRAW 5 needs approx. 100 seconds for the same image. Without the support of the graphics card, the 8 cores of the i9-11980HK already need 2 minutes. On older hardware, this can also take several minutes. Overall, DeepPRIME 3 is fortunately significantly faster than the AI denoising integrated in Lightroom and also than the previous DeepPRIME versions.
After editing, DxO PureRAW 5 closes automatically and Lightroom Classic returns to the foreground. Re-importing the edited file takes a while and it is imported into a newly created Collection in the ‘DxO PureRAW 5′ folder. This is named with the date and time of editing.

Results
So far - so good. We have now successfully used PureRAW 5. But what improvement does it bring compared to conventional noise reduction in Adobe Lightroom?
A lot. Here is an example:
We visited the famous Fushimi Inari-Taisha shrine in Kyōto on a dark and rainy day in Japan. This world-famous shrine consists of thousands of orange-red torii standing in a row.
Without a tripod and with the necessary aperture (f/13) due to the required depth of field, I had to take the photo at ISO 12,800 despite a relatively long exposure time of 1/25 second.
On the left you can see the image processed with Lightroom, on the right the image denoised with DxO PureRAW 5. Admittedly, the difference is not very big when scaled down. But at 300% magnification you can see what DeepPRIME XD can get out of the noisy original:

I still find the result very impressive.
DeepPRIME 3 vs Lightroom AI denoising
But Lightroom also offers the option of denoising with its own AI support. How does it compare with DxO’s DeepPRIME 3? Here is the example above in comparison:

On the left you can see the result of the Lightroom AI denoising (level 80), on the right the result of DxO. The difference is much smaller here. Which you like better is a matter of taste. Lightroom shows less detail, DxO more artifacts. However, both can certainly be changed by adjusting the options. What you like better is certainly a matter of taste, personally I like the result with DeepPRIME 3 a little better. But I would like to investigate this in more detail.
Is DeepPRIME 3 even better than the AI denoising in Lightroom Classic?
So it’s time once again for a comparison test.
Comparative test
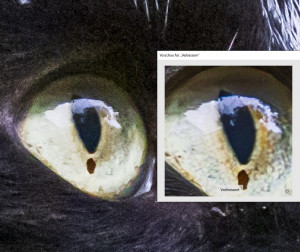
Once again, I used the noisy RAW files from my previous comparison tests as test subjects. The first test object was again the shot of our cat Tom taken at ISO 12,800 with my Canon EOS R5.
First of all, here is the original image again, which has not been denoised. As it was still too dark despite ISO 12,800, I brightened it up by another f-stop in Lightroom. It actually corresponds to a shot with ISO 25,600!

I’m sure we all agree that the picture is so unusable. So get rid of it?
The AI can do it!
Since the availability of AI-based denoising methods, I no longer have any problems working with 5-digit ISO values. However, the results that can be achieved in this way still amaze me. Here is an example in direct comparison. On the left is the original and on the right the version processed with DxO’s DeepPRIME 3 (crop at 200% magnification):


That’s really very impressive, isn’t it?
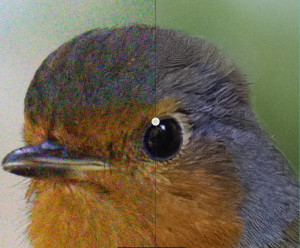
But now to the interesting comparison with the AI denoising integrated in Lightroom Classic since version 12.3. In DeepPrime 3, I set the luminance value to 75 and the lens sharpness optimization to Standard / 100:

In Lightroom Classic, I have also set the AI denoising strength to 75. Both values have worked well for me so far. Then I started the denoising with the “Process immediately” option:
In Lightroom, I then simply set the sharpening to the default value of 40 for all images:

The other settings in Lightroom were not changed. Here are the images in overview (this is already a portrait crop from a landscape image from my Canon EOS R5).


In the image scaled down to 2048 pixels, there are no significant differences between DeepPRIME and the Lightroom AI. Even the original, which has not been denoised, looks scaled down quite acceptable.
In principle, downscaling in itself already represents efficient noise reduction. In order to be able to evaluate the differences that still exist, you have to take a closer look. In the following I therefore show crops of the above images enlarged to 200%:


When enlarged, you can now clearly see the successful noise reduction with both DeepPRIME 3 and Lightroom. The direct comparison of the two AI denoising processes is now interesting:

There are hardly any differences in the original resolution. That’s why I’m showing another crop here at approx. 400% magnification:


At this massive magnification, DeepPRIME actually shows even more detail, the image appears sharper, but there is also a little more noise. All in all, I find it a little more appealing and natural, but given the minimal differences this is certainly a matter of taste. Whether this justifies the additional investment in PureRAW 5 if you already have an Adobe Lightroom subscription is up to you to decide.
What about DJI drones?
Unlike conventional system cameras from e.g. Canon, Nikon or Sony, the current DJI drones use a quad-bayer design for their high-resolution sensors. This means that the color filters are arranged in a much coarser grid than in the usual classic Bayer grid, which makes it more difficult to assign colors to the individual image pixels. I have already written more about this in my review of the DJI Mini 3 Pro.
What was the problem?
When editing the DNG files of my newer DJI drones, I was very disappointed with the results of the AI denoising in Lightroom. Lightroom produced ugly line artifacts in the AI denoised images, which made them unusable for me in this respect.
Here is an example from my PhotoLab 8 test report: I took the picture of the Arenal volcano in Costa Rica with my DJI Mini 4 Pro at ISO 400:

Here you can see the results of the AI denoising from Lightroom and DxO’s DeepPRIME. On the left you find the result from Lightroom in 400% magnification, on the right the result of the denoising with DeepPRIME XD2s:


In my opinion, the denoising in Lightroom was completely unusable for DJI drone images with the 48 megapixel Quad Bayer sensors. DxO delivered much better results with DeepPRIME XD2s, so up until now I’ve denoised all my DJI drone images with it.
And what about now?
To test the new DeepPRIME 3, I have now denoised the above image again with both the current Lightroom Classic (V 14.3) and with DxO DeepPRIME 3. And the result surprised me twice: on the left you can see the results from Lightroom at 400% magnification, on the right the results of the denoising with DeepPRIME 3:


Fortunately, the result of the denoising is much better with the current Lightroom Classic version 14.3 as well as with DeepPRIME 3. The previously annoying visible artifacts in Lightroom are gone. Nevertheless, the result with DxO DeepPRIME is still much better, which can be seen particularly well in the details on the slope of the volcano and in the foliage of the trees. Here is a direct comparison of the two images:


Especially on the slopes of the volcano you can clearly see the differences. In Lightroom, these appear completely smooth and without detail, whereas DxO DeepPRIME 3 still brings out the details of the vegetation there. I like the DxO result much better here.
Resumée
With the latest AI-supported denoising function DeepPRIME 3 included in DxO PureRAW 5, DxO has achieved a further increase in quality. The program has also become faster - at least on my hardware. However, the improvements since the previous versions have been smaller and users of Adobe Lightroom since version 12.3 already have an alternative AI-supported denoising option that also delivers very good results - at least with my Canon system cameras.
However, the situation is different with some newer DJI drones. Although the current Lightroom version 14.3 now also copes better with the Quad Bayer sensors of the new drones, DeepPRIME denoising is still clearly superior.
I will therefore probably continue to proceed as before:
Depending on the subject, my very noisy shots are processed with both Lightroom and DeepPRIME 3, with Lightroom being more streamlined and quicker to use. DeepPRIME 3 is still reserved for the “hard cases” and all my DJI drone shots.
However, if you do not use Lightroom, DxO PureRAW is certainly a good choice for denoising high-ISO images. However, an additional program such as Capture One or the full version of DxO PhotoLab is then required for further processing of the images.
My recommendation:
- If you don’t yet have any experience with DeepPRIME 3, I strongly recommend downloading the free trial version of RureRAW 5 (directly here at DxO*) and testing it intensively with your own images. DxO is extremely generous and allows you to test its programs for 14 days without any restrictions.
- However, if you have not yet built up a large image database and are still completely open in this respect, I recommend that you also take a closer look at DxO PhotoLab 8* as an alternative. Although PhotoLab 8 does not yet support the DeepPRIME 3 process presented here, I believe that this will be added soon. Perhaps this solution will give you everything you need in one program.
Prices and availability
DxO PureRAW 5 is available on the DxO website for download* at the following prices:
- DxO PureRAW 5: 119,99 €
- DxO PureRAW Upgrade from Version 3 or 4: 79,99 €
*= AffiliateLink