DxO has released a new AI-based tool for noise reduction in digital images.
DeepPRIME - A revolution in digital noise reduction
In my review of DxO’s RAW converter, DxO PhotoLab 4, I extensively tested the new AI / Deep Learning based noise reduction technique DeepPRIME (only included in the PhotoLab 4 Elite version) for high-ISO images. In short, I was so impressed with the results that I decided to buy DxO PhotoLab 4 Elite, despite its rather high price, solely because of its sensational noise reduction. In the meantime, I updated to the current Version 5 of PhotoLab.
Since then, I’ve been using the DeepPRIME algorithm frequently on my high ISO images. It allows to achieve impressive results even from photos taken at ISO 12,800. or above. Roughly speaking, the results with DeepPRIME are a good 2 stops cleaner than those I can achieve with Lightroom Classic. That means that an ISO 12,800 image processed with DeepPRIME is comparable in terms of noise to an image processed in Adobe Lightroom at ISO 3,200.
However, I still don’t use the other features of DxO PhotoLab at all, as I still prefer to do all other image editing and tagging in Adobe Lightroom Classic (LRC). In my opinion, LRC is much more intuitive to use and, above all, much faster. LRC also offers extensive management of images, which allows me to organize my now more than 180,000 images very well.
Since I use only DxO’s noise reduction DeepPRIME and want to continue my image processing in LRC, it would therefore be nice if DxO would deliver DeepPRIME as a separate module, since I currently do not need any of the other features of PhotoLab.
My wish was granted
DxO has now fulfilled my wish. Since a few days, DxO PureRAW is available. To see how the new program performs in my workflow, I installed and tested it. In particular, I wanted to see how it compared to my current processing with PhotoLab’s DeepPRIME module.
You can download a trial version of DxO PureRAW* directly from DxO. It can again be used for 31 days without any restrictions.
What does DxO PureRAW offer?
DxO PureRAW is a standalone program that exclusively works with RAW files. These can be processed with three different noise reduction algorithms (HQ, PRIME, and DeepPRIME). In addition, DxO-developed optical correction filters which correct lens-specific distortions, vignetting and chromatic aberrations are applied. Furthermore, the resulting images are automatically sharpened. These corrected photos can then be saved as JPG files or DNG-RAW files. Afterwards, you can pass them to another program for further processing.
Handling
Handling is very straightforward. After starting the program, an empty program window appears.

To select images for editing, they can be either dragged and dropped from a file explorer window into it (this also works with folders, as long as they do not contain subfolders) or they can be selected by clicking on the “+” symbol via a dialog box.
If necessary camera and lens modules are not present yet, DxO PureRAW will ask if they should be loaded:

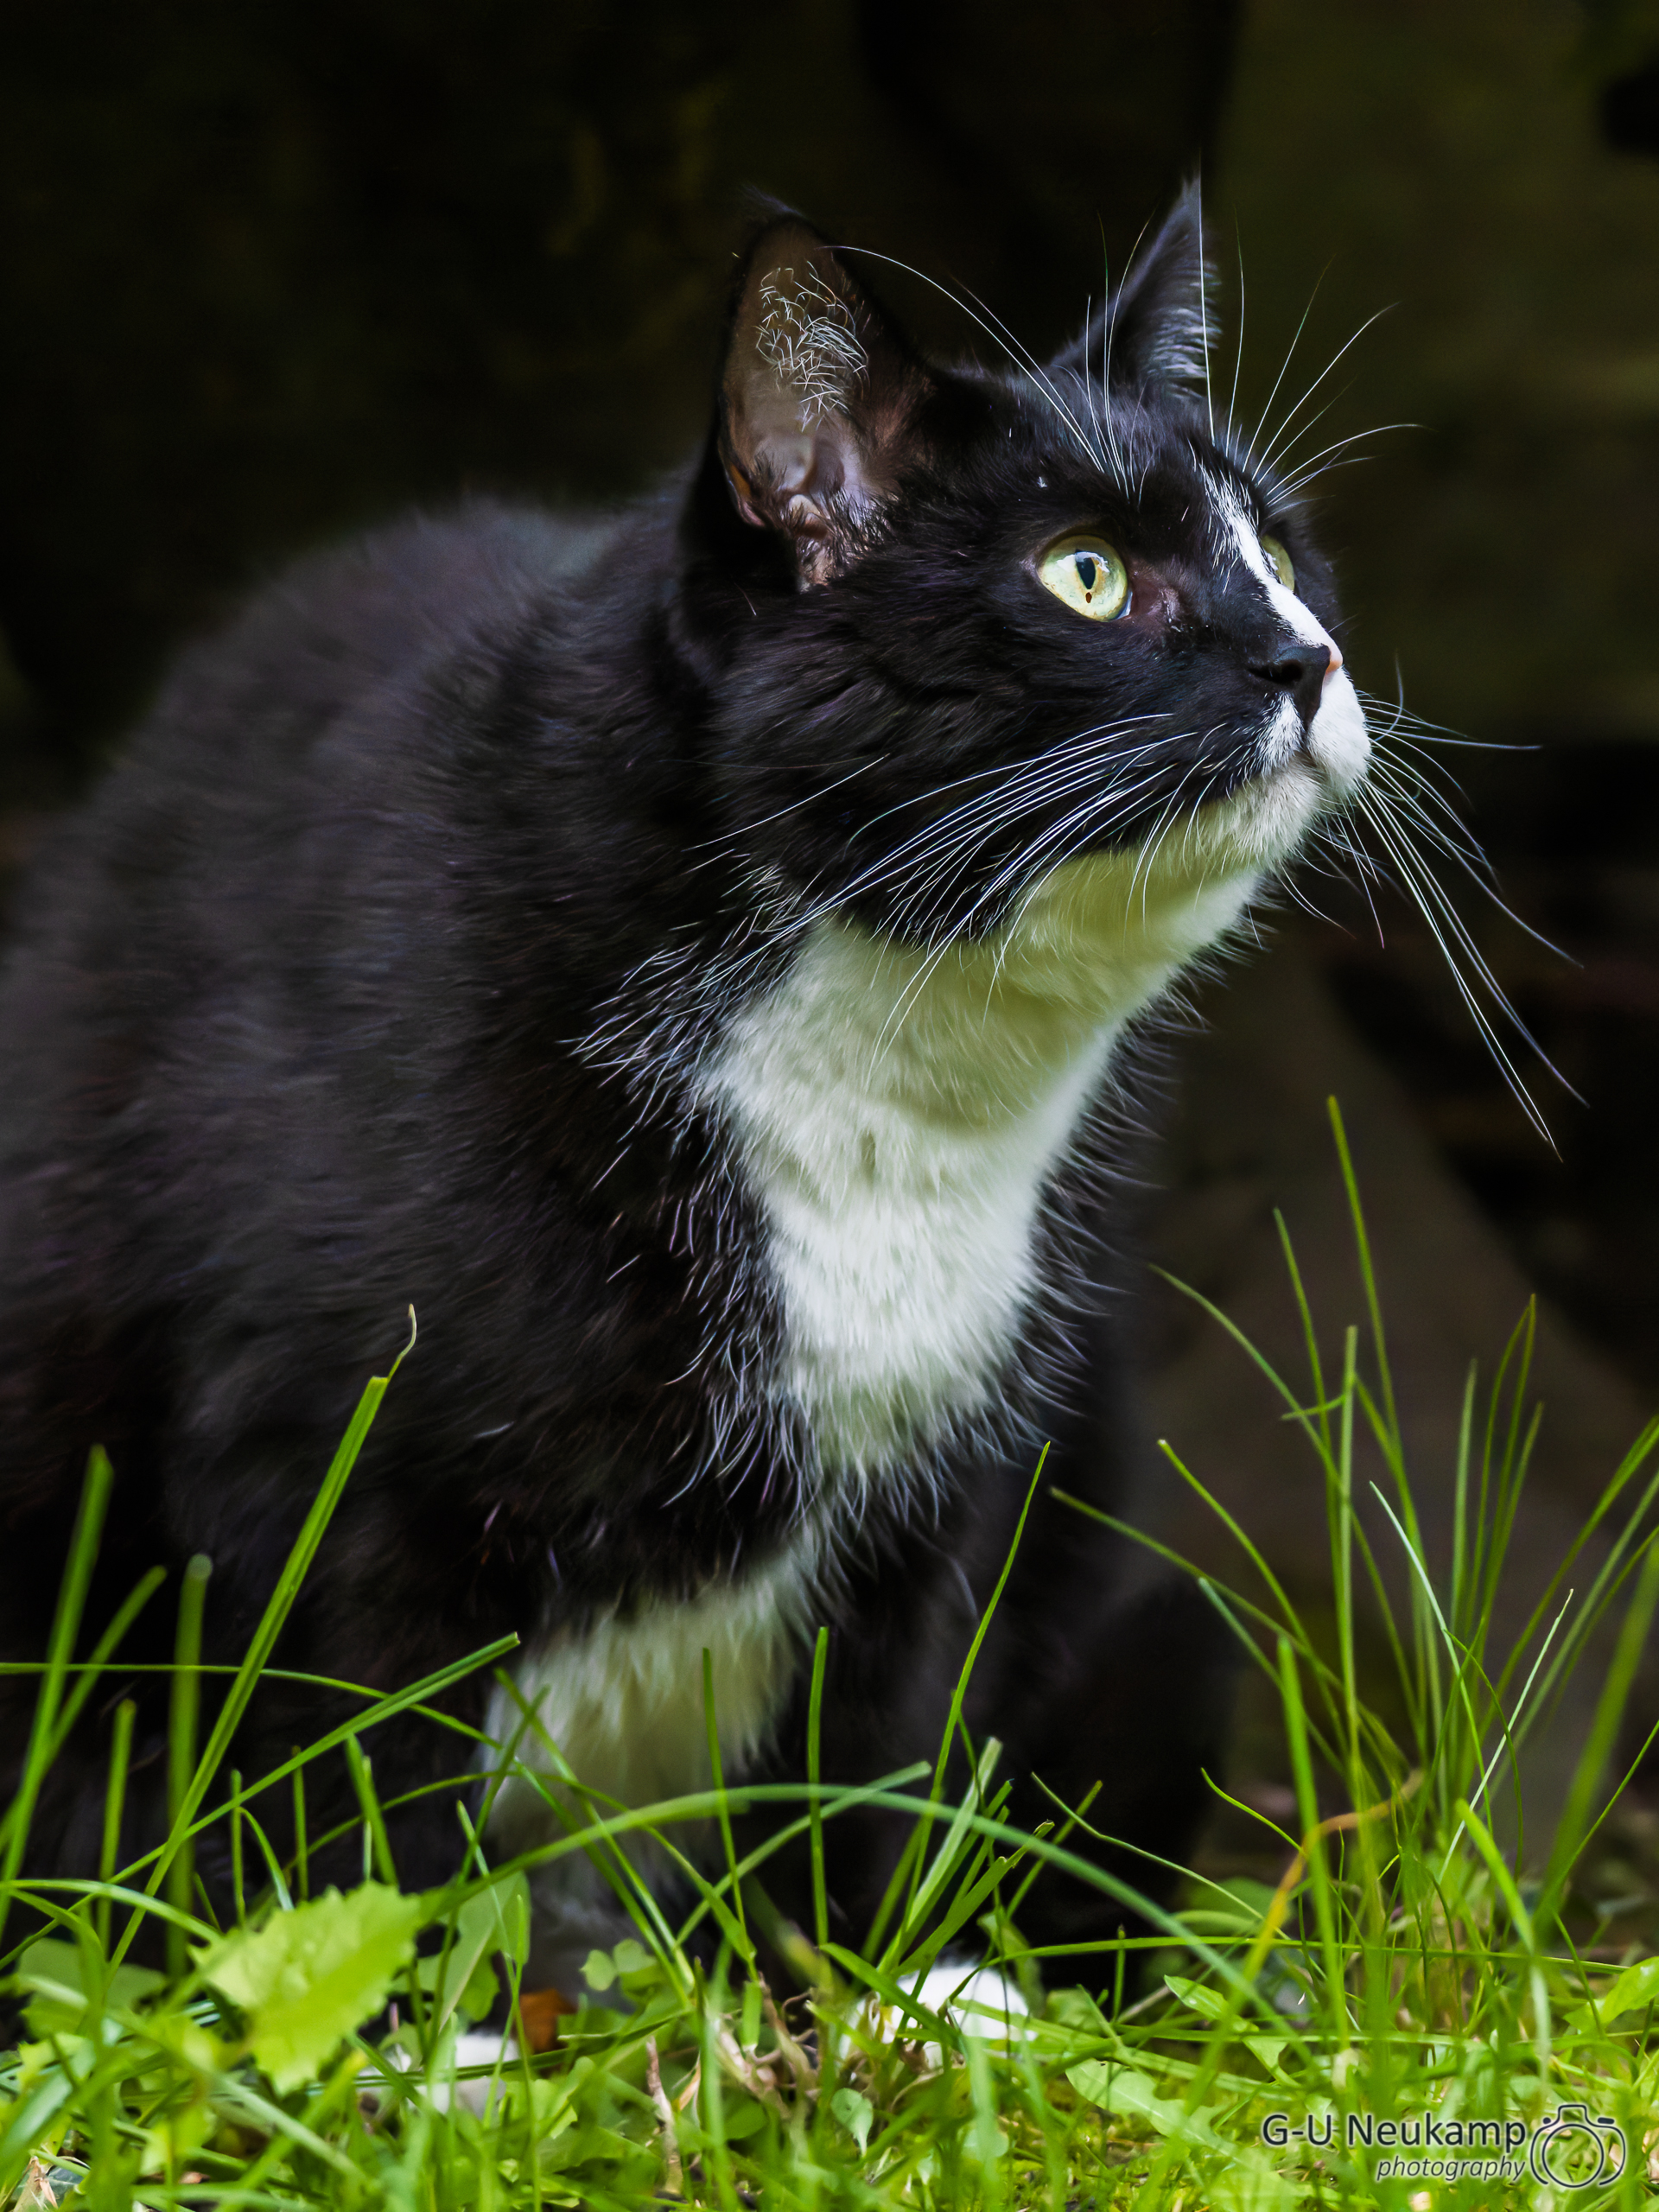
These are then displayed in the workspace in tiles. Double-clicking on a tile opens the image in detail view, the mouse scroll wheel can be used to change the magnification and the image section can be moved with the mouse. I tested the program once again with a photo of our cat Tom (he loves gift wrapping), taken at an ISO of 12,800:

The handling of the program is very straightforward. Simply select the images to be developed (in the example there is only one). Then click on the button “Process photos” and a dialog box with a few options opens up immediately:

My preferred options - method DeepPRIME and output to DNG are already activated. Therefore, all that remains is to select the destination folder and click Process. Then the algorithm already starts. But now you need to be patient. As I wrote in my article on DxO PhotoLab 4, noise reduction with DeepPRIME takes its time. On my laptop with 8-core AMD Ryzen 7-4800U and integrated Radeon graphics, I have to wait about 2 minutes until PureRAW is done with an EOS-R5 CR3 file and asks what to do with the created DNG file:

Results
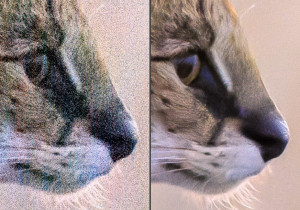
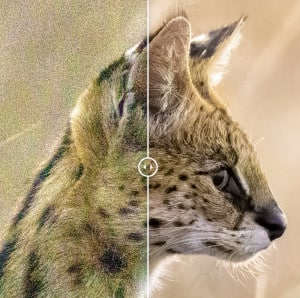
Here, the result can now be compared directly with the source material, or the file can be transferred to another program (e.g. Lightroom or Photoshop) for further processing. Naturally, the first thing that’s of interest here, is the comparative view, which DxO has integrated into PureRAW in a very nice way. By default, the original and processed versions are displayed side by side, and you can move the transition area to the left or right as you wish.

The four small icons at the bottom right allow you to configure the view. The 1:1 switch enlarges the image, so that one image pixel corresponds to one monitor pixel. This is the only way to really compare the two images. The image can be moved with the mouse and further enlarged or reduced with the mouse scroll wheel. With the two icons on the right you can choose between split and switch view. All in all, the result of the DeepPRIME algorithm is really impressive:

Here is another example:

After completion, the DNG files can then be transferred to another program for further processing using the Export to … button, in my case to Adobe Lightroom Classic. There, all further processing steps (e.g. white balance, exposure correction, tagging) can be done in the usual way.
Comparison with DxO PhotoLab
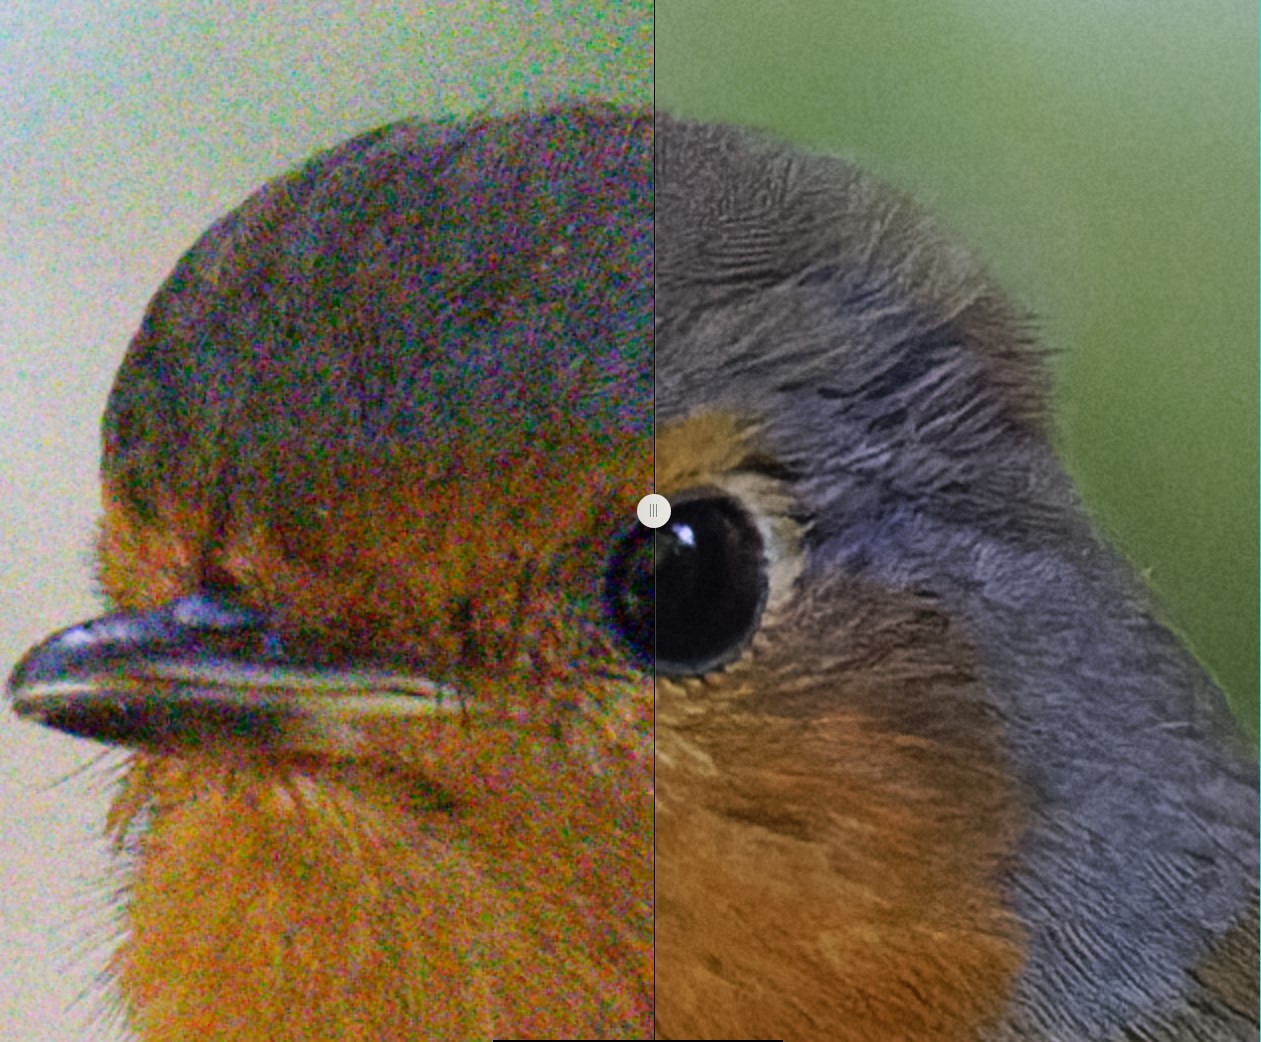
Overall, the results of PureRAW are very good, the operation is unbeatable straightforward and simple. Unlike the DeepPRIME algorithm in PhotoLab, however, no parameters can be set. Therefore I compared the results of the DeepPRIME denoising between PureRAW and PhotoLab. Again, I used the photo of our cat Tom from my PhotoLab 4 test:
The following images contain crops from it enlarged to 200%.
First, as a starting point, the result of my noise reduction (Luminance 60) in Lightroom Classic:

And here you can see what DeepPRIME can squeeze out of the image:

Again, I really like the result. Especially impressive is how the algorithm still works out the individual hairs from the very noisy image above. The difference between the processing in PureRAW and PhotoLab is small. However, I noticed that the DNG in PureRAW is already clearly sharpened. In my processing in PhotoLab Elite, the DNG returns to Lightroom without much sharpening, so it needs to be sharpened there. I did that in the above image on the right with the LR default setting (Amount 40, Radius 1.0, Details 25 and Masking 0). With the already sharpened DNG file supplied by PureRAW, no more sharpening at all should be applied in LR (amount 0), because the image will already appear significantly over-sharpened at the LRC default setting (amount 40).
Conclusion
DxO’s DeepPRIME noise reduction delivers results that are absolutely stunning. With modern digital sensors, the possibility of noise reduction now allows shooting at ISO values that one would not have dared to dream of a few years ago. Not to mention the era of analog film photography: there, the end of the line was usually already reached in color at ISO 400 and B/W at ISO 1,600. I now confidently use ISO values up to 12,800 with my Canon EOS R5.
PureRAW’s results are almost identical to those that can be achieved with PhotoLab 4. This is not surprising, since the underlying algorithm DeepPRIME is identical. The operation of PureRAW is simple and straightforward.
However, you don’t get this for free. DxO PureRAW costs 129,-€, more than half the price of DxO PhotoLab 5 Elite (219,-€), which also includes the Lightroom plugin and a complete RAW converter. However, as an holiday season offer, PureRAW is currently available for €89.99.
Besides the relatively high € costs, the processing with PureRAW however also costs:
Storage space and time
The DNG files created with DxO PureRAW (and also DxO PhotoLab 4) using the DeepPRIME algorithm are more than twice the size of the CR3 raw files from my Canon EOS R5. The processing speed is highly dependent on the computer hardware and the built-in graphics card, but you can safely expect processing times in the minutes range per image. As mentioned above, my laptop with the 8-core AMD RYZEN 4800U needs a good 2 minutes for a 45 megapixel RAW of my EOS R5.
I can’t test how this looks with more potent processors and graphics cards at the moment, but would be happy to hear comments with timings on other machines. All in all, probably no one will use PureRAW on all his images. It makes more sense to process only the images that will certainly benefit from it.
This now brings me to my next point:
Hello DxO - Please give me a Lightroom plugin!
I wish DxO would include a plug-in for Lightroom with PureRAW, similar to PhotoLab. Since processing with the DeepPRIME algorithm is, as mentioned, extremely time-consuming, I only process those few images with it, that really profit from the algorithm.
My usual workflow is this: first, I import and edit all my images in Adobe Lightroom Classic, as I am used to. I have configured Lightroom so that all images are already denoised at import, depending on their ISO value. After importing, I first delete everything that is obviously misshapen - blurry images, glaringly wrong exposures, obviously bad images (sometimes there are those even with me 😉 ) etc. The remaining images are reviewed one by one and briefly edited (exposure, white balance, keywording). At last I rate the images and look at the better ones again more closely. Then I edit the best ones more extensively.
From them, I only transfer those images to PhotoLab via the plug-in that require a better noise reduction than the one integrated in LRC. In my experience, this only applies to a small part of the pictures I take with very high ISO values or where the shadows had to be increased considerably. For ISO values up to about 1600, Lightroom Classic already does a pretty good job these days.
The new PureRAW, on the other hand, is designed to be executed as an intermediate station even before the import of the new images into Lightroom. However, this would take a good 3 hours with 100 shots of my Canon EOS R5 on the one hand and double the memory requirement on the harddrive from 4.5 to a good 9 GB on the other.
So I will continue to use DxO PhotoLab Elite, which I already bought, even though I only use it because of the DeepPRIME algorithm.
However, if I didn’t have it yet, I would seriously consider using PureRAW. The results are just as good as with PhotoLab 4/5, and the program is straightforward and easy to use. Unfortunately, though, PureRAW doesn’t integrate into my usual editing process with Adobe Lightroom Classic because of the (still) missing plug-in.
I can only recommend anyone who has ever noticed noise in his or her pictures to download the trial version of PureRAW* once and try the DeepPRIME denoising. You can get amazing results even out of old noisy images.
*= AffiliateLink