The Canon EOS R5 and R6 offers a new function in its menu, the “Focus bracketing”. The camera takes an editable number of pictures in quick succession and shifts the focus backwards in adjustable steps. The plane of sharpness thus moves from image to image towards the beckground.
Some optical basics
All lenses focus on only one plane at a certain distance, called the “focal plane” and the distance to this plane can be read directly from most lenses. In front and behind of this plane, all objects are displayed more and more blurred with increasing distance.
Our eyes are no different. For accommodation, it they can change the refractive power of the eye lens to make us see sharply either near or far (i.e. an internal focusing 😉 ). With increasing age, our eye lens gets more and more rigid, then the only thing that helps is wearing glasses - Ok, I’m digressing…
So back to the camera: The range of sharpness depends on the lens aperture, the focal length and the distance to the subject. The area in front and behind of the focal plane which is still sufficiently sharp is called “depth of field”.
Further information on this topic can be found in the Wikipedia article. I do not want to go into further details here. But what you should know is,
that the depth of field decreases when
- the aperture is opened further (smaller aperture number)
- a longer focal length is used (telephoto lenses)
- you get closer to the object (macro photography)
You can control the depth of field during shooting by selecting the aperture. In many cases, a depth of field as shallow as possible is even desired in order to isolate a subject. Fast lenses are particularly suitable for this purpose.
Things are different if you want to display a three-dimensional object completely in focus. In some situations even the smallest aperture is not sufficient. This is especially common with macro shots, i.e. small objects, where only a minimum depth of field can be achieved even with a very small aperture. For example, the depth of field in the 1:1 macro range is only 2 mm at an aperture of 16. A depth of field calculator for the macro range can be found here, for example.
An example
But even when photographing with telephoto lenses, the depth of field is sometimes not sufficient. This is shown e.g. in the following picture, which was taken at 600mm focal length at an aperture of 32:
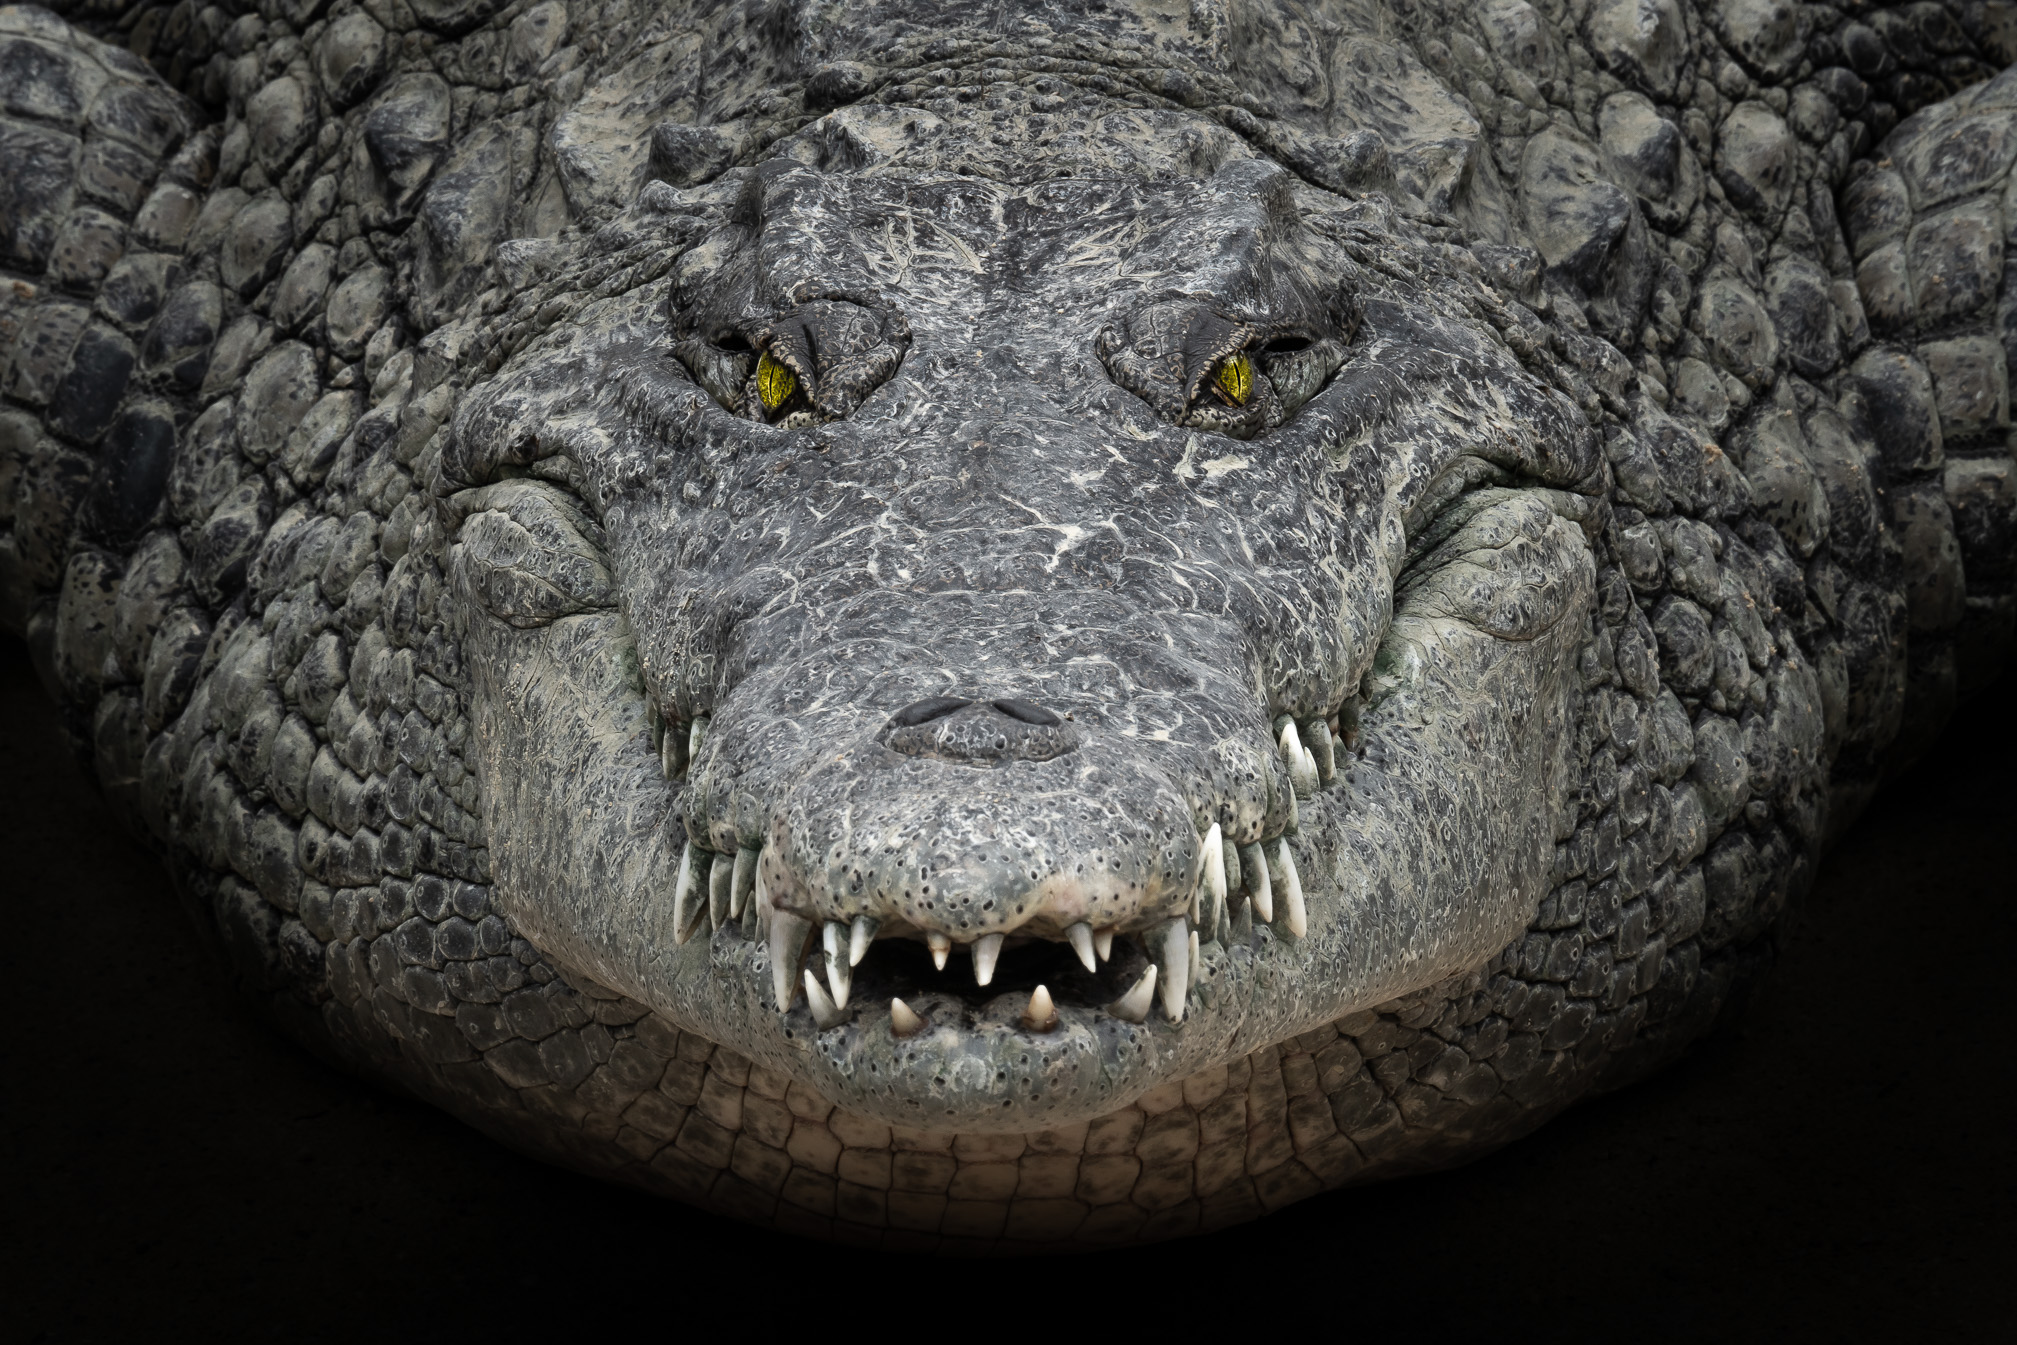
Even at aperture 32, the depth of field is only about 30cm at a distance of approx. 8m from the crocodile at 600mm focal length. So I took an additional manual focused series of 9 pictures at aperture 8 with different focal planes, at that time manually focused with my Sony Alpha 7R III and the Sigma 60-600mm DG OS HSM. I then “stacked” the 9 images in Photoshop (more about this later), resulting in the following image, which is now sharp from front to back:
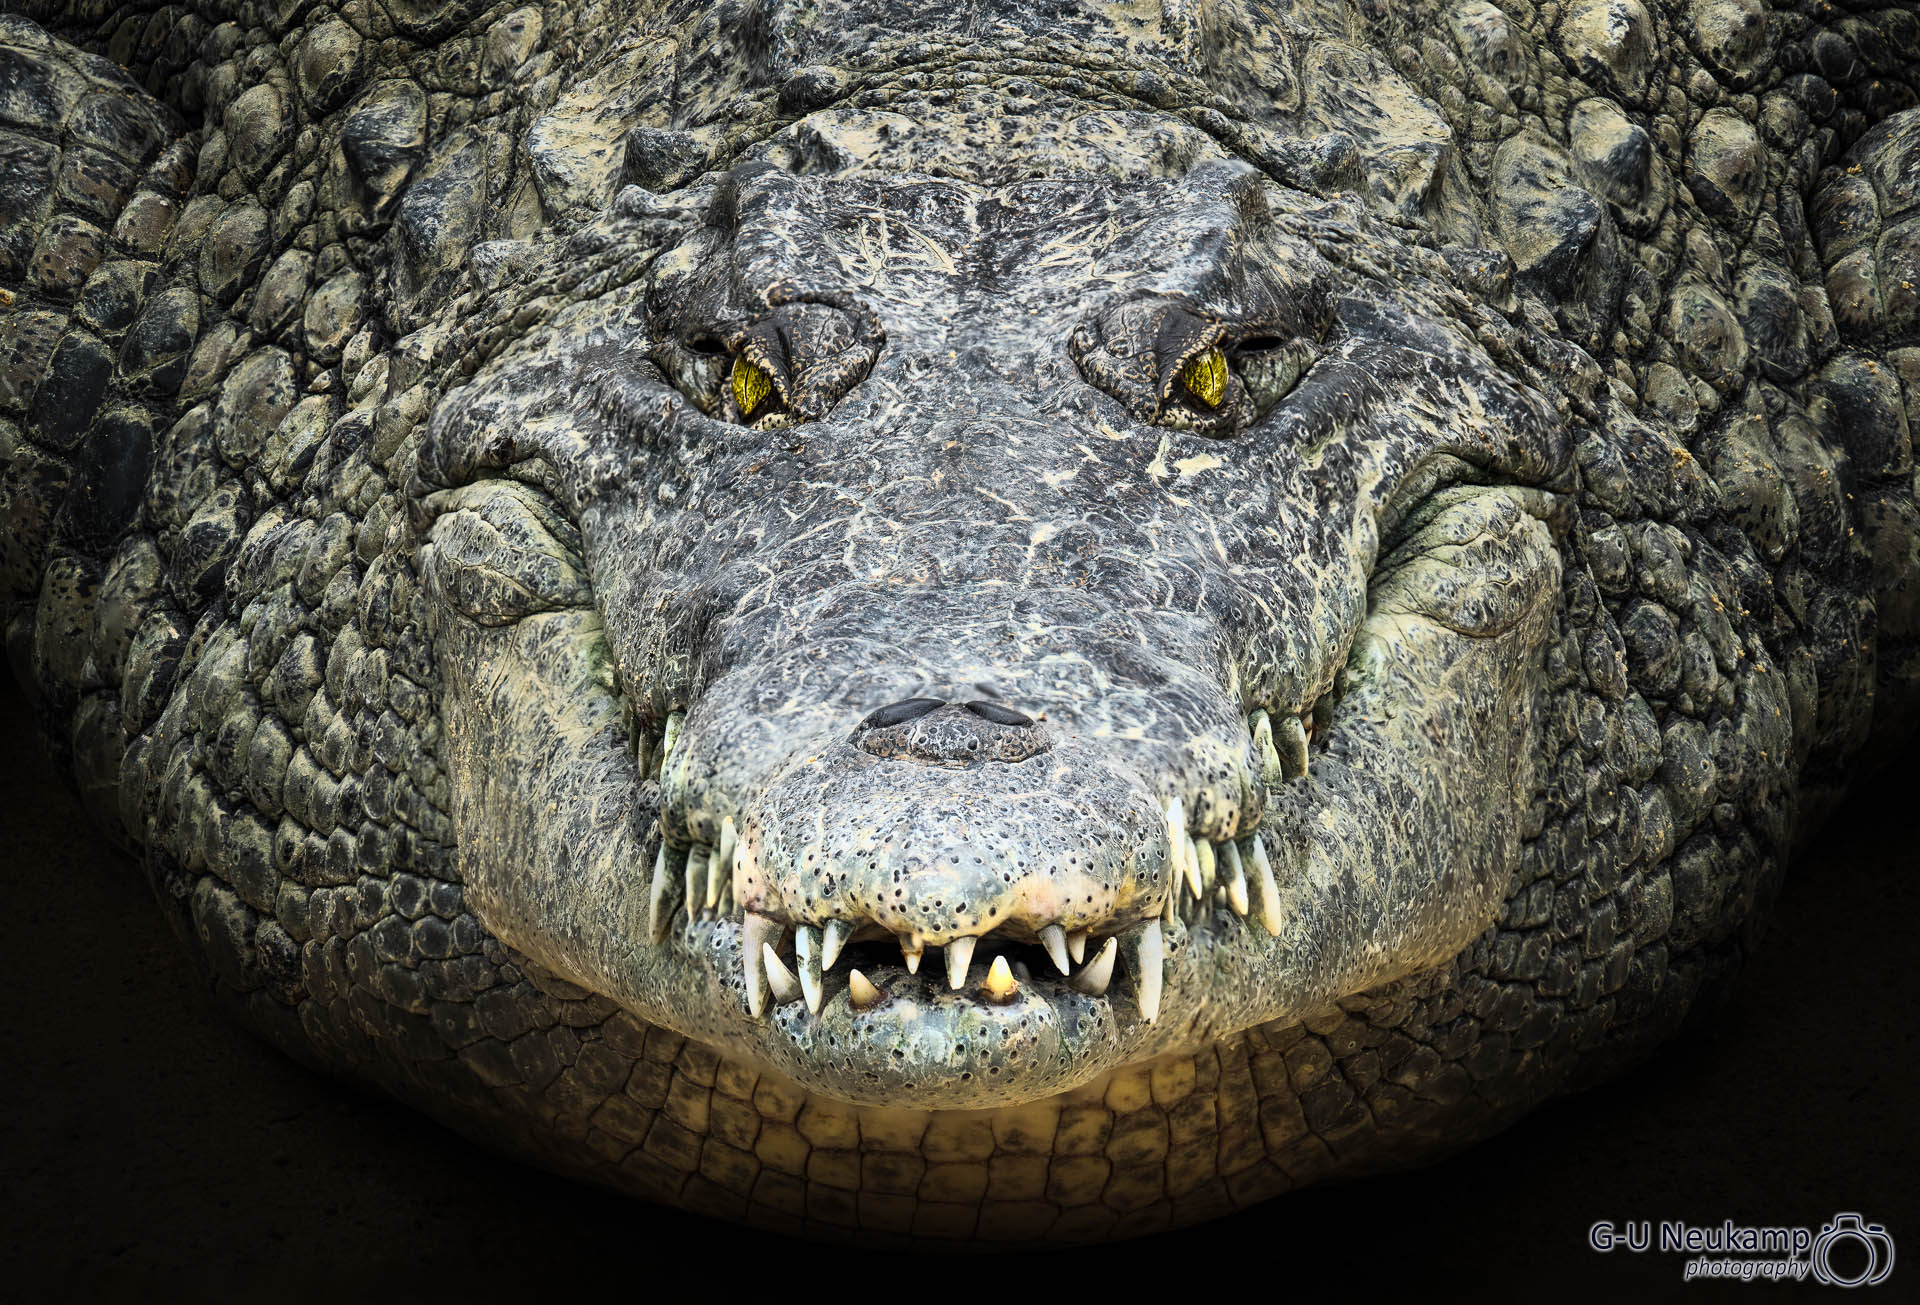
Manual adjustment of the focus planes is prone to error. A step size suitable for the selected aperture must be selected so that the individual images fit together seamlessly. In addition, it is time-consuming and therefore only works reasonably from a sturdy tripod and with objects that hardly move at all. Fortunately, the crocodile kept relatively motionless, but while stacking, I noticed some artifacts due to breathing movements, which required manual post-processing in Photoshop. But all in all, it worked out quite well, I was lucky. But since then, I have completely forgotten about Focus Stacking.
First (focus) steps with the EOS R5
Now the Canon EOS R5 (and also the R6) has a Focus Stacking automatic built in. After the EOS RP and the EOS 90D, which were capable of this, but which I personally have never used before, this is a novelty with Canon bodies. Other manufacturers, like Olympus and Panasonic, have been supporting focus stacking already for years. This new option made me curious again.
Menu options
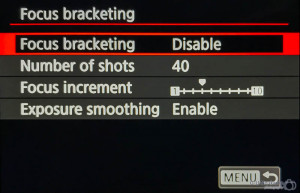
The corresponding menu item “Focus bracketing” can be found in the SHOOT5 menu. When the menu item is selected, the following message appears on the display:
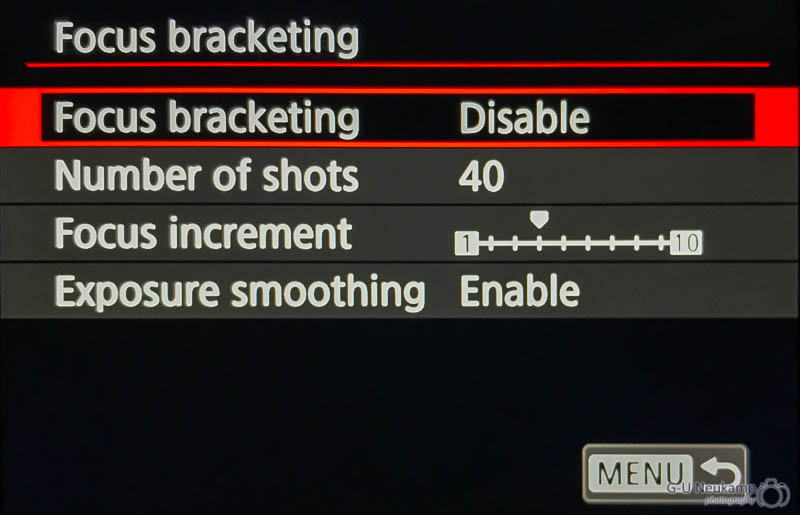
On the first line, the function first has to be activated. In the following three lines, the number of exposures (up to 999), the size of the focus steps and an exposure smoothing can be selected.
Number of shots
The number of steps required depends on the selected aperture and the desired range of focus. Unfortunately, Canon does not provide any clues, so there is no way around trying it out. The focus run always starts at the set distance. In the following shots, the focus is shifted backwards by the selected step size. As soon as the “infinite” setting is reached, bracketing stops, even if the number of set steps has not yet been reached.
Focus increment
The size of the adjustment steps can be selected on a scale from 1 to 10. According to Canon, the step size depends on the aperture set, but unfortunately there are no more precise selection guidelines. To be on the safe side, I have chosen the step size “2” in my recent experiments, but Canon seems to recommend the step size “4”, at least this value is marked grey in the scale.
Exposure Smoothing
This option compensates for brightness variations between individual images. This is especially relevant for macro lenses, since the effective aperture differs from the set aperture at high reproduction scales. For example, at 1:1 macro setting with a dialed-in aperture of 8, the effective aperture is 16, so only 1/4 of the amount of light reaches the sensor as it would, if the lens were set to “infinity”.
Focus bracketing with the Canon EOS R5
The Canon EOS R5 automatically switches to the electronic shutter during focus bracketing. This has the advantage, that with sufficient light and a correspondingly short exposure time of 20 frames/second, the process is very fast, silent and free of vibrations. 40 pictures are so captured in just 2 seconds. The series starts directly with the shutter release and continues to the end, even when the shutter button is released.
This high speed, the good stabilization by the IBIS and the lack of vibration due to the electronic shutter, allows to use the focus bracketing without the need for a tripod. The disadvantage of the electronic shutter, however, is that it only supports exposure times up to 1/2 second (for reasons I don’t understand, the Sonys don’t have this limitation). Focus bracketing at night is therefore not possible with the R5 😉 .
I tried out the new option several times during my vacation without using a tripod. Here are a few examples:
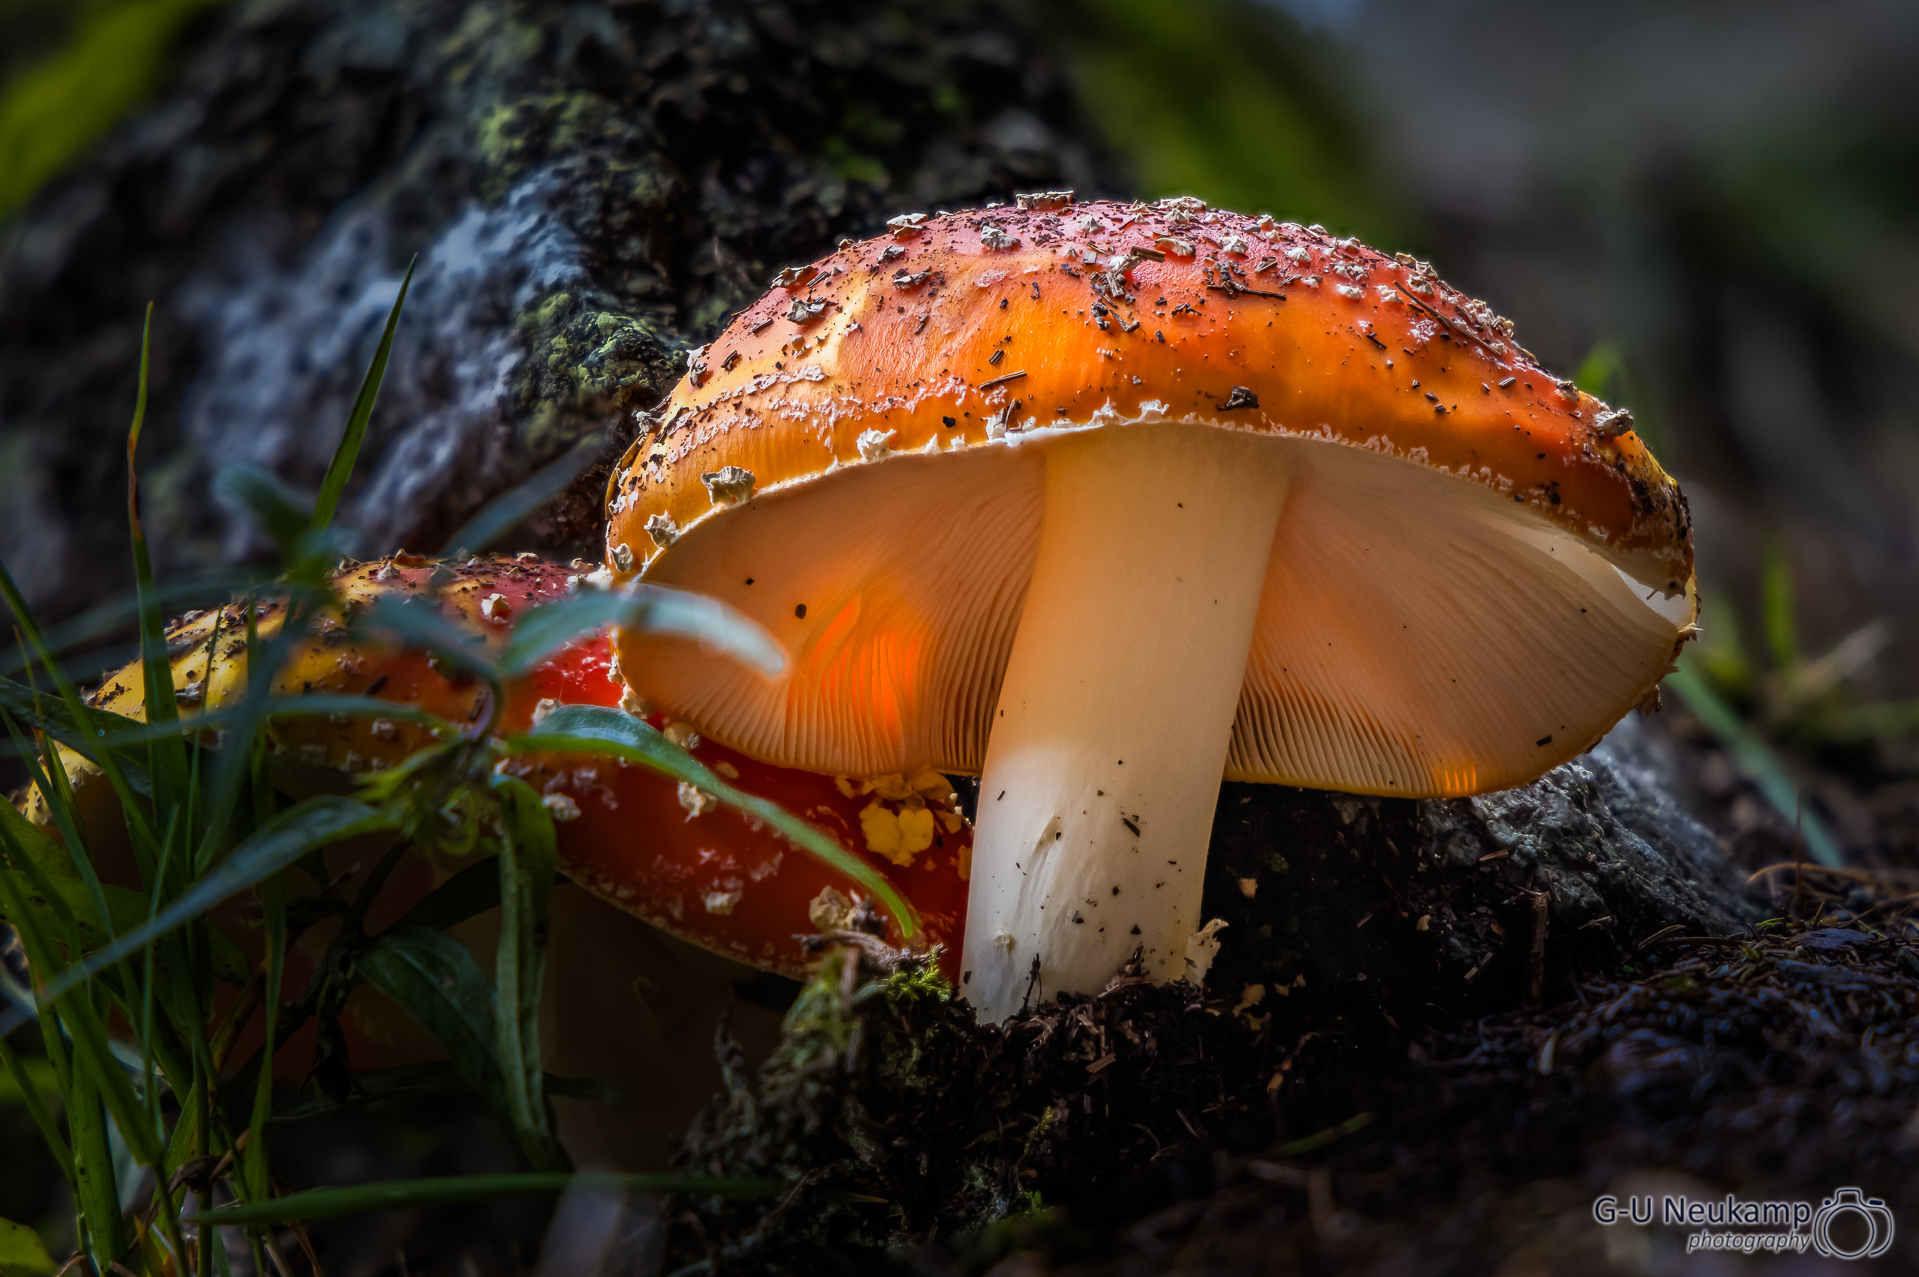
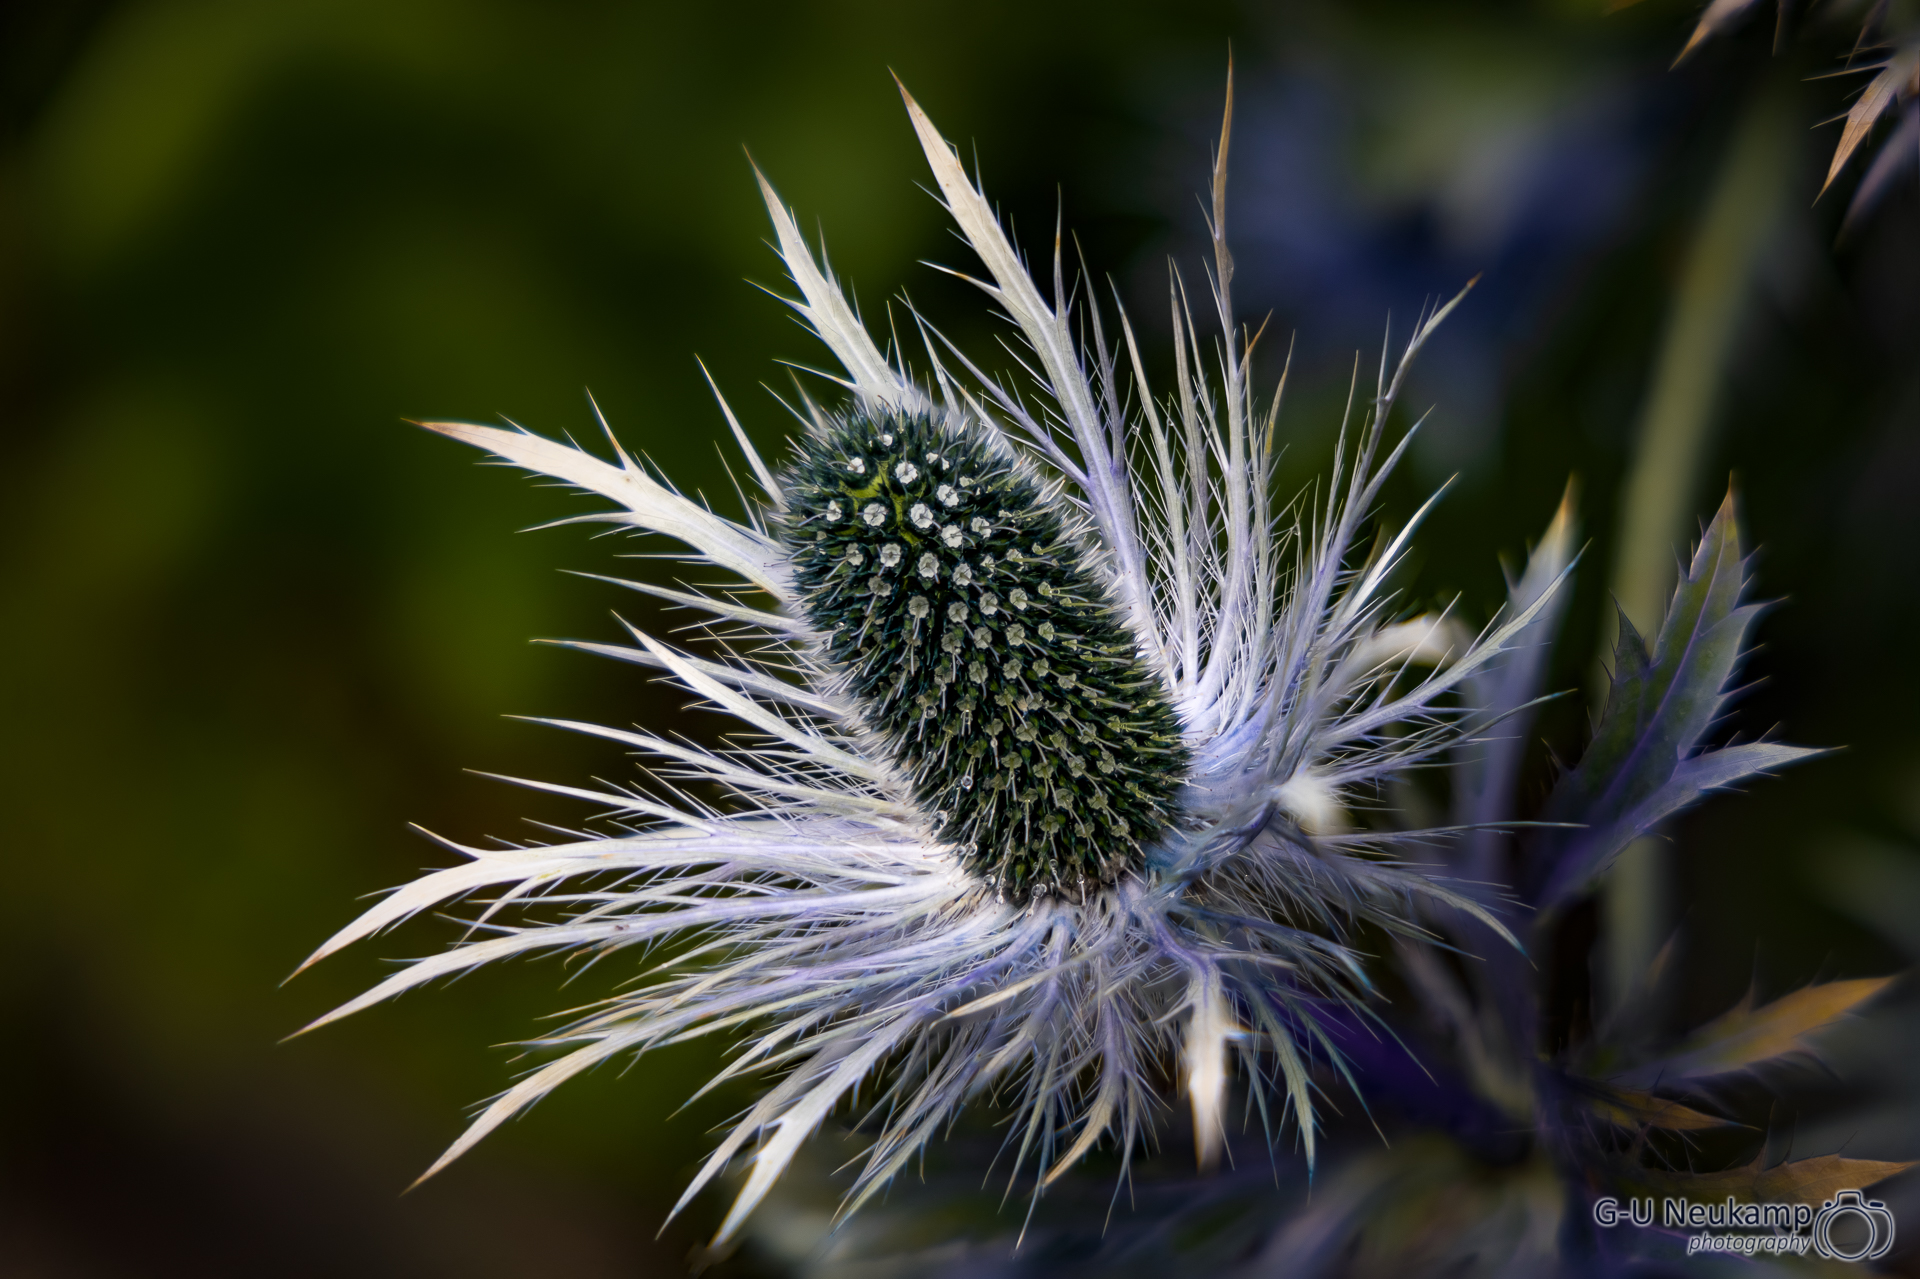
In the following I show a single image from the series to illustrate the low sharpness range. For these tests I took all shots with the RF 24-105 f/4L at open aperture:
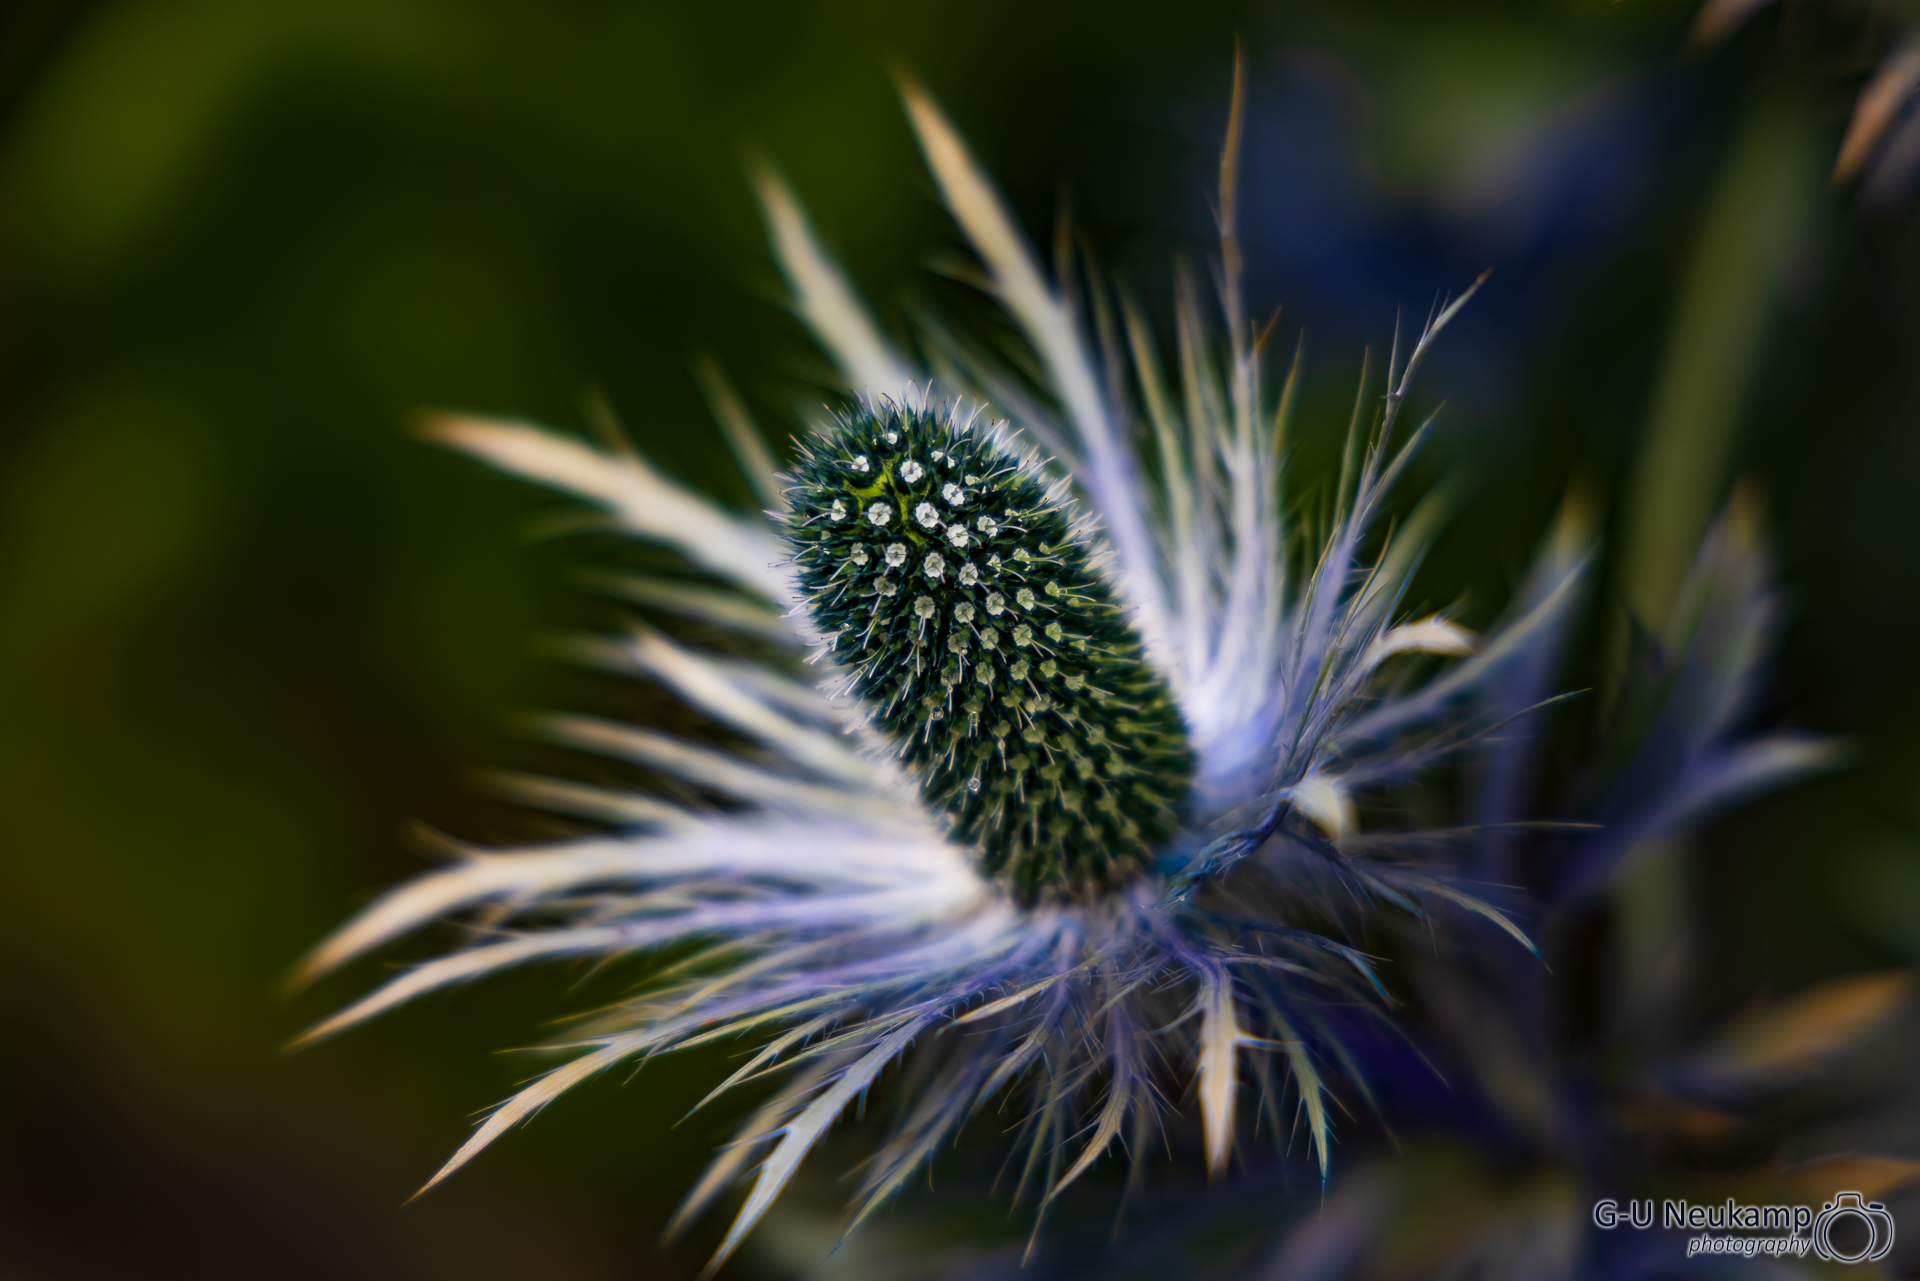
I took all these pictures with the RF 24-105mm f/4L IS USM without tripod and stitched them together in Photoshop and Helicon Focus 7. Since I was pleasantly surprised by the result, I decided to take a closer look at it.
Stacking, how does that work?
If you are interested in more information after the first results, as I was, they are coming here:
After the Focus-Stacking series has been taken, the real work begins: the stacking of the photos. I will present two approaches I have tried so far.
Adobe Lightroom + Photoshop
If you, like me, use the Adobe Photo Subscription with Lightroom Classic*, you already have everything you need. The Stacking Series can be imported into Lightroom as usual and stacked in Photoshop.
Tip: If you take a black image before and after the Stacking Series, the Stacking Series is much easier to identify
In Lightroom Classic I have got used to edit one of the images of the series first (white balance, brightness, contrast, highlights/shadows, color corrections / masks etc.) and then synchronize the settings with all images of the stack. If the images are prepared in this way, they must be transferred with the menu item
Photo| Edit in | Open as Layers in Photoshop…
to Adobe Lightroom. The images are then rendered in Lightroom and transferred to Photoshop (in my case in the set high resolution 16bit TIFF format) as single layers. With the EOS R5 this means 256MB per image, which is a total of 7.5GB of data with 30 planes. Depending on the number of focus planes and the performance of your computer, this takes some time. On my 16 core AMD Threadripper 2950X with fast NVMe SSD and 32GB Ram the process takes almost 3 minutes for 30 images.
Three more steps have to be done in Photoshop. First, all imported layers must be selected. You can do this by pressing CTRL+ALT+A (Windows) or CMD+ALT+A (Macintosh) or directly by selecting them with the mouse in the layer selection box.
Then, by selecting
Edit| Auto-Align layers…
the shots can be placed exactly one above the other. The “Auto” default setting in the dialog box is well suited for this purpose. In my case with 30 layers, this process again takes about 3 minutes.
Last, but not least, there is the third and last step, the crossfade. This is done in Photoshop with the menu item:
Edit| Auto-Blend Layers…
In the dialog box that appears here, the default setting “Stack Images” can also be used again. I activate the option “Seamless Tones and Colors”. Whether the “Content Aware Fill Transparent Areas” is selected for or not is a matter of taste. If the transparent areas are not bordered by important details in the image, this usually works quite well. After confirming the dialog box you have to wait again. In the case described above, the process took about 4 minutes until the final image is ready:
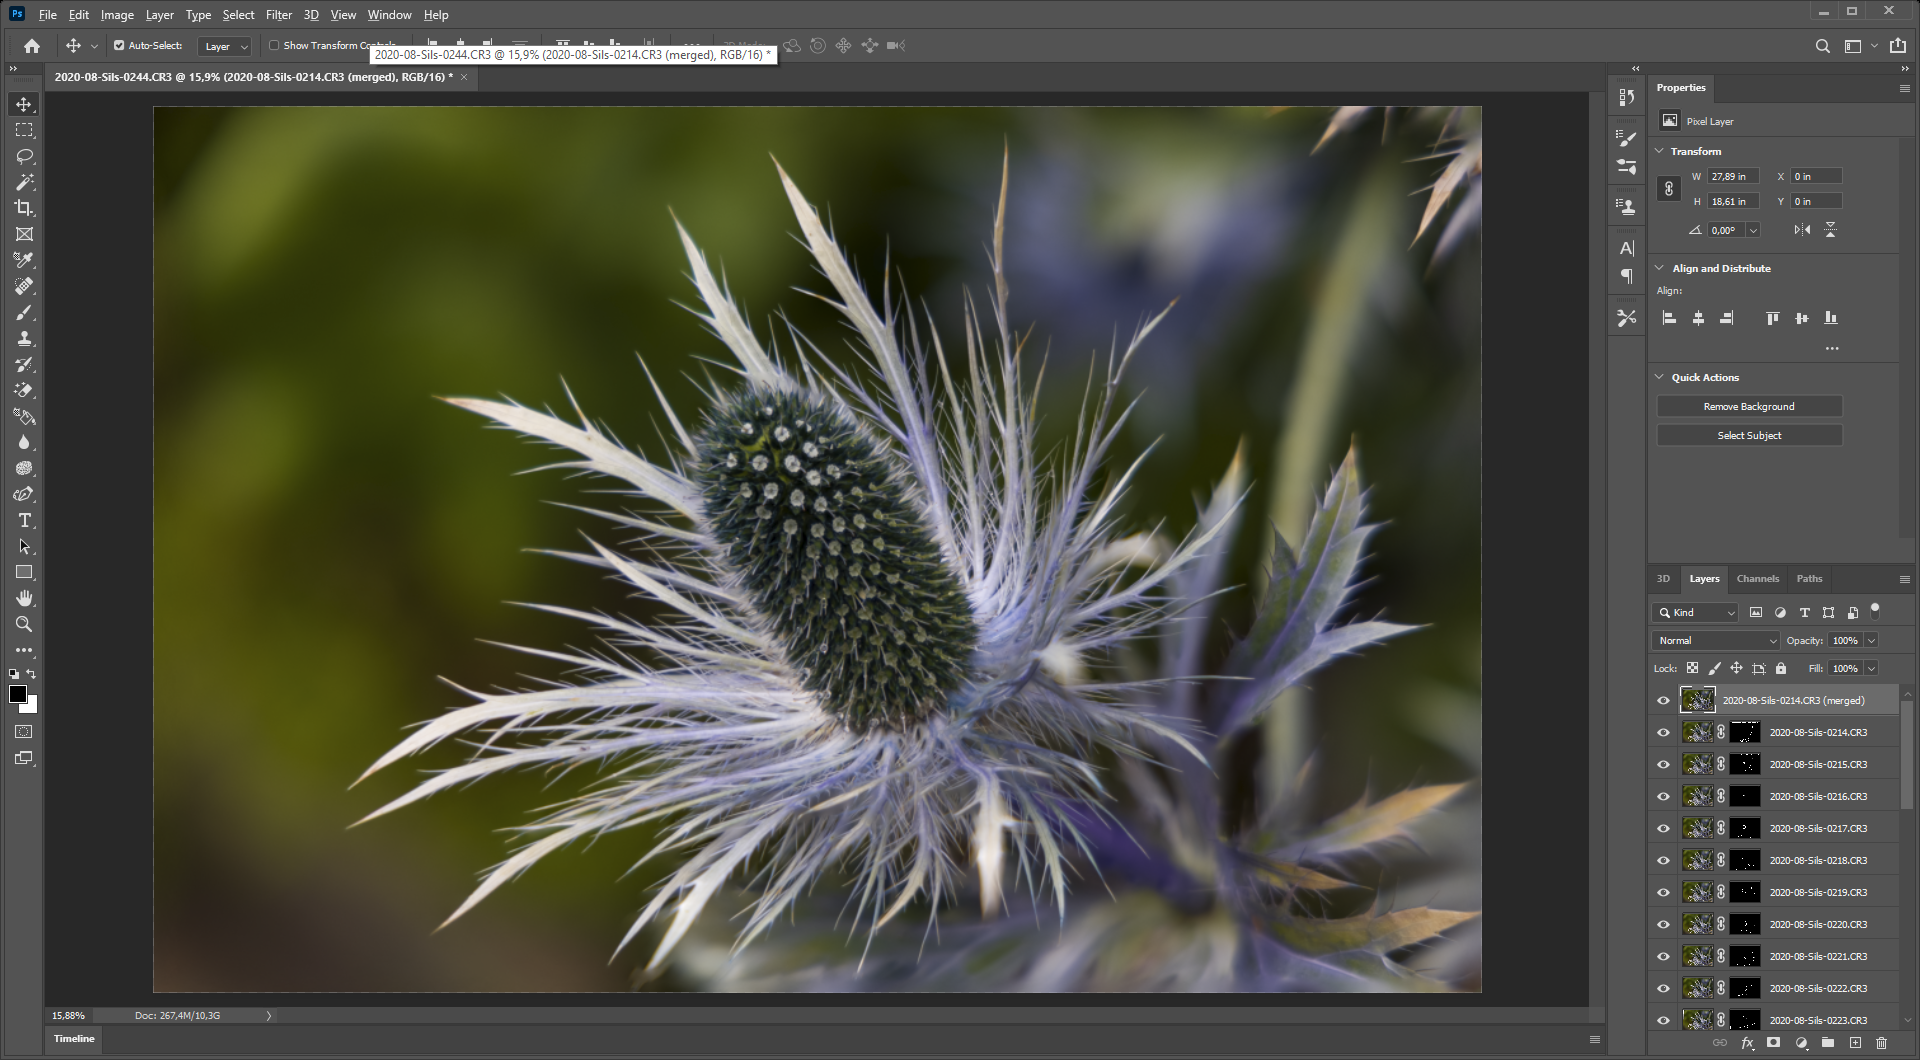
Photoshop created masks for the individual layers, which let only those parts shine through in each image, which are in focus. Usually this works quite well, but stacking errors (like double contours or blurred areas) can occur which then have to be painstakingly corrected in the individual layer masks. This is possible, but is extremely tedious.
The result is very acceptable, but a closer inspection reveals small defects at the edges:
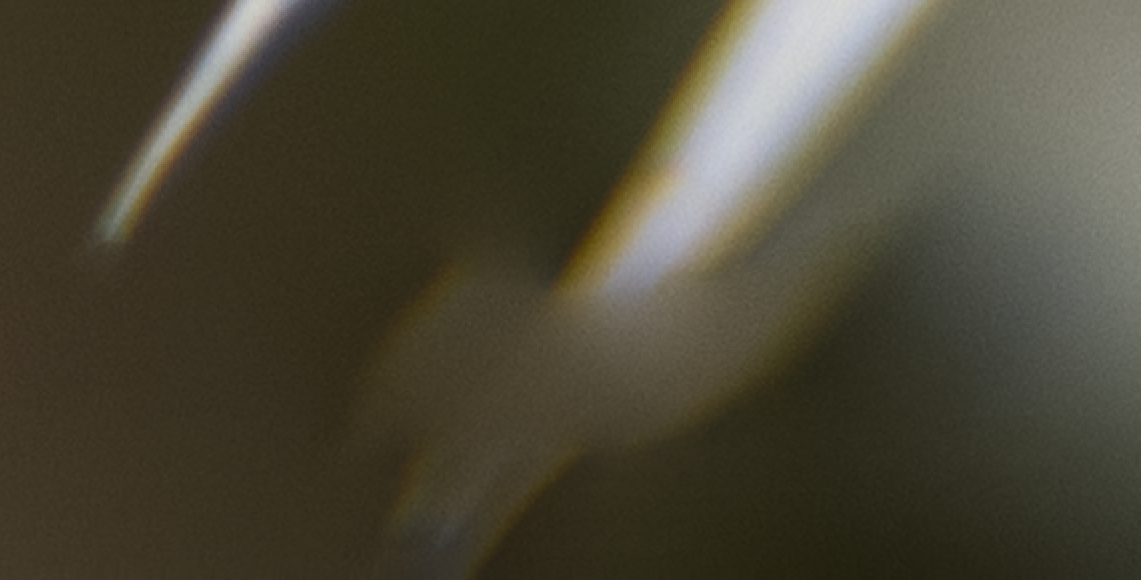
This error occurred because there was no sharp image in the series of the respective part of the leaf. Since the shots were taken without a tripod, the camera moved slightly between the individual shots and this detail was not included in the shot of the corresponding layer. These mistakes can now be corrected in detail, but the easiest way is to crop the image accordingly, that’s how I did it. When you are finally satisfied with the result, the layers can be combined. This is done by the menu item:
Layer| Flatten image
Then you can leave Photoshop, accepting the question “Save changes to Photoshop document XXX before exiting? Photoshop then saves the newly stacked image in the same folder where the stack is located and passes it back to Lightroom, where it appears in the film strip.
All in all, the result with Lightroom and Photoshop is quite good, but in this case the editing took a good 15 minutes - that has to be done faster, right?
Yes, is it actually possible, for example with
Helicon Focus from HeliconSoft
Helicon Focus is a program specialized in focus stacking. A for 30 days fully functional trial version can be downloaded directly from HeliconSoft via the following links:
Helicon Focus for Windows 7 / 8 / 10
Helicon Focus for Mac OS 10.13 and later
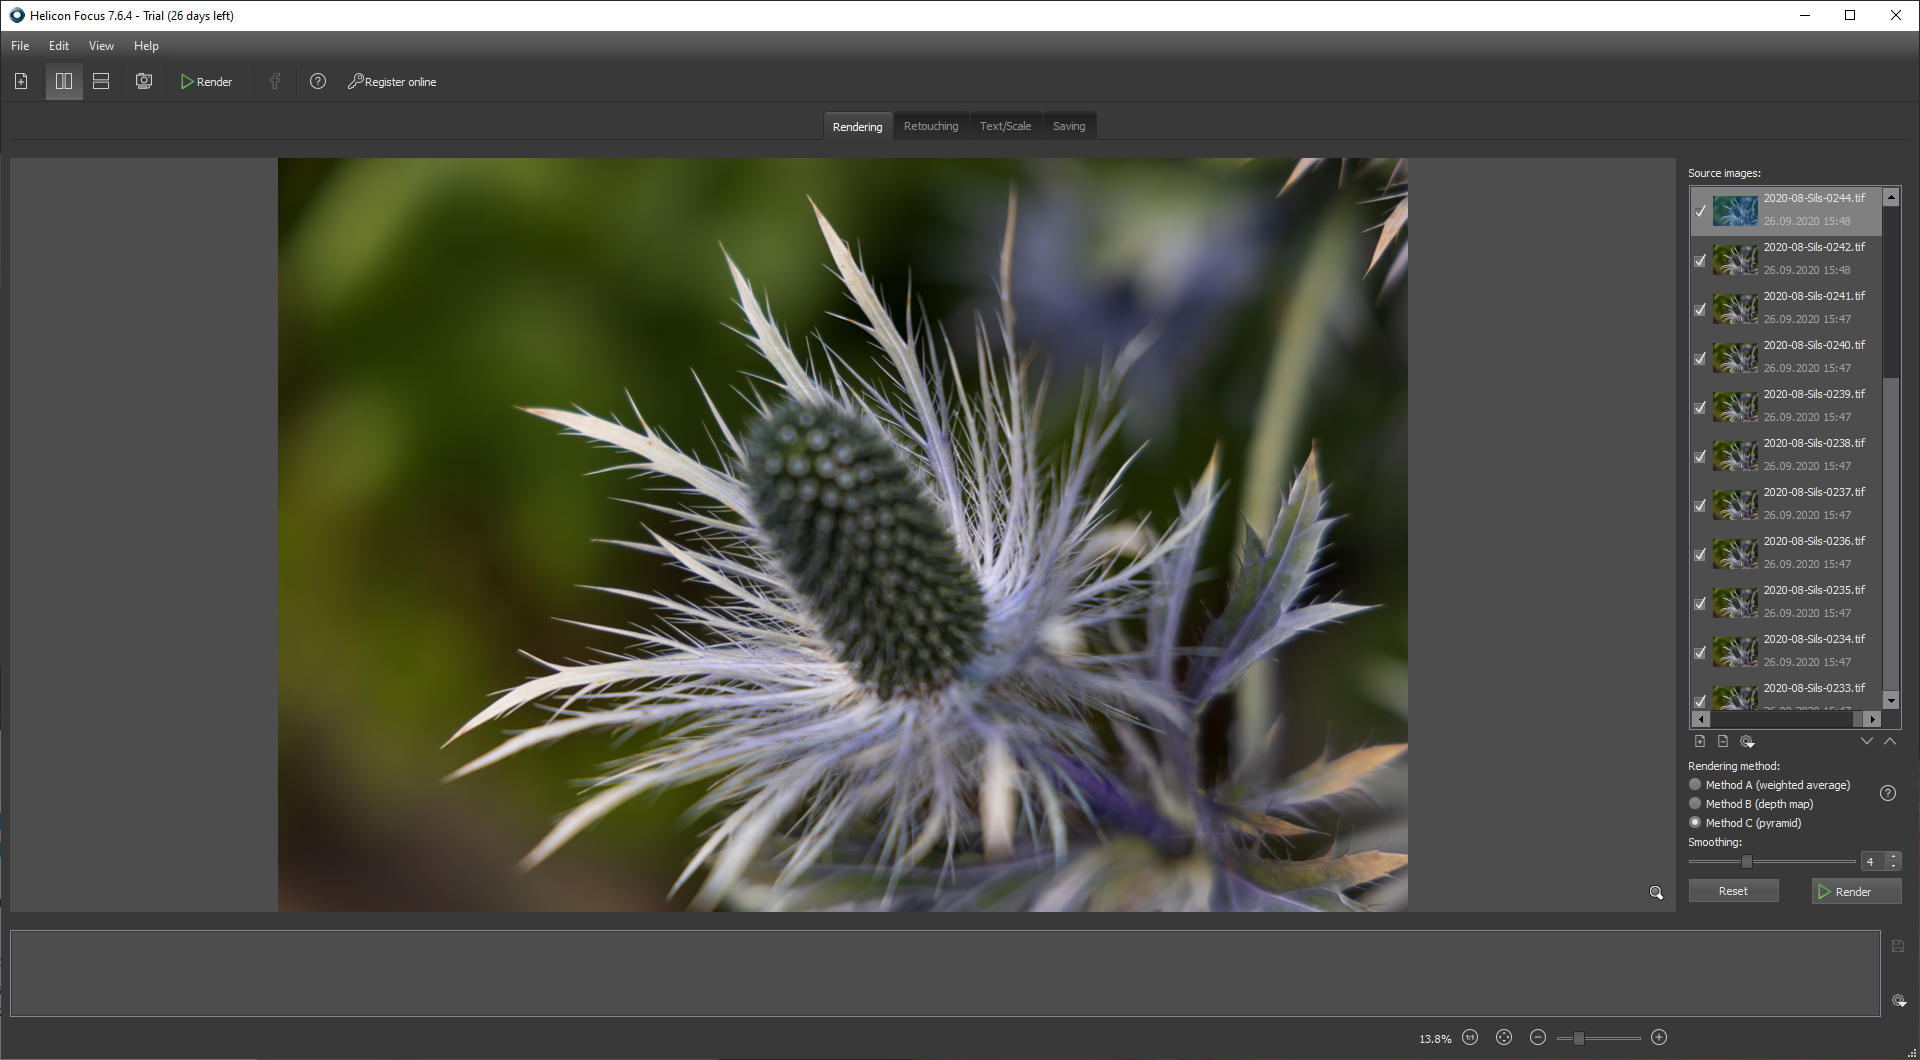
For more info, visit the HeliconSoft website. I have tried version 7.6.4. The program comes with a plugin for Adobe Lightroom, which is automatically set up during installation and is available immediately after restarting Lightroom. So the processing of the stack can be started comfortably from Lightroom, similar to the way it works with Photoshop. The first steps are therefore the same as with Lightroom. When all images in the stack have been processed, they are again selected and Helicon Focus is activated via the menu item:
File| Plug-in Extras| Export to Helicon Focus…
Lightroom now exports the images of the stack to a temporary directory (the path can be selected in the Lightroom Add-on Module Manager if desired) and starts Helicon Focus, if necessary:
This process alone is much faster, it takes only about 1 minute for 30 images of the R5 on my computer (AMD Threadripper 2950X with 16 cores, 32GB Ram, NVMe SSD).
If the images have been transferred to Helicon Focus, there are now 3 rendering methods to choose from
A: weighted average
B: depth map
C: pyramid
In addition, different parameters can be selected for the individual methods. So far, I got the best results with method C (pyramid). But in Helicon Focus the different methods can easily be tried one after the other and the results can be compared. The individual results are stored temporarily and can be displayed at any time by selecting them in the small film strip at the bottom. There you can choose the best result and save it.
The rendering of the stack is blazing fast compared to Photoshop. Helicon Focus apparently uses the existing processor cores much better than Photoshop can. My example stack with the 30 images of the Miss Willmott’s ghost was rendered in 15 seconds using method C, Photoshop needed 6 minutes (aligning and blending).
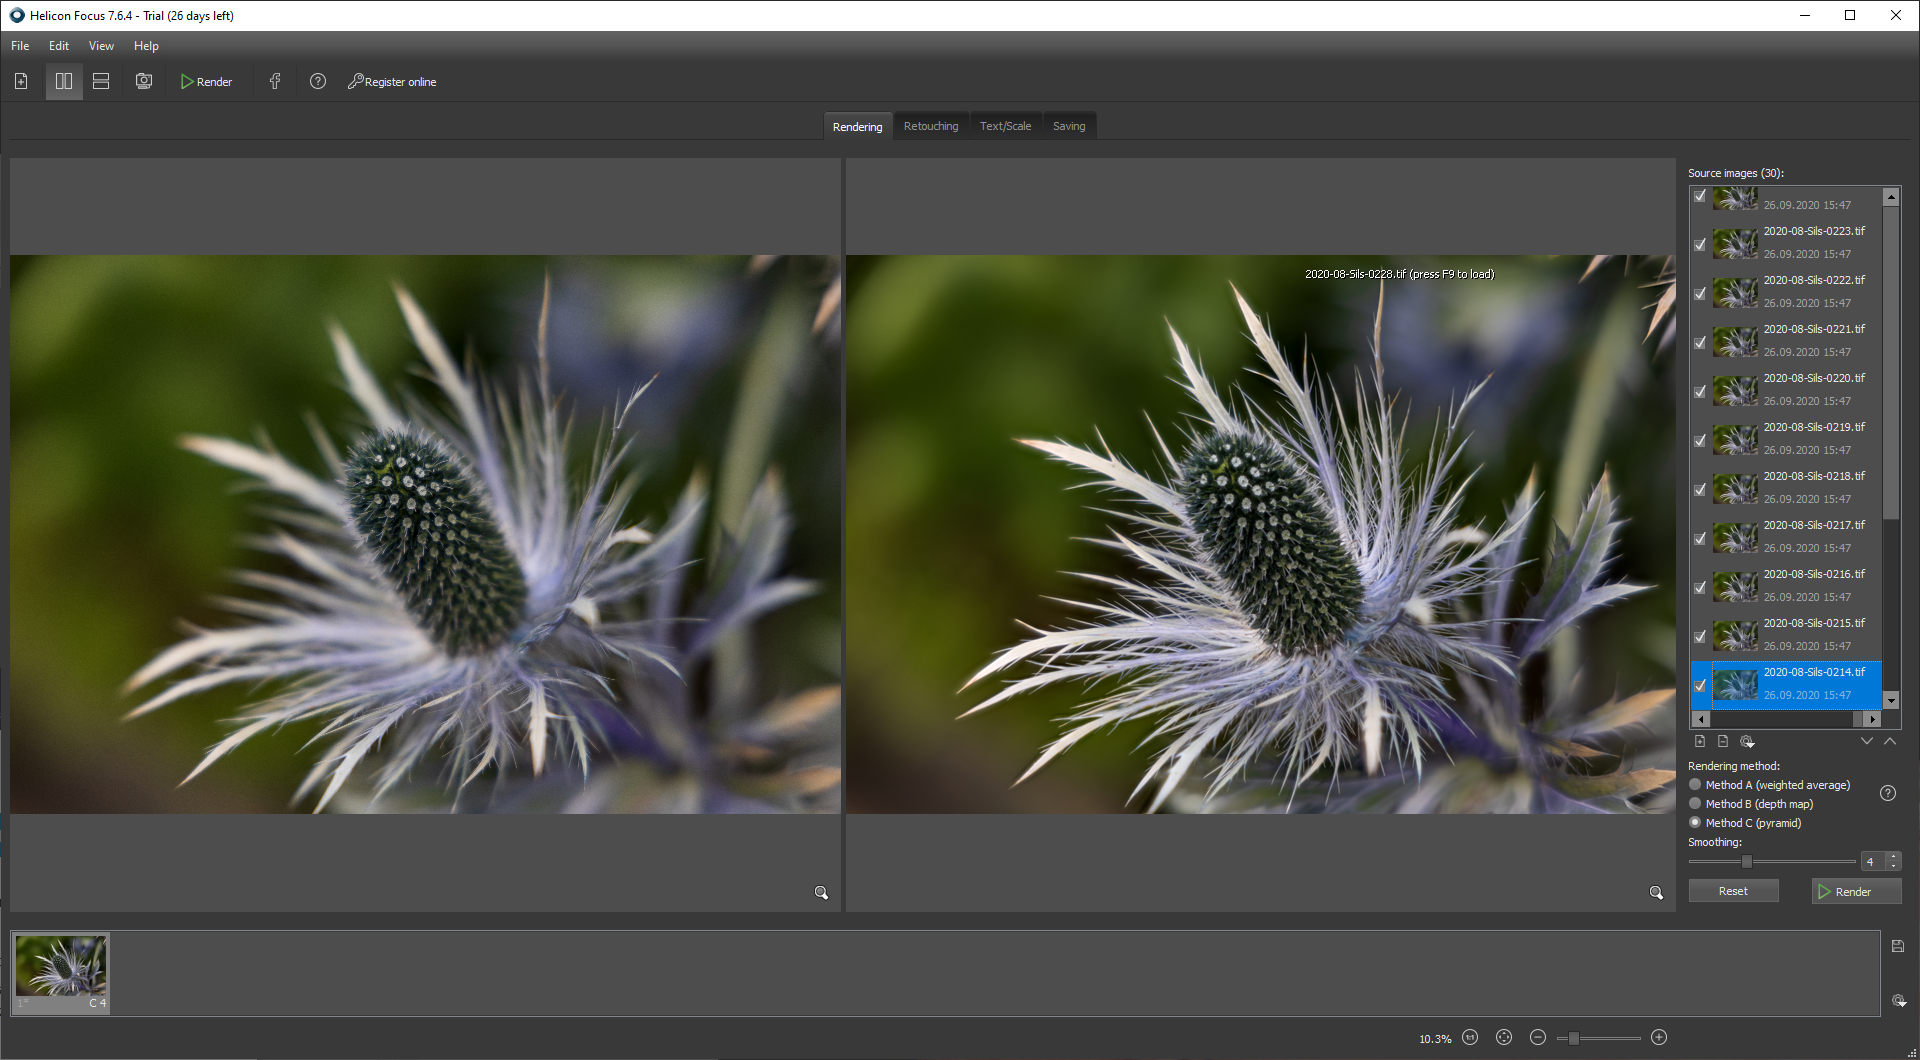
Nice is that Helicon Focus displays an animated image of the rendering process during the calculation. With method B - depth map, the process is also finished in 15 seconds:
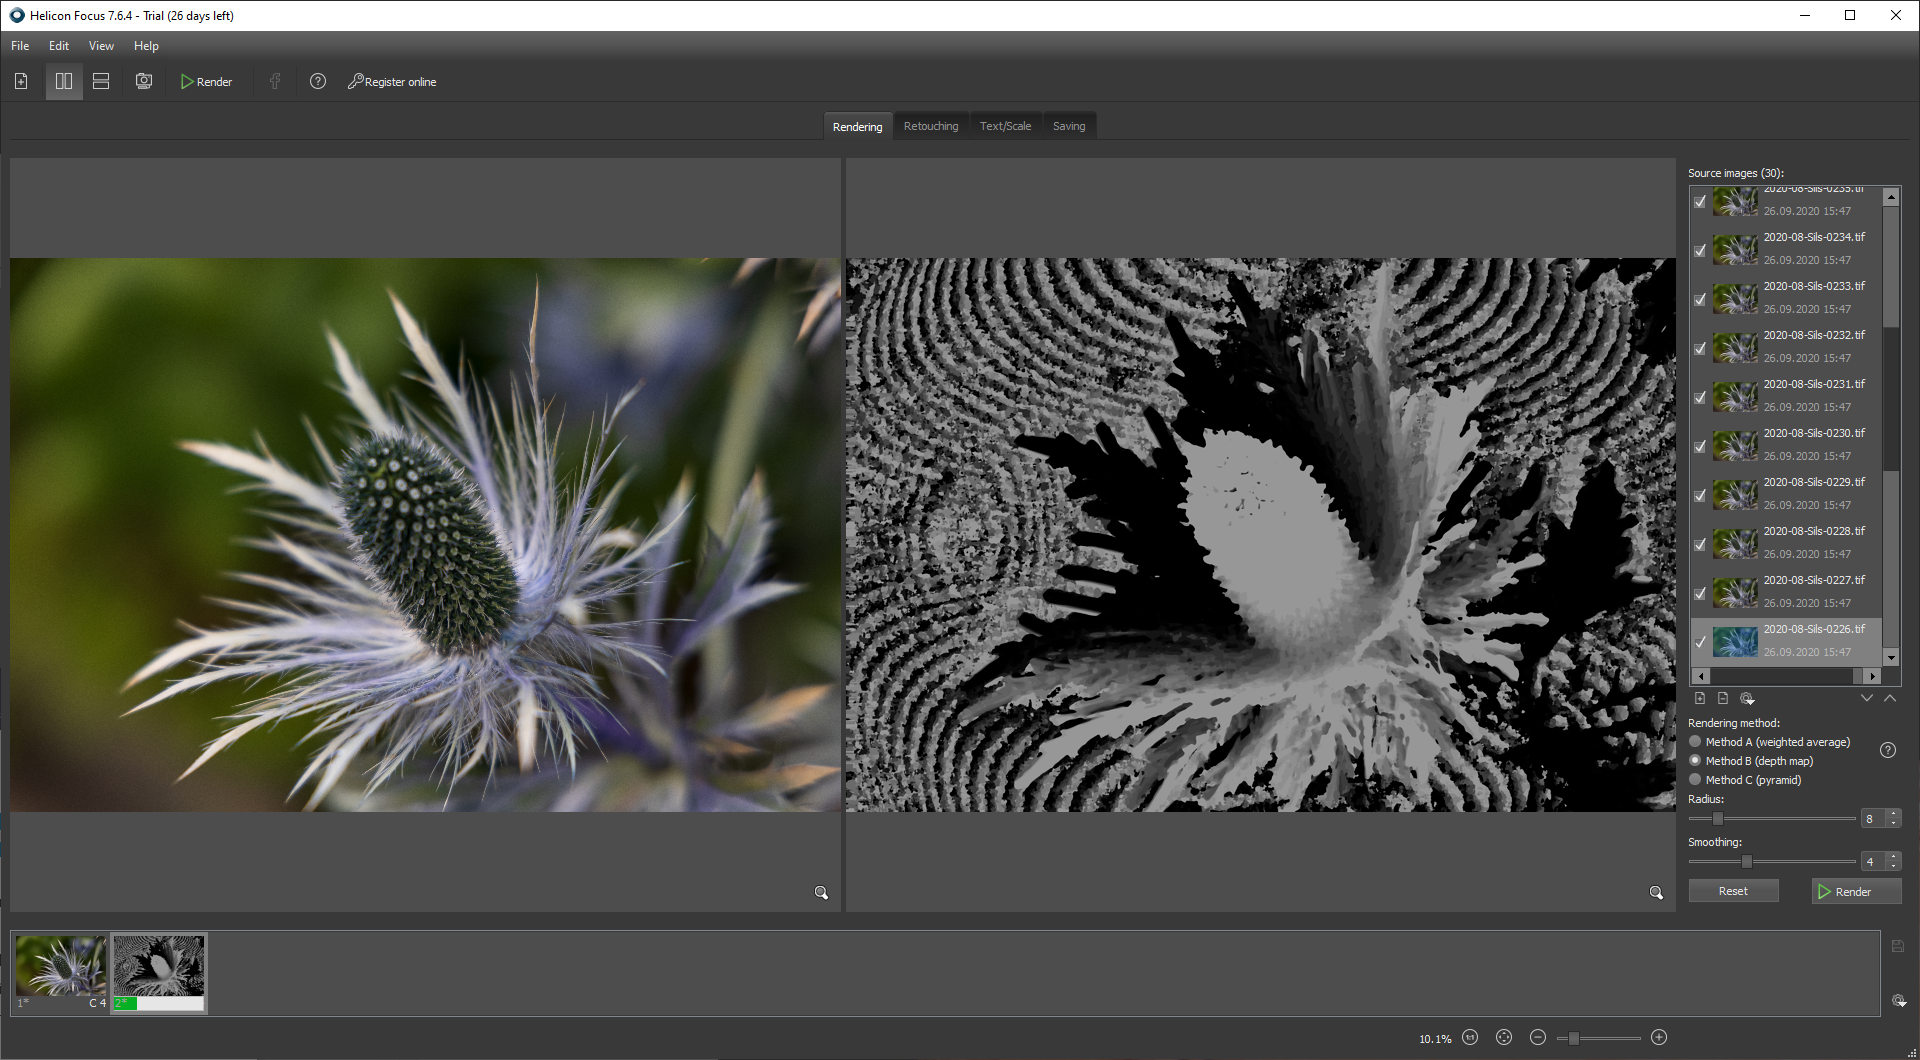
After completion, the images can be viewed enlarged in Helicon Focus and, if necessary, post-processed. In this case, both methods were well-suited. The processing is much faster and more comfortable than with Photoshop.
In the ” Retouching ” module, Helicon Focus displays a selected single photo of the stack in the left window and the complete image on the right. Using the mouse, a part of any selected single layer can be copied to the whole image. This is much more difficult to describe here than it is in reality. In any case, it is much easier, more intuitive and faster than in Photoshop. In my experience, post-processing in Helicon Focus is also much less necessary, since the results are usually better than with Photoshop.
All in all, editing with Helicon Focus is much more fun and much more powerful than with Adobe Photoshop. Helicon Focus currently costs $30 per year as an annual subscription and $115 once as a “Lifetime License”, where all future updates are included for free.
After extensive testing and comparison with the other options, I decided to buy the lifetime license of Helicon Focus Pro. Currently, this is currently available for 200 US$.
Some more examples
The above experiences with the Focus Stacking of the EOS R5 now made me want to try out my macro lens again.
My good old EF 100mm F/2.8 Macro USM* has been lying unused in the box for quite some time. I had always considered to exchange it for the EF 100mm F/2.8L IS USM at some point, since the IS seemed to me to be interesting especially in the macro range, but I refrained from doing so, since I use it very rarely and the L-lens is optically not better. It was worth the wait: Now my old macro has a stabilization by the built-in IBIS of the EOS R5, which works really well 😉 .
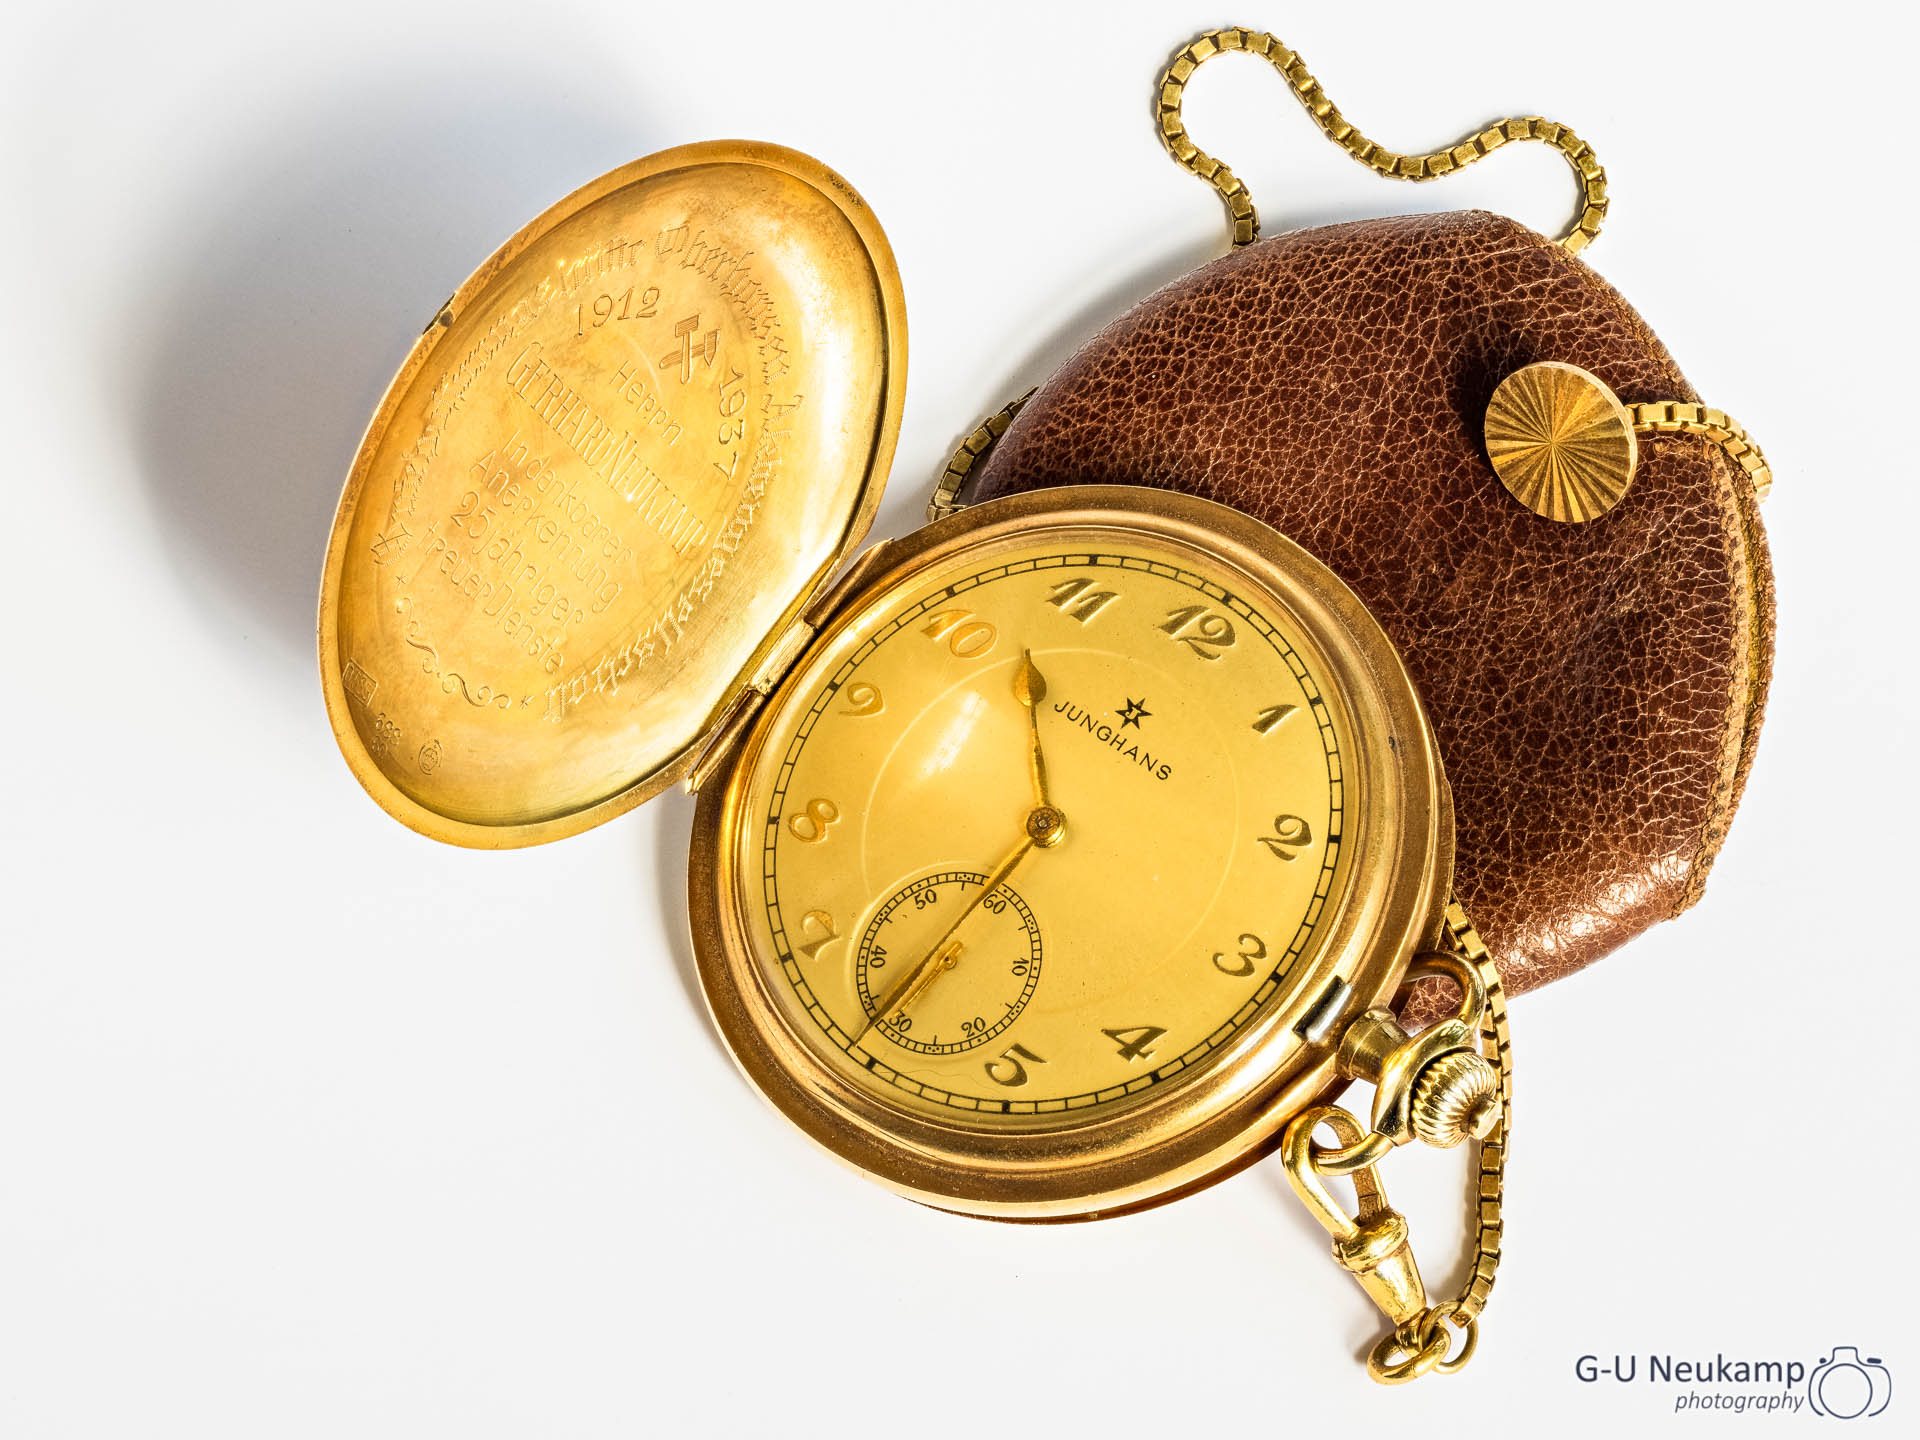
As a training object I chose a family heirloom from the vitrine, which is over 80 years old. It is a golden pocket watch, which my grandfather received in 1937 on the occasion of his 25th anniversary of employment at the GHH, the “Gute Hoffnungs Hütte” in Oberhausen. The good old piece is still fully functional after more than 80 years. I rewound it and it worked!
This time, I used the camera on a tripod for stacking. The lighting came through the window, I put the clock on a white sheet of paper. Then I took up to 40 shots at apertures 5.6 and 8, edited them in Lightroom and stacked the series in Helicon Focus:


I am quite happy with the results, Focus Stacking is fun! These were my first steps with Focus Stacking. I would be very happy about comments and suggestions for improvement.
If you are interested in further information about the Canon EOS R5
You can find my first test report on the EOS R5 here. On my website there are also many other articles about the EOS R5.
*=Affiliate Link
Question 1: Is the bracketing speed the same with EF like with RF? You said in RF you make 40 shots in 2 seconds. Have you verified this using the exif (looking at the seconds)?
Question 2: When you put the camera in APS-C mode, the RAW files generated by focus bracketing are smaller then normal?
Answer 1: I just tested it with my 100mm f/2.8 EF-Macro: With it, my R5 also reaches full stacking speed.
Answer 2: Yes, the files are actually smaller. A single raw file in APS-C mode takes about 24MB, in full format about 50-60MB.
Best regards, Gerd-Uwe
Thanks, for the answers.
Good news then.