Note:
In the meantime, DxO has released the new version 3 of PureRAW. In addition to a welcome redesign of the Option menu, PureRAW now also supports the improved AI denoising technique DeepPRIME XD, which was introduced with DxO PhotoLab 6. A review of PureRAW 3 is also available here on this website.
DxO has finally fulfilled my wish and included DxO PureRAW 2*, a plugin for Adobe Lightroom Classic. The basic functionality of PureRAW hasn’t changed with the new version. PureRAW still supports the artificial intelligence-based denoising method DeepPRIME. I’ve already written more about this in my detailed review of DxO Photolab, which also includes the DeepPRIME module.
My workflow
For all those who, like me, prefer to edit and manage their images with Adobe Lightroom Classic, however, DxO Photolab is actually overkill. DxO Photolab is a full-featured RAW editing program with similar editing features as offered by Lightroom.
However, since I have archived and keyworded all my images in Lightroom for years, I don’t need these functions. In fact, I use DxO PhotoLab exclusively for denoising critical images - the DeepPRIME algorithm does this so much better than Lightroom. In my own tests, the results are a good 2 stops better than what I can achieve with Lightroom alone. For some examples, see my review of DxO Photolab linked above.
PureRAW v1
DxO had also realized this problem and released PureRAW, a stand-alone denoising tool that could process RAW files and save the results in DNG RAW files for further processing in Lightroom or other RAW developers. In my test of PureRAW, the results were quite good.
Unfortunately, I couldn’t get along with the workflow provided by DxO. PureRAW is an independently running program that you had to process all the images through BEFORE you could import them into Lightrrom. With the complex DeepPRIME process, this is extremely time and memory consuming, even on fast computers.
I only use denoising on the few high-ISO images that really benefit from it, though. To select them, however, I need to have them previously imported and reviewed in Lightroom. In my review I had already described this problem and asked for a Lightroom plugin.
Finally, DxO provides this in PureRAW 2!
PureRAW v2
To see how the new plugin performs, I downloaded and installed the trial version of PureRAW 2* from DxO. DxO is very generous: the trial version can be used without restrictions for 31 days. The Lightroom plugin can be installed during the installation.
To test the program , I have chosen an absolute extreme example. On our last trip to Africa we spotted a serval cat half an hour after sunset. It was already very dark, the serval was only barely visible.
I took the following picture at ISO 12800 with my Canon EOS R5 and the 400mm f/2.8L IS II USM. The exposure data: f/2.8, 1/125 sec. With this setting the image was still clearly underexposed, so I had to lighten it up by 2 f-stops in Lightroom so that the exposure is equivalent to a value of
ISO 51200!
I initially processed the image in Lightroom, lightened it by 2 stops, and got the following result:

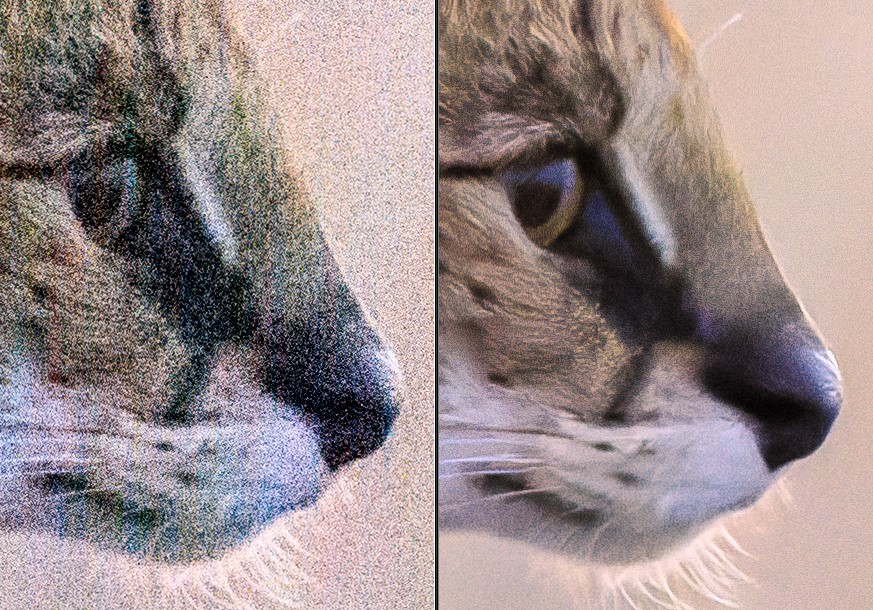
In the overview it still looks quite usable, but the 100% view shows the severe noise:

At this point I have passed the image to the PureRAW2 plugin that I have just installed:

The PureRAW2 plug-in still does not offer many options for adjustment. Neither the strength of the noise reduction nor the post-sharpening can be changed. The method of noise reduction can be selected, but I exclusively choose the DeepPRIME algorithm. Lens corrections can also be applied, but I prefer to do this in Lightroom in post-processing. I always choose DNG as the output format for this, so that I can use Lightroom for the complete post-processing.
You can select either any destination folder or a DxO subfolder in the current directory for the output. This is unfortunately incompatible with my usual workflow. I save all my processed images in the same folder, so I either have to select the folder manually or move the image afterwards. After pressing the “Develop” button, the development starts, which takes a bit longer than I was used to with the DxO Photolab plugin.

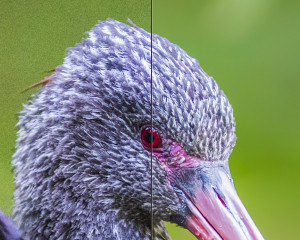
The result is initially a bit darker than the Lightroom image and shows a slight magenta color cast, but both can be easily corrected in Lightroom. The final result looks like this in the full screen view:

You can see how well the DeepPRIME algorithm works when viewing the 100% view:

Of course, this is not a perfect photo, but when the picture was taken, it was so dark that we could hardly see the serval with naked eyes. I show it here as an absolute extreme example.
The 100% view shown above roughly corresponds to what you see when you stand with your nose directly in front of a large-format printout. Since the image looks so very flat, here’s another direct and probably more practical comparison at 33% magnification. On the left you see the DxO PureRAW 2 version; on the right is the result with Lightroom.

I think this gives you a better idea of the quality of DxO PureRAW’s noise reduction. Such a shot would have been absolutely impossible just a short time ago. I really think the result is sensational!
More “normal” examples can be found in my other reports on the DeepPRIME algorithm.
I think PureRAW 2 with the Lightroom plugin is now highly recommendable even for those who are hardcore Lightroom (or even Phase One) users. Since I already bought PhotoLab 6 Elite*, which also supports denoising with DeepPRIME, I don’t see the need to buy PureRAW 2 as well. However, if you don’t have PhotoLab 4, 5 or 6 with DeepPRIME, I think the program is absolutely worth recommending.
But everyone can make up their own mind. The 31-day unlimited trial version of DxO PureRAW 2 can be downloaded here*. If you want to try the above example image of the serval with other denoising tools, you can download it as an EOS R5 CR3-Raw file here:
Download of the EOS R5 CR3-Raw file “Serval-ISO12800.CR3”
I am happy to receive comments.
*= Affiliate Link