DxO today introduced the new version of their RAW processor PureRAW 3*. I already had the opportunity to test a beta version of it in detail previously and would like to share my impressions here.
What’s new?
Compared to the previous version, PureRAW 2, DxO has significantly and reasonably expanded the range of processing options. In particular, I appreciate the possibility now of having control over the sharpening, which in my opinion was often too intense in the previous version.

Besides some other visual changes to the appearance, which I like better so far, the main new feature is that DxO PureRAW now also supports the new AI-based DeepPRIME XD algorithm. This algorithm was first introduced in DxO’s powerful image editor DxO Photolab 6 Elite (my full review of it can be found here) and has now finally found its way into the updated version 3 of PureRAW.
PureRAW vs PhotoLab difference
Unlike the full-featured PhotoLab image editor, PureRAW is reduced to the actual development of RAW files, which it outputs either as linear RAW files in DNG format or also as TIFF (in up to 16bit) or JPG files. PureRAW only performs demosaicing, denoising and optical corrections using specific camera and lens modules created by DxO.
The final processing of the images, such as exposure adjustments or cropping is not implemented in PureRAW. This requires additional software. The most elegant way to do this is to work with Adobe Lightroom Classic or Photoshop. DxO PureRAW provides interfaces for both programs, which results in a very smooth workflow.
Denoising with DeepPRIME (XD)
In my opinion, the absolutely outstanding feature of both PureRAW and PhotoLab is the quality of noise reduction of high-ISO photos with the DeepPRIME algorithms.
If you, like me, still know the limitations of analog photography, you’ll be amazed by the results that can be achieved with current digital cameras, even in low light.
In analog photography, significant image noise was already visible at ISO 400 in color and ISO 1,600 in black-and-white. Today, current digital cameras can handle this without any problems. Nevertheless, DxO shows that even more is possible.
The secret is the AI
The secret behind DxO’s improved algorithms is artificial intelligence. At the latest since ChatGPT, AI has been on everyone’s lips. Here, DxO’s technology was used specifically to reduce noise in digital images. By comparing billions of noisy RAW files as input with cleaned examples as output, a multi-layered neural network was trained. A special feature is that DeepPRIME already works with the raw data of the camera sensor before the debayer algorithm (more information about Bayer sensors can be found here) and therefore has much more detailed image information available than other converters that start afterwards.
What is DeepPRIME (XD) able to do?
Thanks to its extensively trained neural network, DxO achieves a noise reduction improvement of about 2-2.5 stops with DeepPRIME and DeepPRIME XD. This means that photos shot at ISO 6400 processed in this way will have similar levels of noise as unprocessed shots taken at ISO 1000-1600.
I already did an extensive comparison test of DxO DeepPRIME’s denoising with Lightroom’s built-in denoising some time ago. It can be found here on my website with many image examples in my review of PhotoLab 4. I mentioned there that DeepPRIME can even deliver a good 3 f-stops better result.
According to DxO, DeepPRIME XD has been trained with much more extensive data and is thus supposed to extract even more details (XD = eXtreme Detail). It does not replace the older algorithm, but is an additional option that does not always deliver better results. See some examples below for more information.
In my opinion, DeepPRIME (XD) is currently the best image denoising tool available, and in particular, it’s orders of magnitude better than what I can achieve with the built-in algorithms in Photoshop and Lightroom.
DeepPRIME XD now raises the bar again.
PureRAW or PhotoLab 6 - which should I choose?
Previously, I usually avoided using ISO values above 3,200 in my digital photography, but now I also use the ISO range up to 12,800 without much hesitation if necessary. I am always amazed by the details that DeepPRIME still gets out of the images.
I’ve been using DxO PhotoLab regularly since version 4, currently I’m using version 6, in particular because of its DeepPRIME XD enhancement. However, I use it only for those noisy pictures that benefit from the integrated DeepPRIME algorithms. All further processing, organization, tagging and exporting for printing or online presentation of my images is still done in Adobe Lightroom Classic.
This also has historical reasons for me. I have been a long-time user of Adobe Lightroom since version 1.0 in 2007 and have edited, organized and also keyworded all my images in its integrated database. Currently, that’s already over 200,000 shots. In addition, Lightroom has become very powerful over the years, it is also very performant and intuitive to use.
In short, I am actually 100% satisfied with the possibilities of Lightroom - only the integrated algorithms for noise reduction currently leave something to be desired. Therefore, I bought PhotoLab 4 in 2020 after an extensive test, despite the comparably high price, only because of the integrated DeepPRIME process and since then I use it (currently in version 6) exclusively via the integrated Lightroom plug-in. Unfortunately, the stripped-down PureRAW version was not yet available at the beginning.
PhotoLab 6 has become a very powerful tool for image editing. I have had a look at the features for myself, and they leave little to be desired. Nevertheless, because of my large stock of images organized there, I still stick with Lightroom Classic for most of the image editing steps and only use the DeepPRIME (XD) plug-in.
Thus, for my purposes - and I think for the vast majority of people who are happily working with Adobe Lightroom - the new PureRAW 3 would now be perfectly sufficient.
Installation
There is actually not much to say about the installation. After downloading the setup file from the DxO server, it starts and installs the stand-alone PureRAW 3 program (which I won’t discuss further below) and the plug-in for Adobe Lightroom, which is the subject of this article.

The first time you launch Lightroom Classic after installing PureRAW 3, you will be notified that a new plug-in is available.

If you take a closer look in Lightroom Classic’s Add-on Module Manager, there are actually two plug-ins installed:

The first passes a file selected in Lightroom into DxO PureRAW 3. The second then merges the file edited in PureRAW back into Lightroom.
By the way, you have to have some patience for this. The re-import does not take place directly after editing in PureRAW - it happens a bit later. I therefore initially thought that this wasn’t working and therefore imported the DxO files myself via a synchronization of the directory in Lightroom Classic. This then led to an error message after the subsequent automatic start of the DxO import process. So: you should have some patience there.
My workflow
I edit my pictures as I have already described here and here for years in Lightroom Classic in several steps.
After a shoot, I first briefly review all the images in the library module and delete any obviously unusable images (blurred, grossly underexposed, out of focus, etc.).
Then I usually go through them in chronological order in a second pass in the Develop module. Thereby I make first short editing steps (cropping, rough exposure corrections, white balance).
If there are several images in a series, I then synchronize the processing to all images in a series. During this first processing I mark the images. Images that I want to keep and process further get a marker (key ‘P’ for ‘pick’). Images that I am sure I do not want to edit, are marked with the ‘X’ key for subsequent deletion, the rest remains unmarked.
In the third step, I only look at the marked images in more detail by selecting them. This usually leaves me with only about 15-30% of the original images. For these, a more detailed processing with all options of the Lightroom development module follows. Images that I like particularly well are now rated by me with a star (key ‘1’) at first.
And just now, in my workflow, DxO comes into play.
DxO DeepPRIME integration
If I now notice that a particular image still has a lot of noise after processing, it is now handed over to the DxO plug-in for further processing with DeepPRIME. The transfer is done somewhat unintuitively via the Plug-in Extras menu item in the file menu:

After starting PureRAW 3, which takes a moment, the first thing that can be done is to select the recognized camera and optics modules. In my example it’s my EOS R5 with the EF 16-35mm f/4L IS USM:

If you don’t want to do any optical corrections in PureRAW, you can simply omit these modules with “None of above”. Afterwards the options window will appear:

For all my RAW processing, I exclusively choose DeepPRIME or DeepPRIME XD as denoising method.
Regarding the choice of optical corrections, everyone has to decide for himself if he wants to handle this by PureRAW or later by Lightroom. In the example, I just use PureRAW for everything except the lens distortion correction, which I don’t always want to use. I leave the lens sharpness correction at the preset value ‘Standard’.
Output formats
Since I still want to edit the images in Lightroom, I only choose DNG as output format. Since this is a linear DNG format, you have to accept that the resulting file will be a good 3 times as large as the original RAW file from the camera.
This is because the linear DNG format contains the calculated red, green and blue color values for each image pixel (i.e. three values), while the camera’s original RAW format stores only one color value corresponding to the Bayer color filter in front of the pixel in question (i.e. red or green or blue).
The default destination is a subfolder named ‘DxO’ in the directory of the file to be processed. However, as an additional option, I would like to be able to write the DNG file with the suffix ‘DxO’ to the same directory, similar to PhotoLab. Alternatively, you can also select any other folder here.
If you now scroll down in the options window, you can choose whether the edited file should be renamed. Therefore you can add a prefix or suffix to the original file name. The suffix ‘RAW processing method’ is the default and in my opinion a good choice.

Finally, you can specify where you want to export the edited file. For my workflow, the export to Adobe Lightroom Classic is already preset. Alternatively, you can transfer the processed file to Adobe Lightroom or any other software of your choice.
After selecting the options, the actual processing can now be started. Depending on the hardware installed in your computer, more or less patience is required.

The graphics card installed in the computer is in particular time-critical. On my laptop with an nVidia RTX 3080, processing a 45 megapixel file from the Canon EOS R5 takes 15-20 seconds. On older hardware, however, this can take several minutes.
After processing, DxO PureRAW 3 closes automatically and Lightroom Classic returns to the foreground. However, the re-import of the processed image still takes a while; in my experience, after about 30-60 seconds, it is imported into a newly created collection in the ‘DxO PureRAW 3’ folder. This has as its name the date and time of the processing.

Results
So far - so good. We have now successfully used PureRAW 3. How does it improve on the noise reduction in Adobe Lightroom?
A lot. Here is an example:
We recently visited the famous Fushimi Inari-Taisha Shrine in Kyōto on a dark and rainy day in Japan. This world famous shrine consists of thousands of orange-red torii standing directly behind each other.
Without a tripod and with an f/13 f-stop necessary because of the required depth of field, I had to take the photo at ISO 12800 despite a relatively long exposure time of 1/25 second.
On the left, you can see the image processed with Lightroom, and on the right, the image denoised with DxO PureRAW 3. Admittedly, the difference is not very noticeable in the downsized image. But in the 400% magnification you can see what DeepPRIME XD can get out of the noisy original:
I still think the result is very impressive.
DeepPRIME vs DeepPRIME XD
New compared to version 2, PureRAW 3 now offers the new DeepPRIME XD in addition to the well-known DeepPRIME process, which is supposed to get even more details out of the originals. DxO advertises the XD version not as a replacement, but as a addition to the already very good DeepPRIME process. This is not without reason.
On the one hand, the computational effort of image processing has increased even further due to the even more complex neural network in DeepPRIME. Both methods make intensive use of the capabilities of modern graphics cards. With older, less powerful graphics cards, the time required for DeepPRIME XD to process a high-resolution RAW file can be in the range of minutes. But even on more powerful modern computers DeepPRIME XD needs several seconds per image. In my own test, the newer DeepPRIME XD method sometimes needed 6 times as much computing time as the original DeepPRIME. With current powerfull graphics cards, however, the time difference is insignificant.
On the other hand, sometimes you get the feeling with certain RAW-files that DeepPRIME XD tries a bit too much and adds details that are not there.
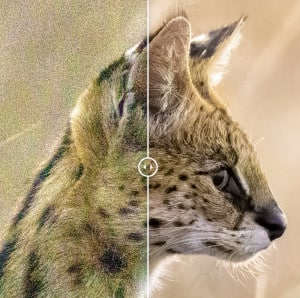
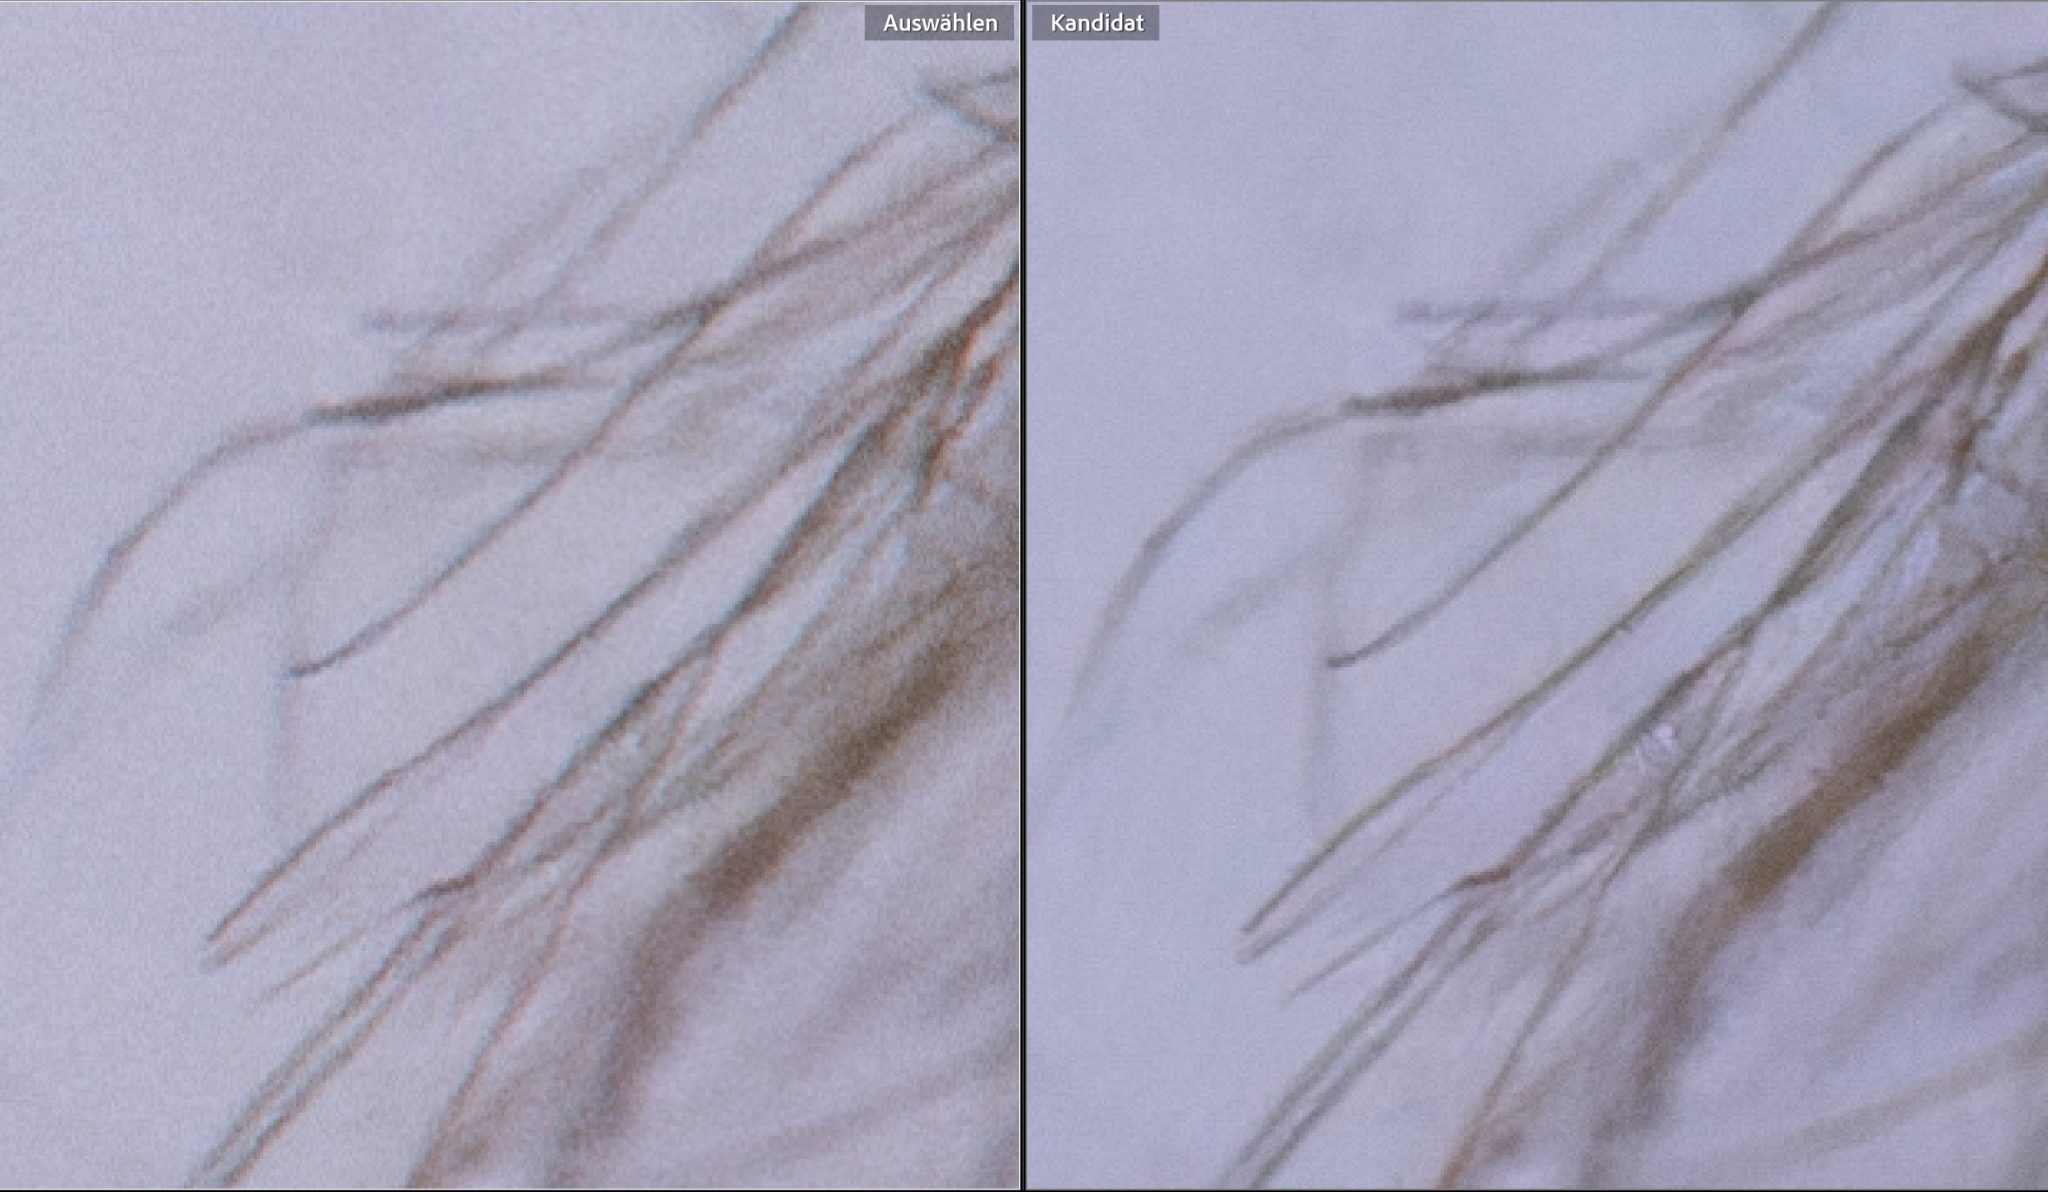
According to my reviews so far, DeepPRIME XD has particular advantages in bringing out fine regular structures, such as the hairs in fur. Here is an example from my review of DxO PhotoLab 6:
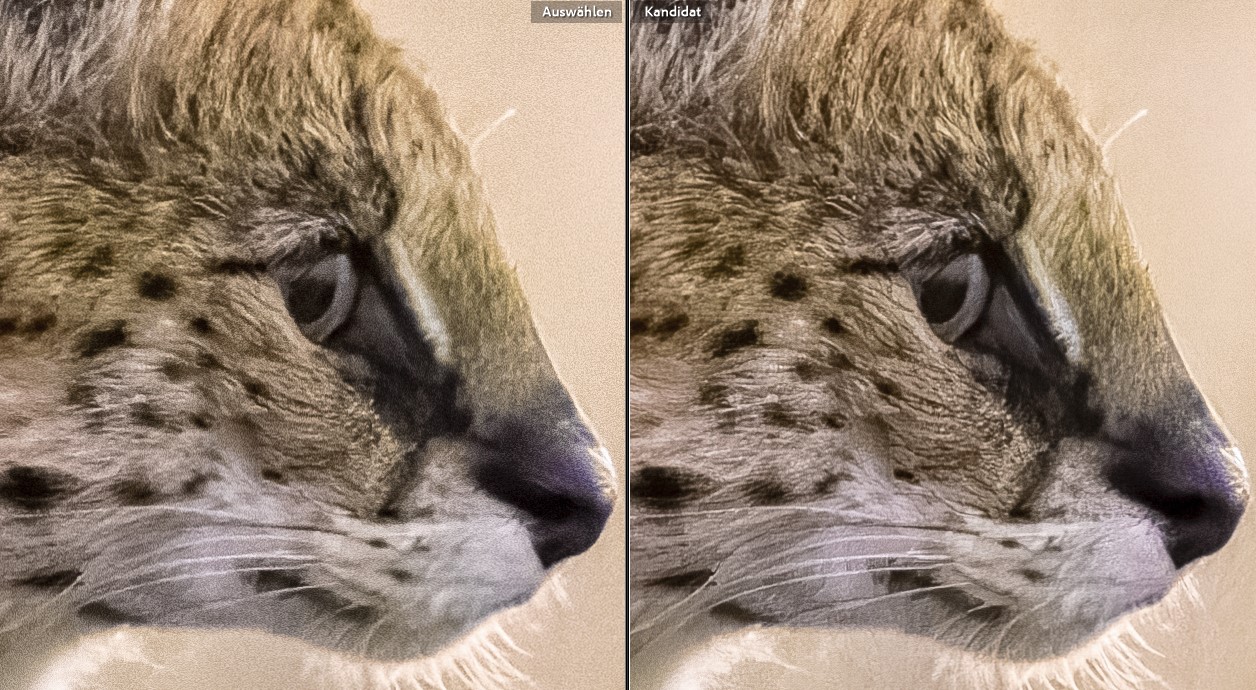
The image on the right, developed with DeepPRIME XD, reveals much more and more natural looking details in the fur of the serval, especially around the nose.
Also, comparing my ISO 12,800 test shot of a stuffed animal from my review of DeepPRIME in PhotoLab 4 shows slightly better resolution when processed with DeepPRIME XD. Here you can see the scaled down image first:
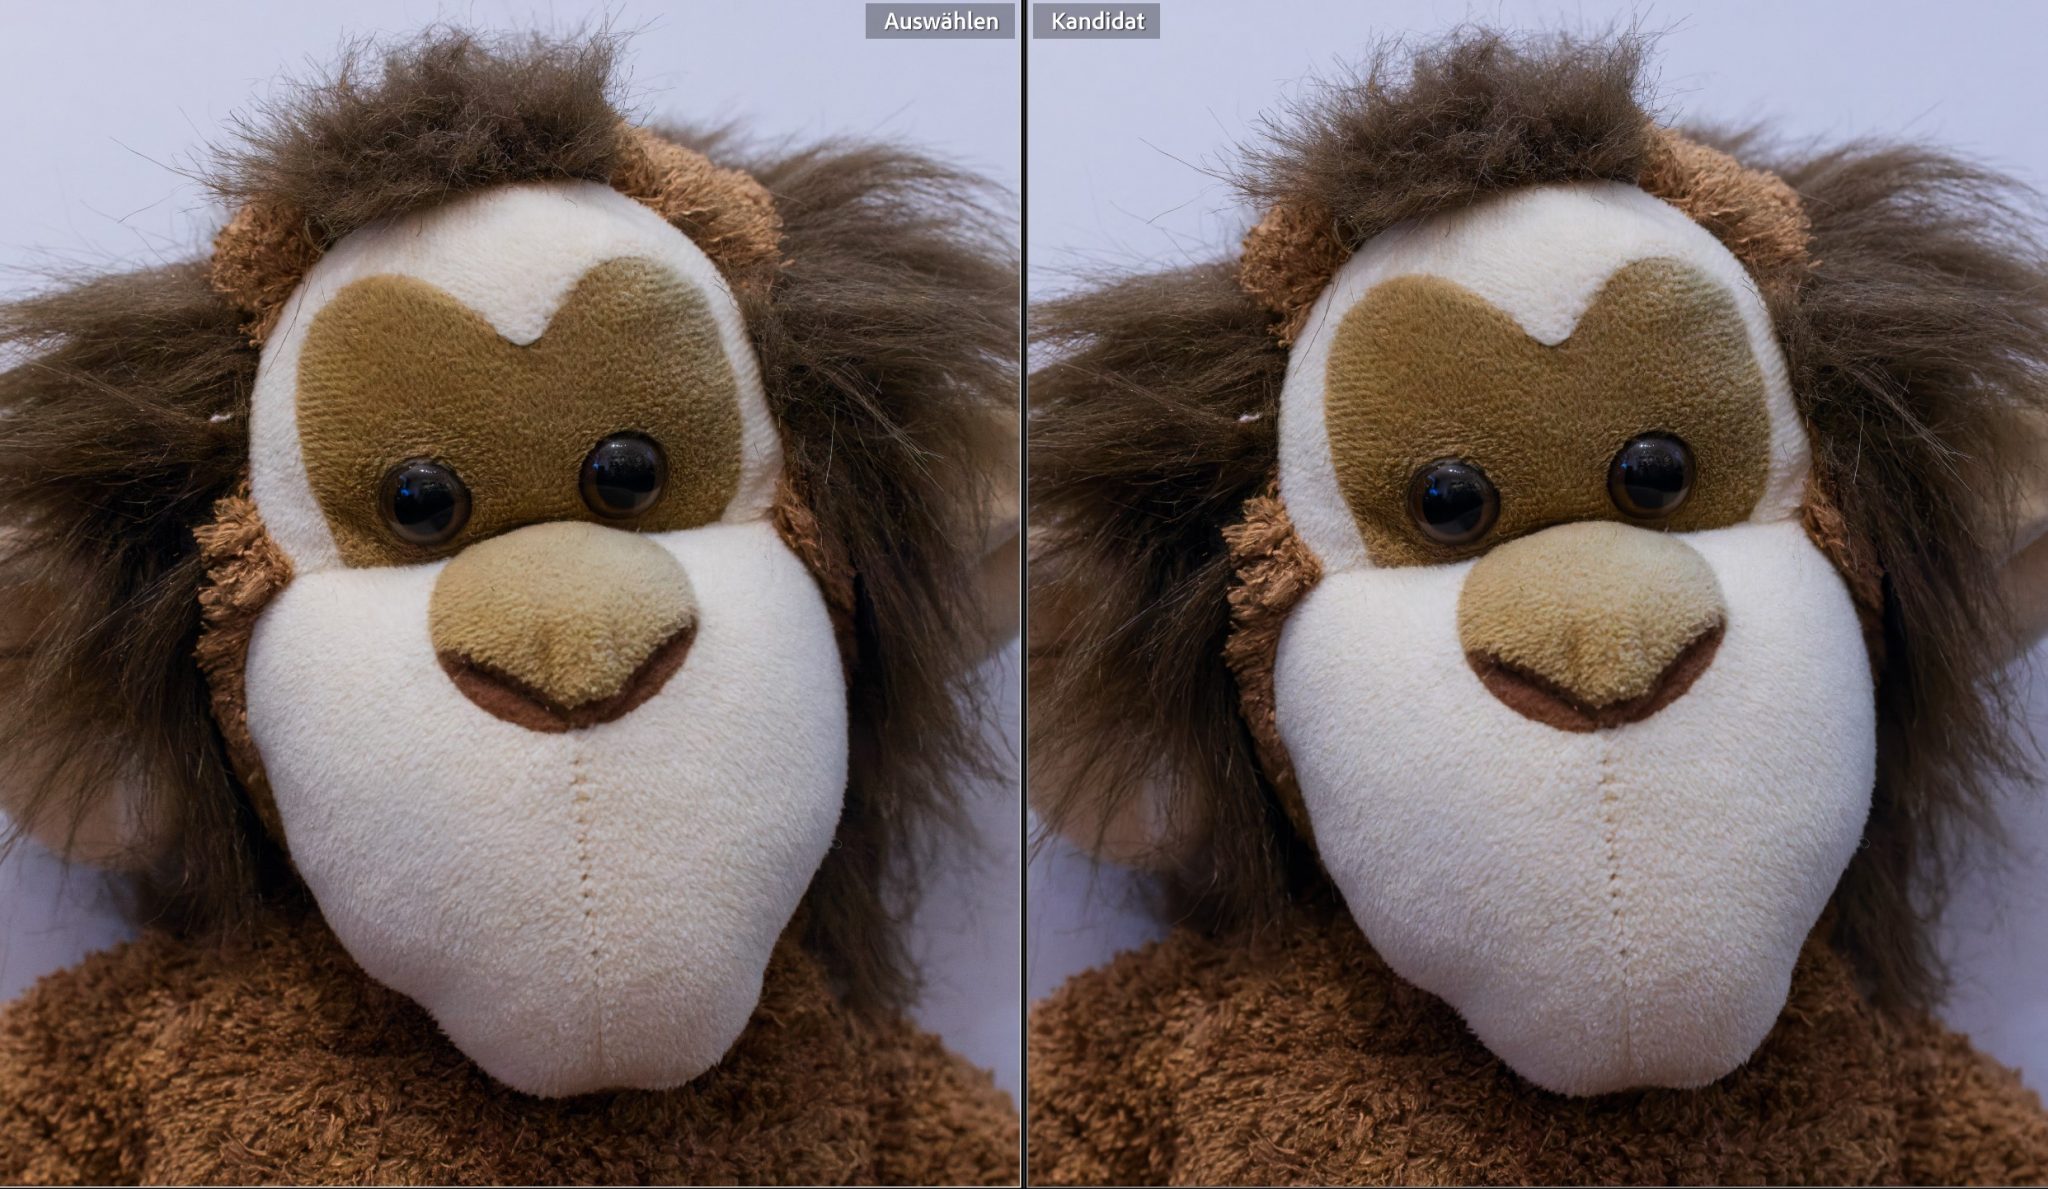
Admittedly, there are hardly any differences in the scaled down image. They only become subtly visible in the 400% crop:
The differences are admittedly small. Nevertheless, the processing with DeepPRIME XD actually reveals more details and less noise. What one prefers in each case, however, is admittedly a matter of taste.
Disadvantages?
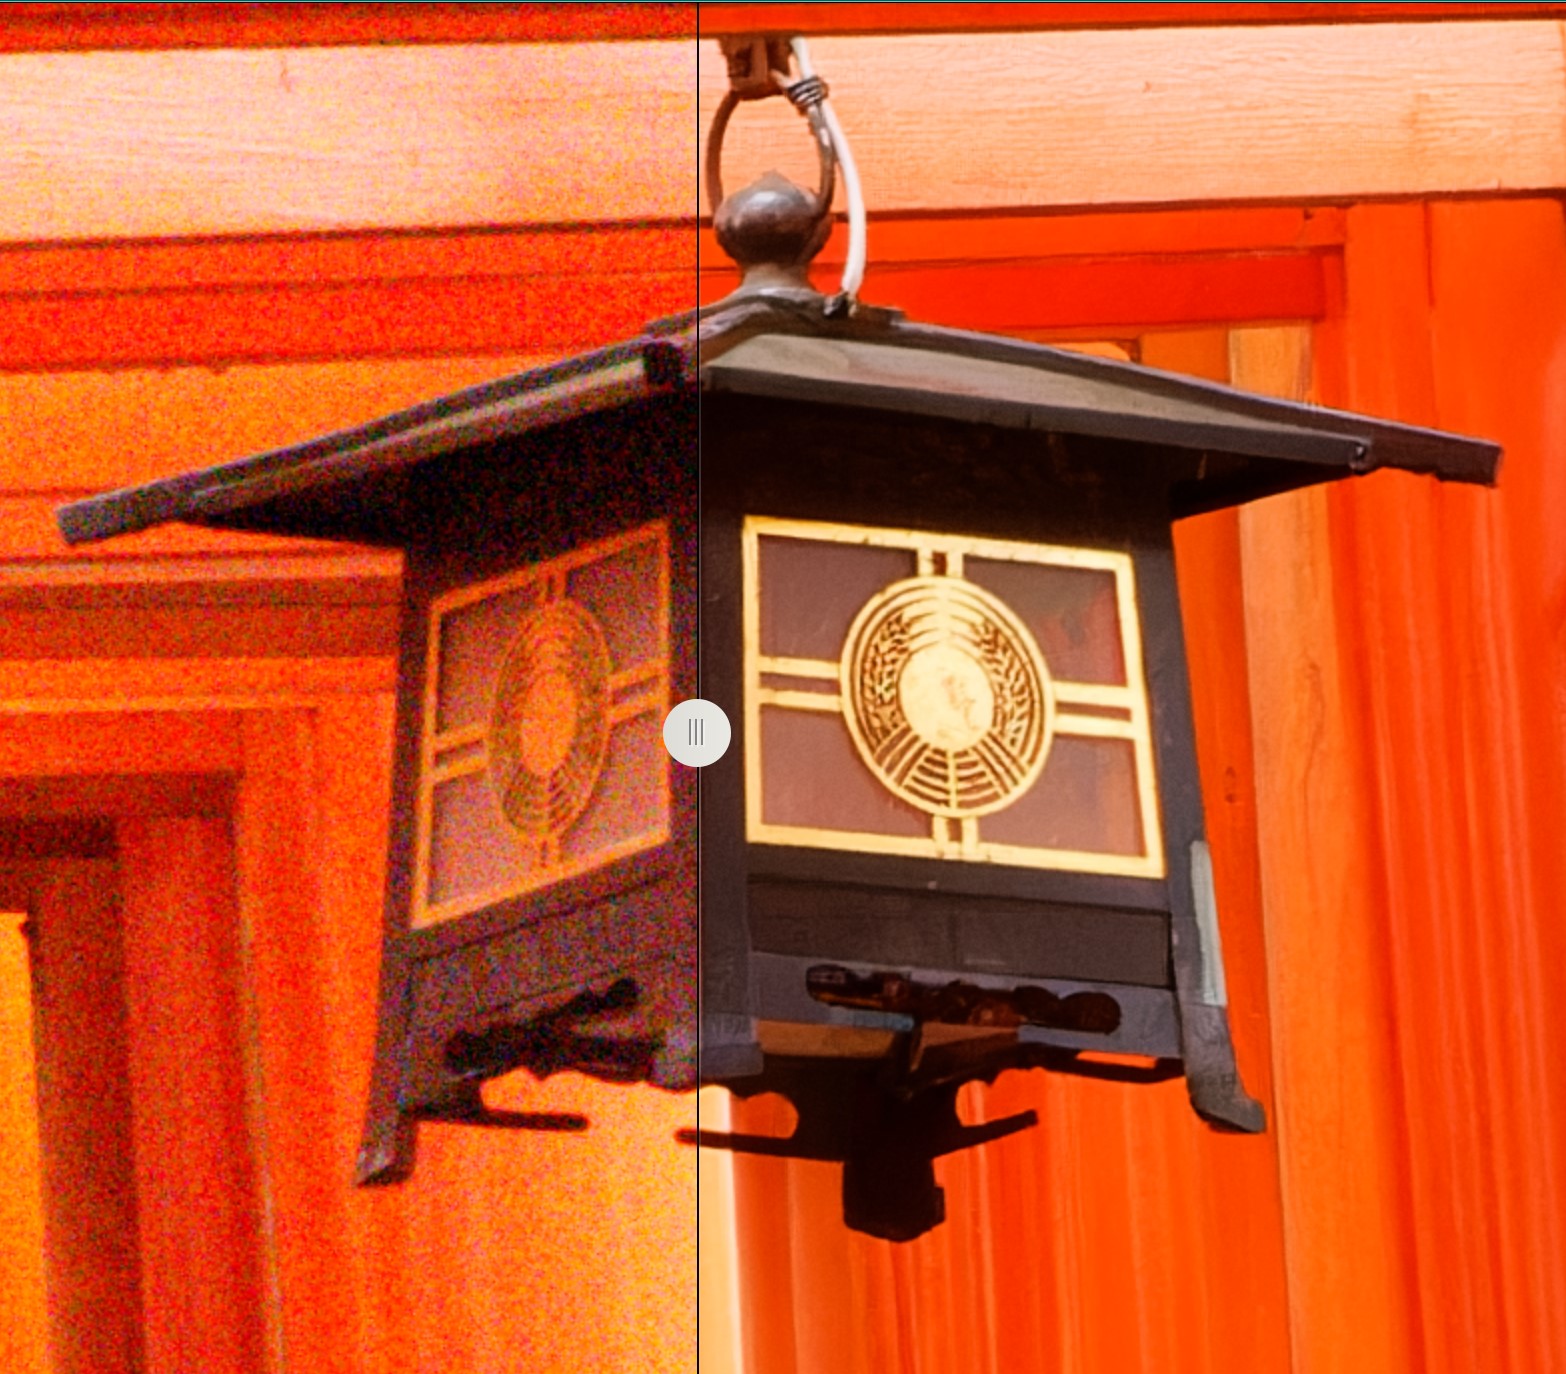
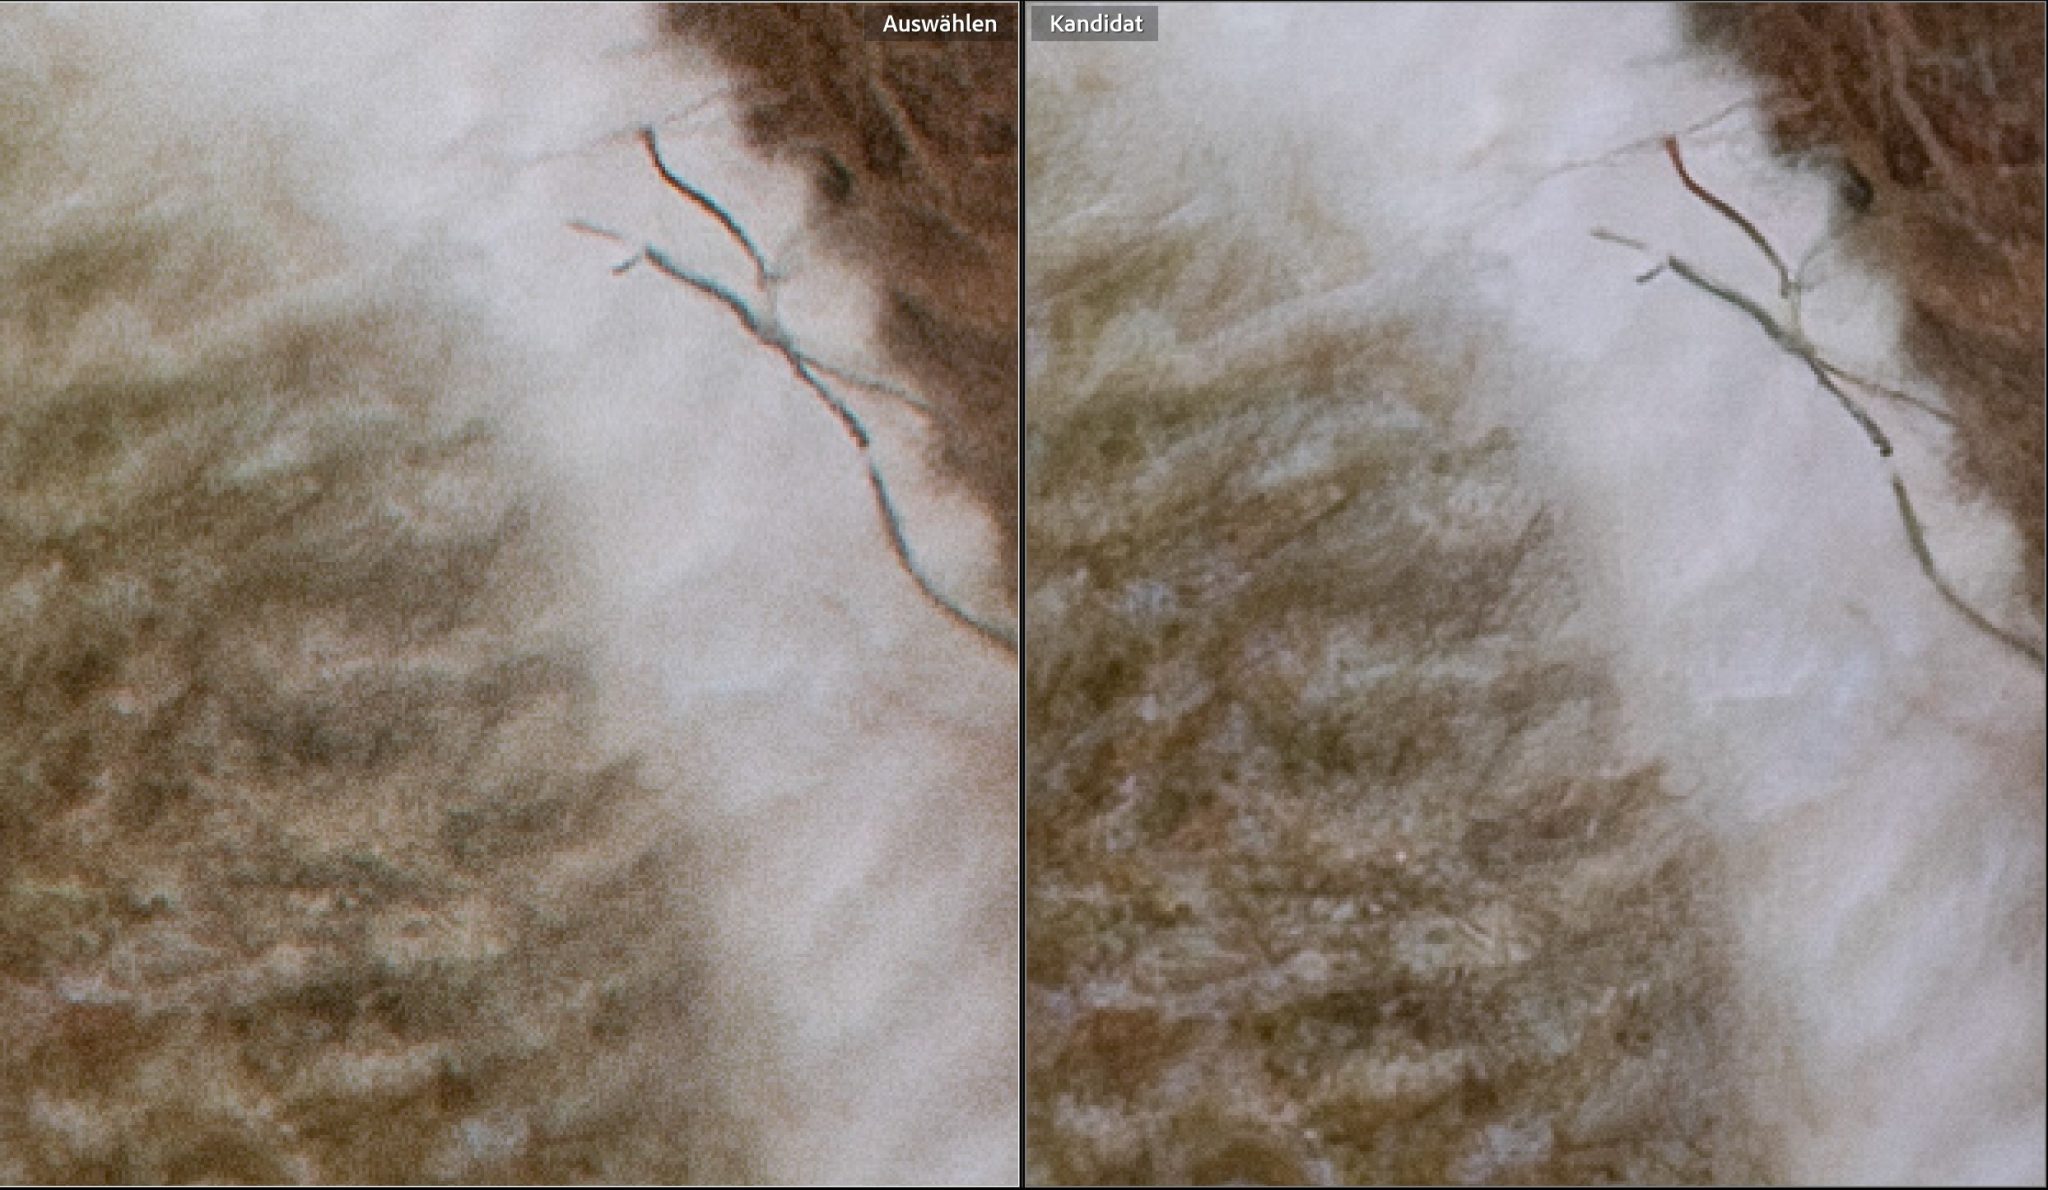
But the processing with the new XD method is not always advantageous. Here is an example where I personally like the earlier process a bit better. It is again a recent shot with my Canon EOS R5 of the famous Fushimi Inari-Taisha shrine in Kyōto.
Without a tripod and with the necessary stoped-down aperture (f/13) because of the required depth of field, I again had to take the picture with ISO 12,800 despite a relatively long exposure time of 1/25 second.
Here again, the image taken with DxO DeepPRIME on the left and DxO DeepPRIME XD on the right are compared. First, the complete image, which again does not reveal any significant differences due to its reduction in size:
Only the 400% crop blow-up reveals the differences here:
In this example, I think DeepPRIME XD did too much and “added” details that are not there, both in the lantern and at the bottom of the torii columns. Here I prefer the result of the older DeepPRIME process.
By the way:
if you have any doubts about the performance of both methods, here is an example of the two crops above with the denoising as I manage it with Lightroom alone:
There are worlds between both processings!
Comparison with Topaz DeNoise AI
Almost two years ago, I compared the two main competitors in denoising high-ISO images: DxO DeepPRIME vs. Topaz DeNoise AI. Both are based on AI algorithms trained with large amounts of data.
In my previous test, I found that DxO DeepPRIME performed much better than Topaz DeNoise AI. As some time has passed in the meantime and Topaz has also released newer versions of DeNoise AI, I had my above example processed with the current version 3.7.2 of Topaz AI Topaz AI once as well.
Regarding performance: On my computer (laptop with i9-11980HK and RTX 3080), Topaz AI takes much longer to process the RAW file of my Canon EOS R5 than DeepPrime. It took 80 seconds for the image to get processed. Here is the result in comparison to DeepPrime:
Overall, TopazDeNoise AI now processes RAW files much better than in my previous test. The results are quite good, especially when compared to the above result from Lightroom alone. Still, I see some artifacts in the lamp (double contours in the sidebar). The surfaces also look much more jittery. In direct comparison, I still prefer the result from DeepPRIME.
Résumé
PureRAW 3 is a welcome enhancement. It fits seamlessly into my workflow with my usual workflow of editing with Adobe Lightroom Classic. That is, it would if I didn’t already own PhotoLab 6 and were already using the plug-in that also comes with it there.
Nevertheless, PureRAW 3 would certainly suffice for my needs at the moment. I don’t use the additional extensive capabilities of the larger PhotoLab 6 in my workflow, so I could have saved some money by using DxO PureRaw 3.
However, I would like PureRAW 3 to add the ability to save the edited images to the same folder as the originals, as this has been my usual way for years.
Both DxO programs contain what I consider to be the best technology currently available for processing noisy images. The newly added DeepPRIME XD in PureRAW 3 and PhotoLab 6 can extract even more fine details from suitable images. From my gut feeling, I would estimate the gain over DeepPRIME then to be about 1/2 to 1 f-stop. But sometimes DeepPRIME XD is too much, so I’m grateful that DxO continues to offer the older DeepPRIME.
If you haven’t had any experience with DeepPRIME yet, I highly recommend downloading the free trial version of PureRAW 3 (directly here at DxO*) and giving it a try. DxO is extraordinarily generous and allows you to test its programs for 30 days without any restrictions.
Those who, like me, have been used to using Lightroom Classic or another RAW development program for many years can enhance it effectively with PureRAW 3.
However, if you haven’t yet built up a large image database and are still completely open in this regard, I recommend taking a closer look at DxO PhotoLab 6*. Perhaps this solution offers everything you need in one single program.
Those who already use PureRAW 2, on the other hand, will have to consider whether DeepPRIME XD’s slight improvements justify an upgrade. Here I recommend simply checking it out for yourself with the free trial version.
However, the improvements in DeepPRIME XD alone motivated me to upgrade from PhotoLab 5 to version 6, which was even more expensive.
*= Affiliate Link