DJI Mini 5 Pro vs Mini 4 Pro - comparison of photo quality
As I mentioned in my article “DJI Mini 5 Pro – Photo Quality”, I have now purchased the new DJI Mini 5 Pro. The main reason for the upgrade was the new 1-inch camera sensor, which I hope will further improve the quality of the photos. But is that really the case?
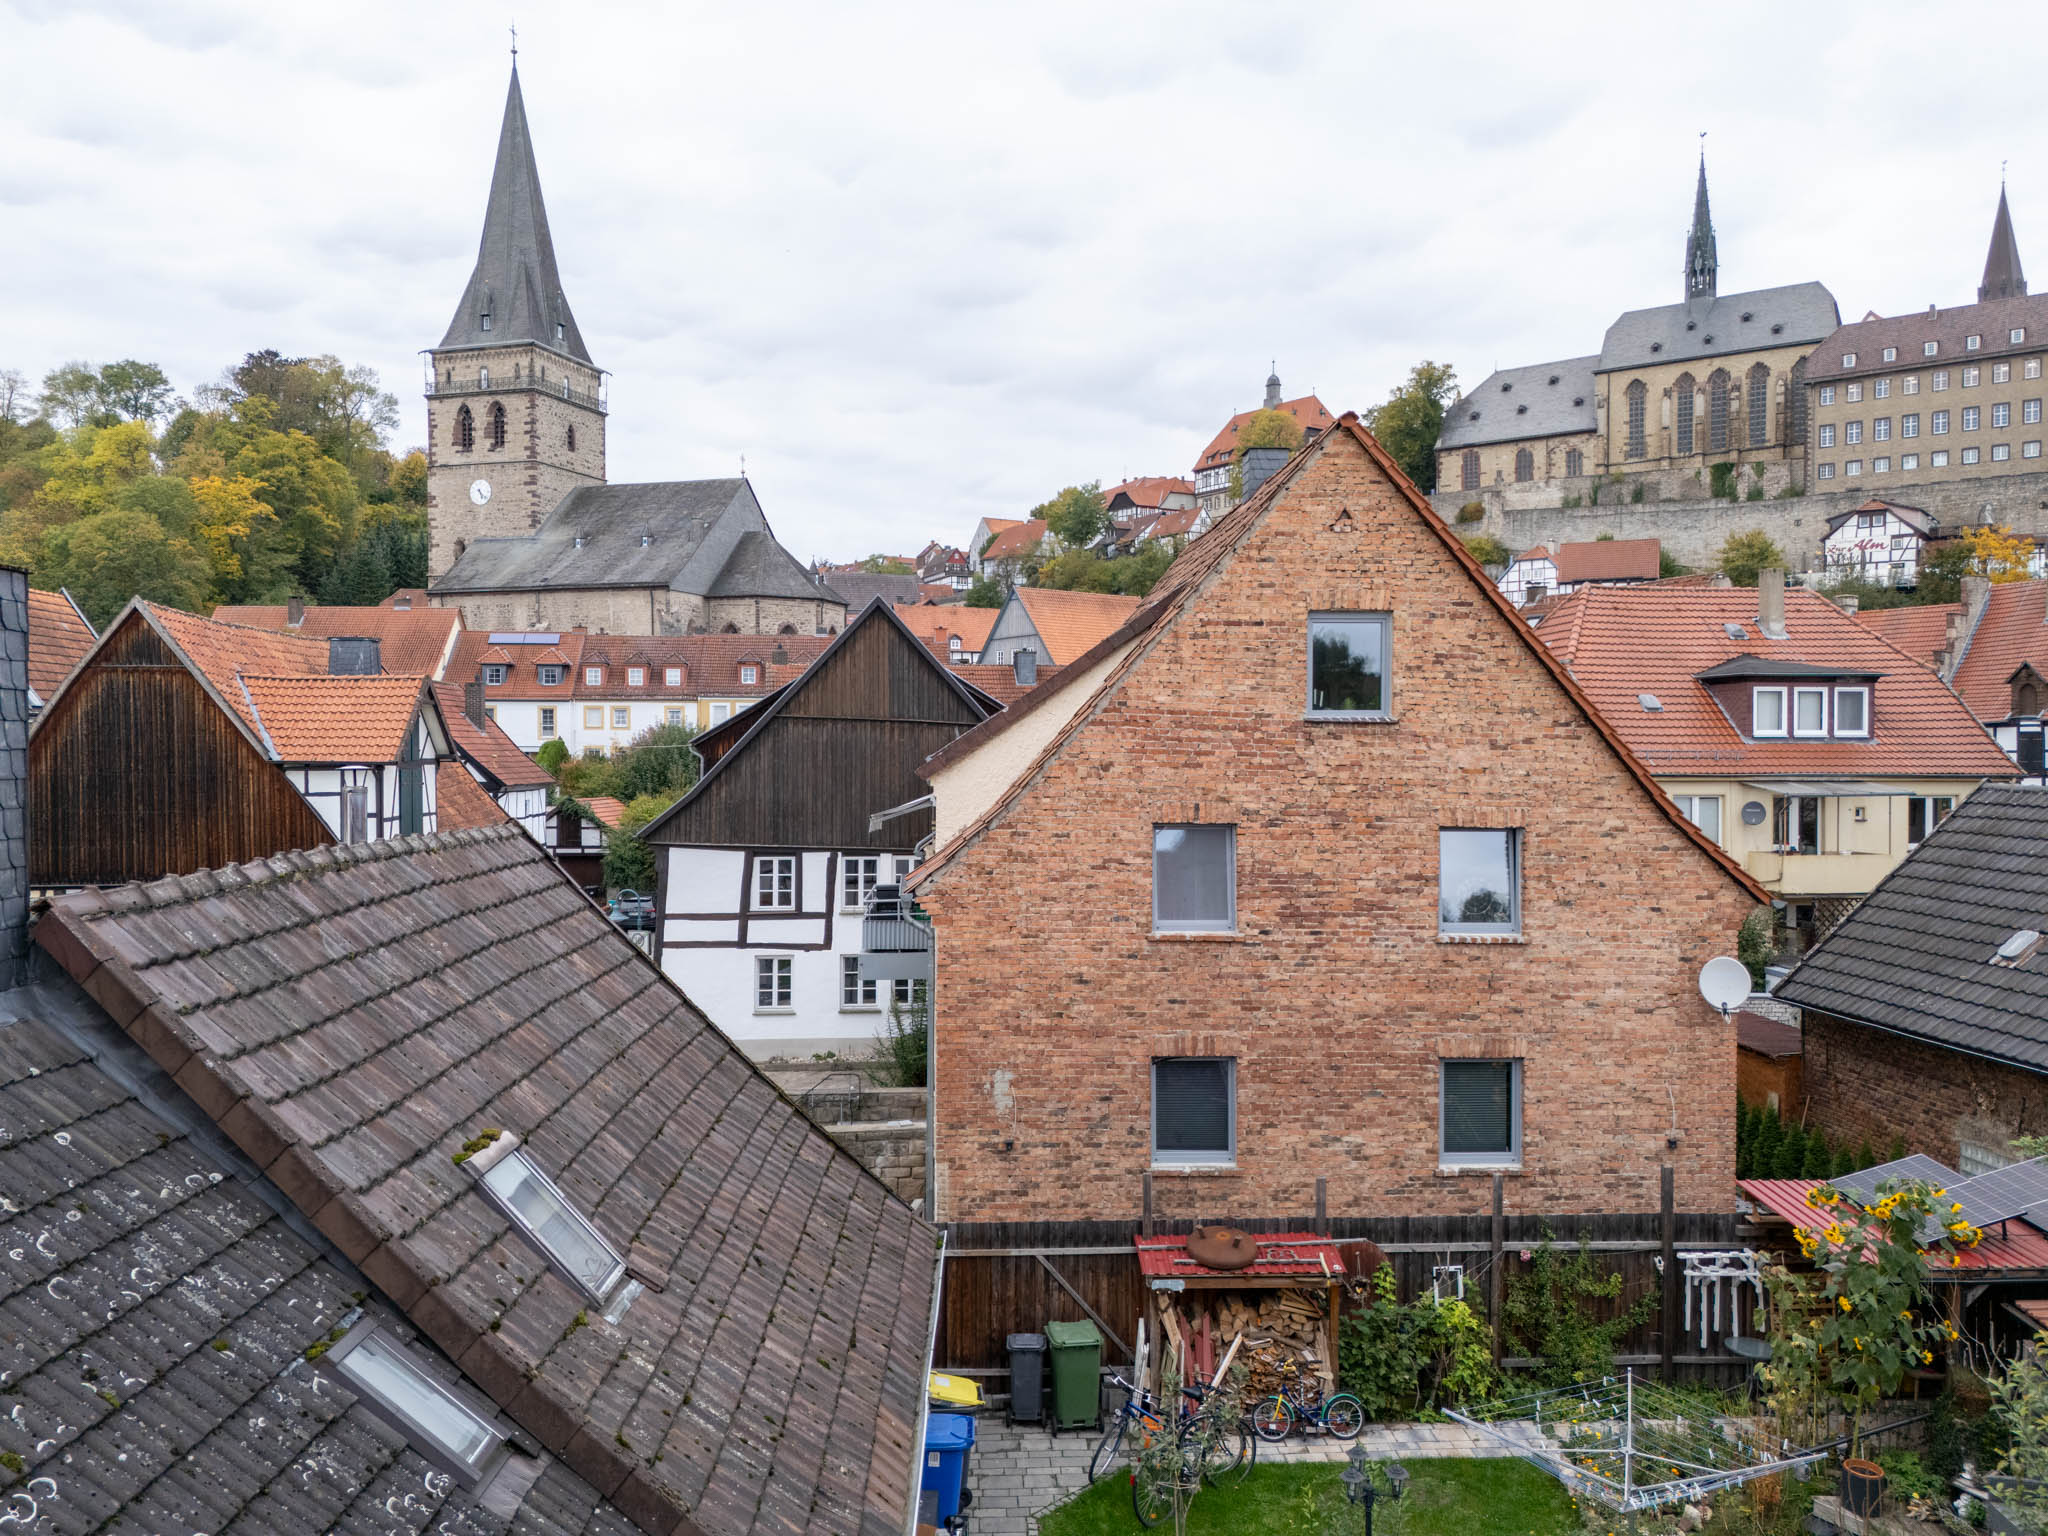
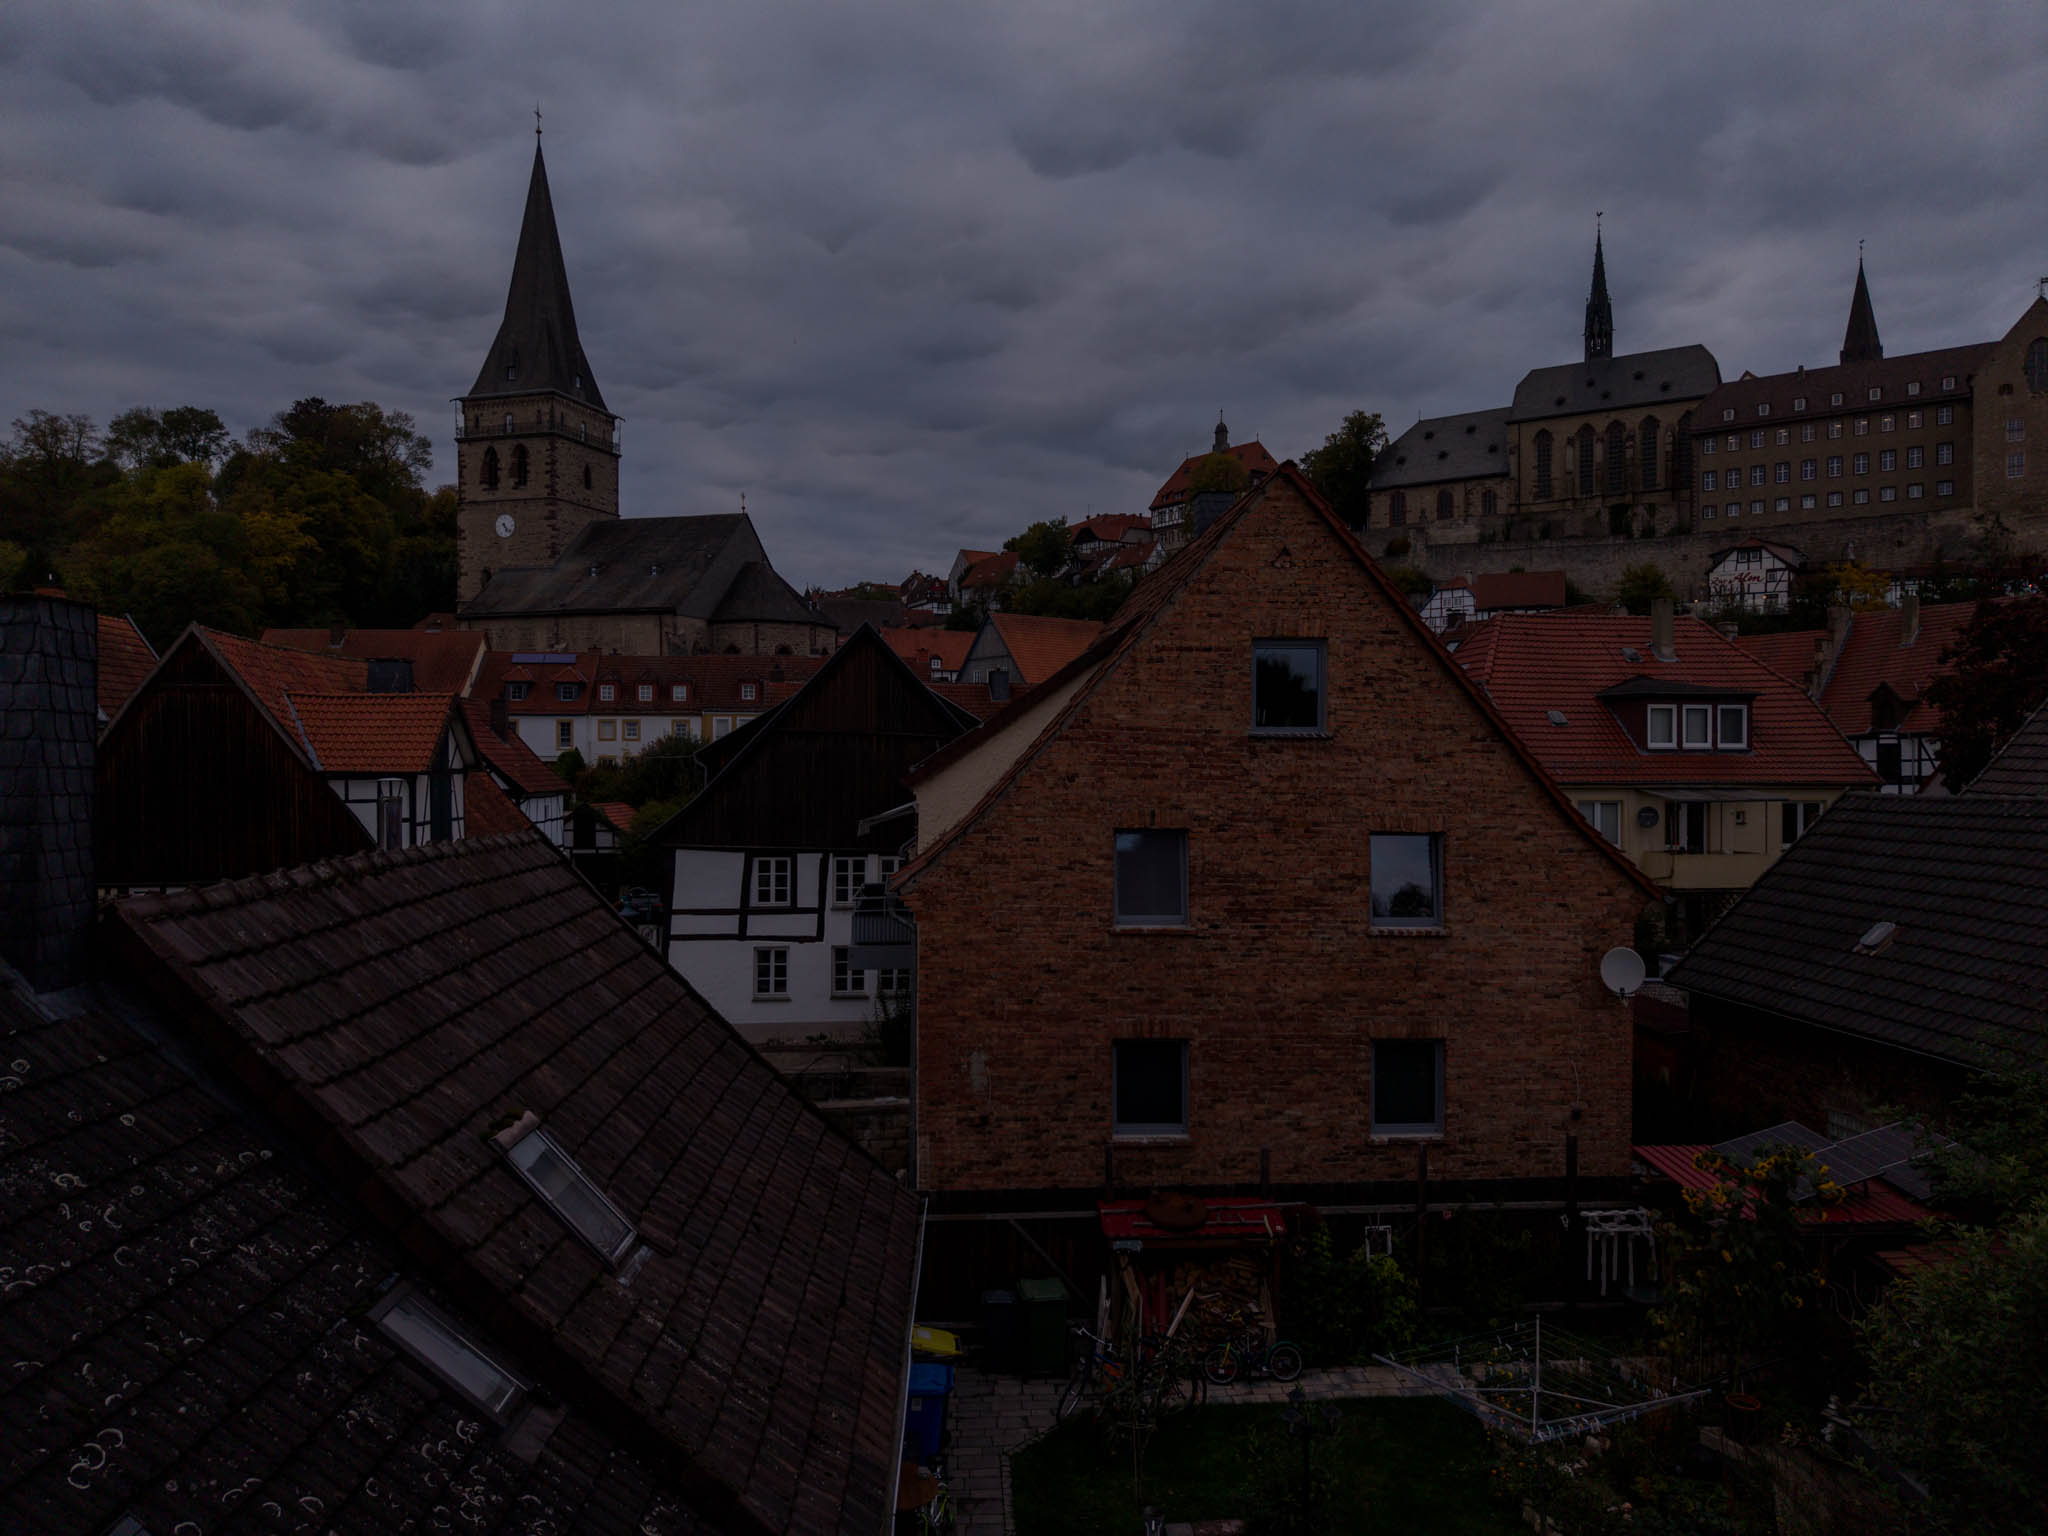
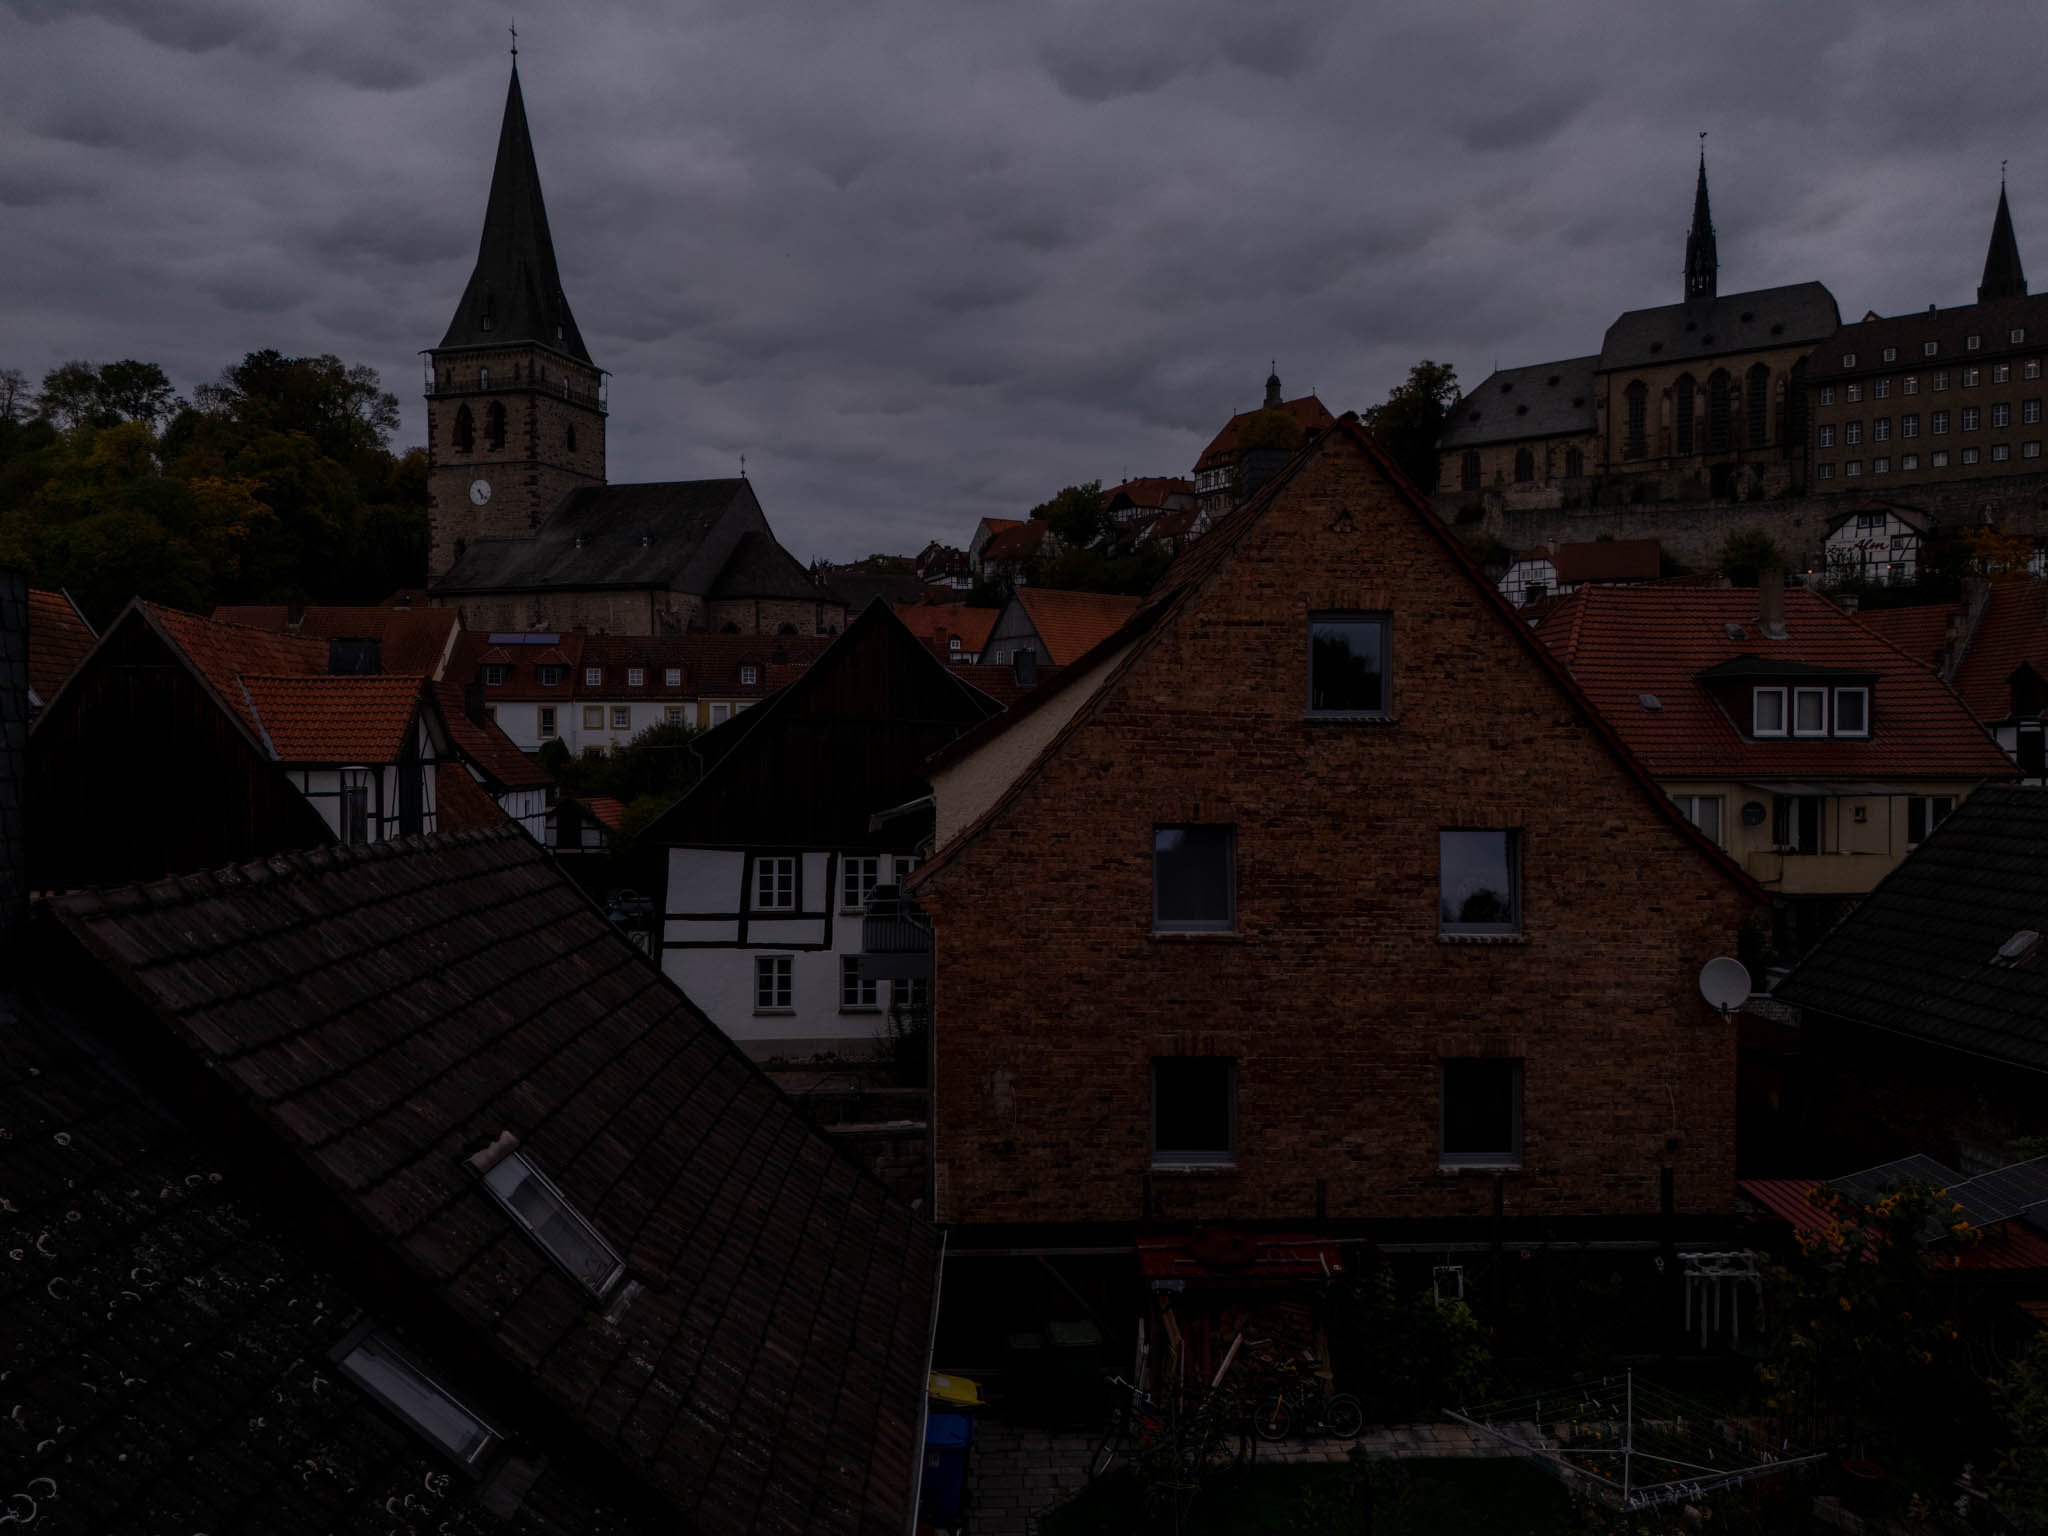
As in my previous drone tests, I once again took comparison photos with identical settings using both drones from my window. Unfortunately, the sky was overcast this time.
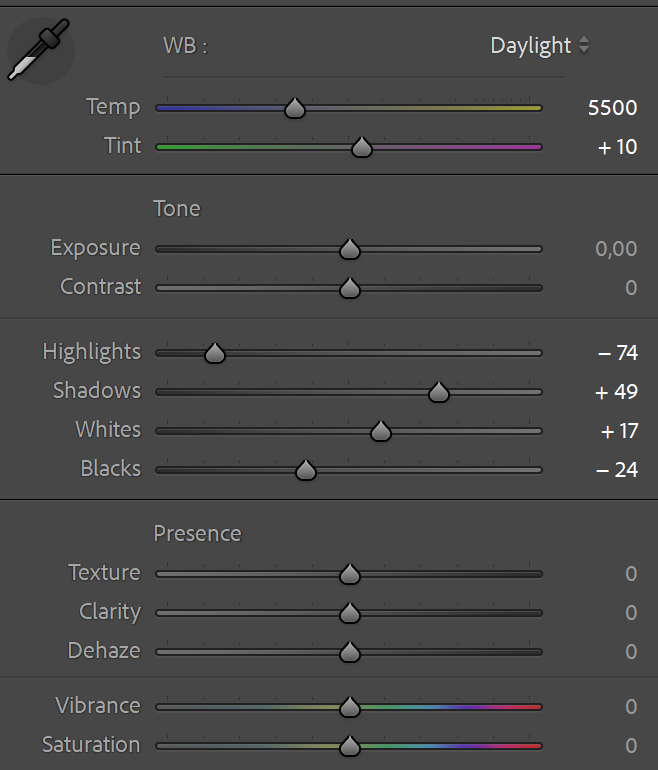
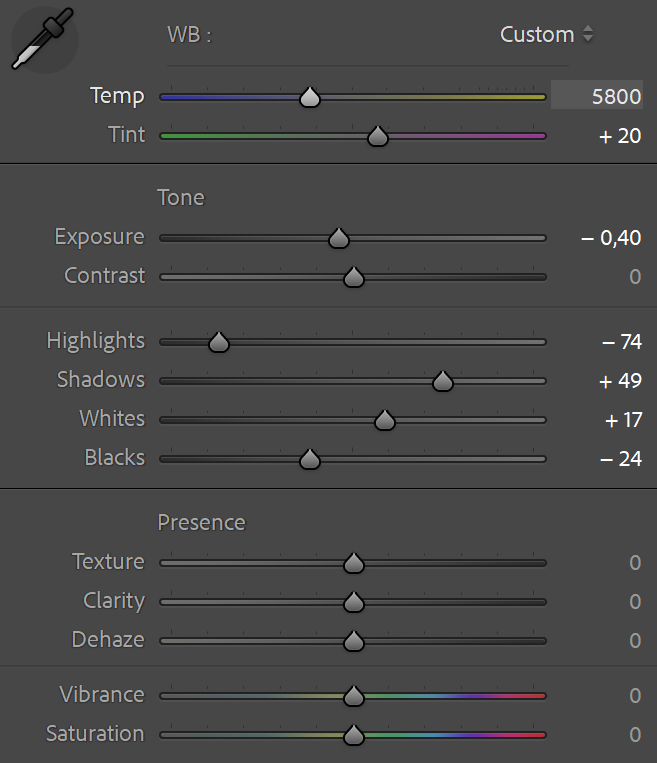
Both drones were manually set to ISO 100 and an exposure time of 1/200s. Focus was set via the touchscreen on the gable of the house with the orange clinker bricks. The photos were taken simultaneously at the highest resolution (50 and 48 megapixels, respectively) to achieve optimal comparability. I ignored the minimal difference in lens aperture (Mini 5 Pro f/1.8 vs. Mini 4 Pro f/1.7), which corresponds to only about 1/10 of a f-stop. The DNG files were then imported into Lightroom Classic V 14.5.1 and edited minimally with the following identical settings:
I left all other options in Lightroom at their default settings.
Overview
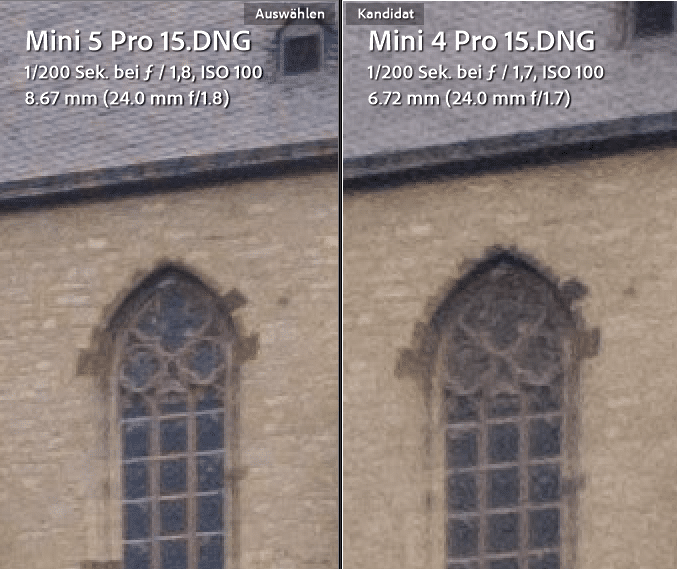
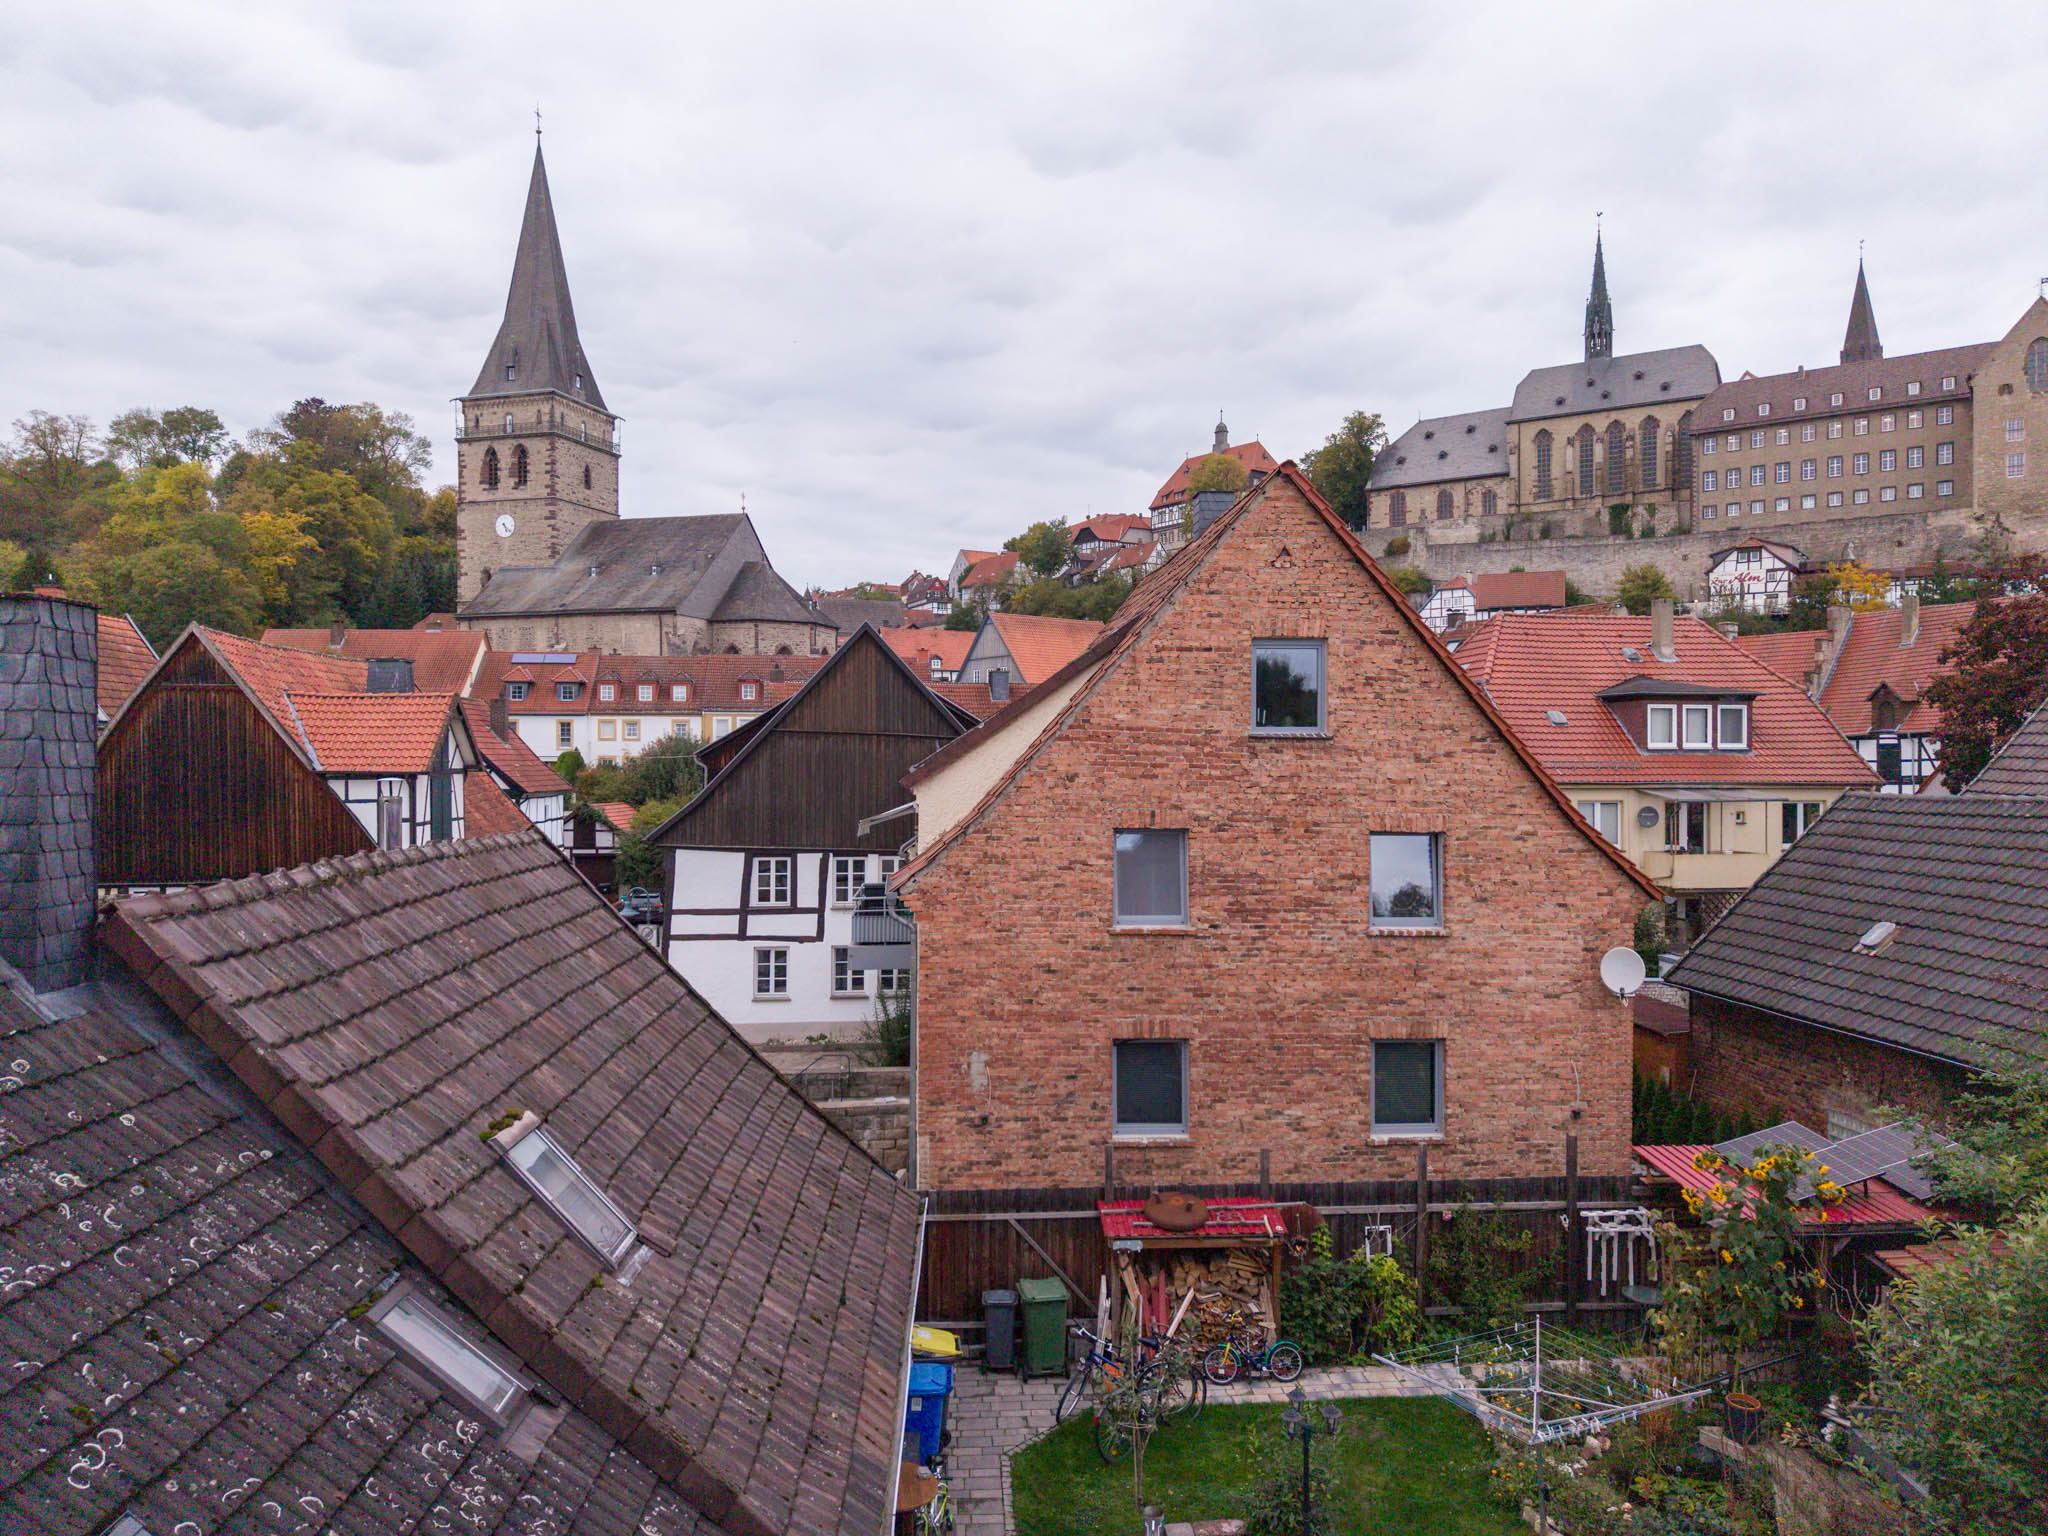
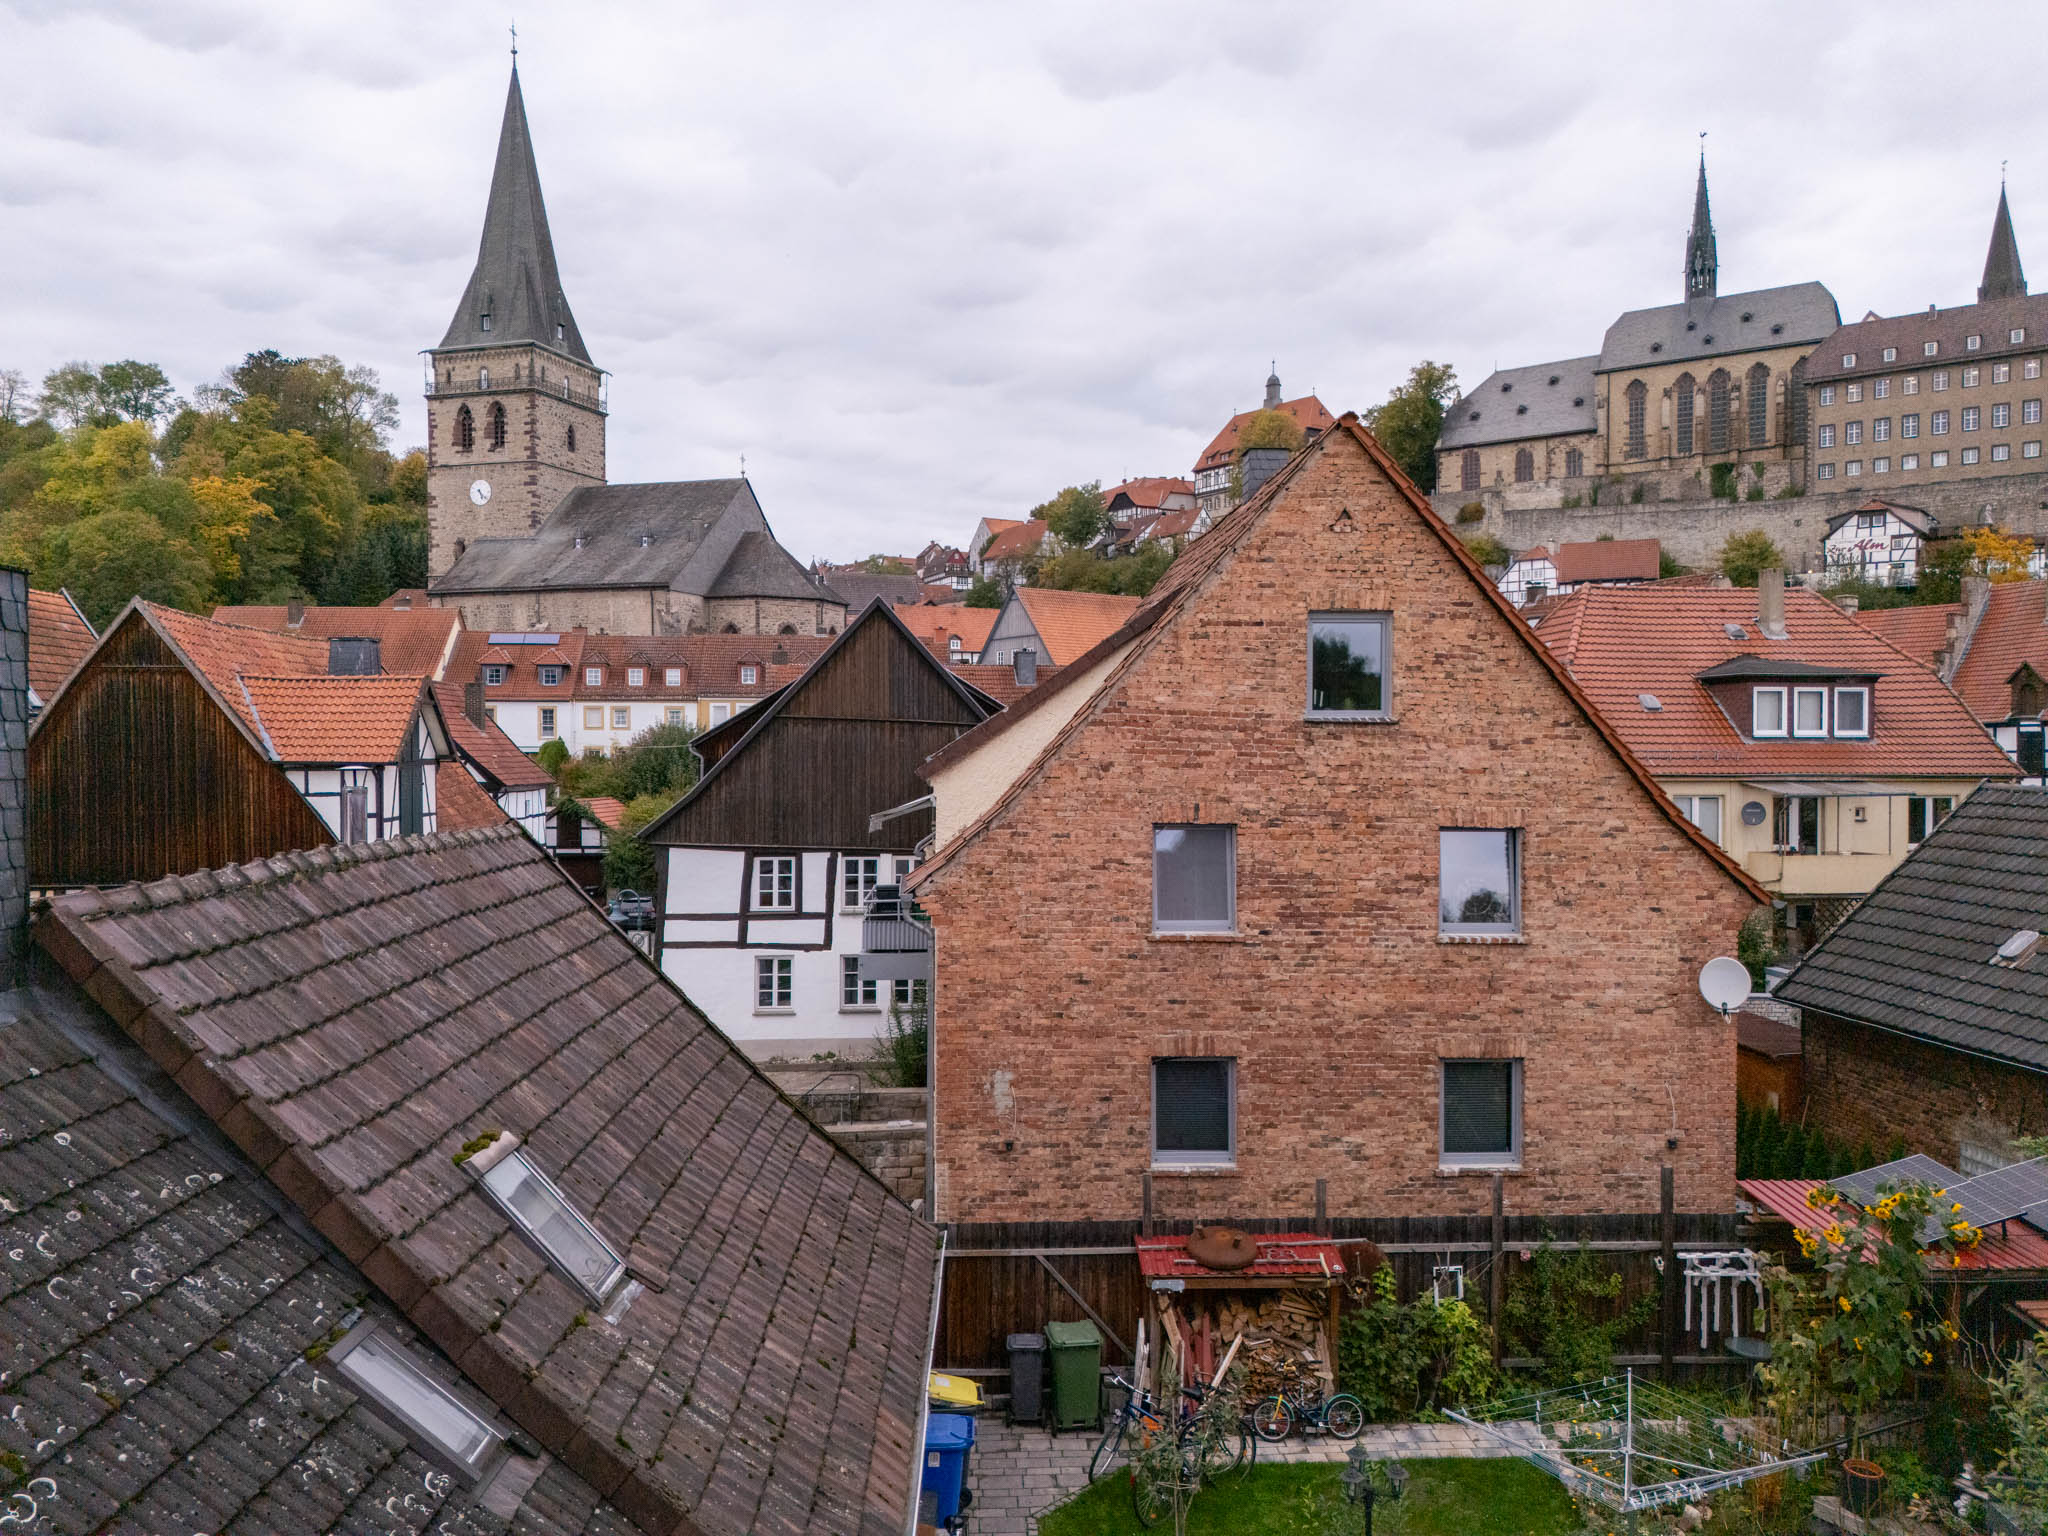
Here are both images in direct comparison:
On the left (or at the top when viewed on a mobile phone), you can always see the image from the Mini 5 Pro, and on the right that of the Mini 4 Pro. The direct comparison already clearly reveals that the Mini 5 Pro has a visibly larger field of view.
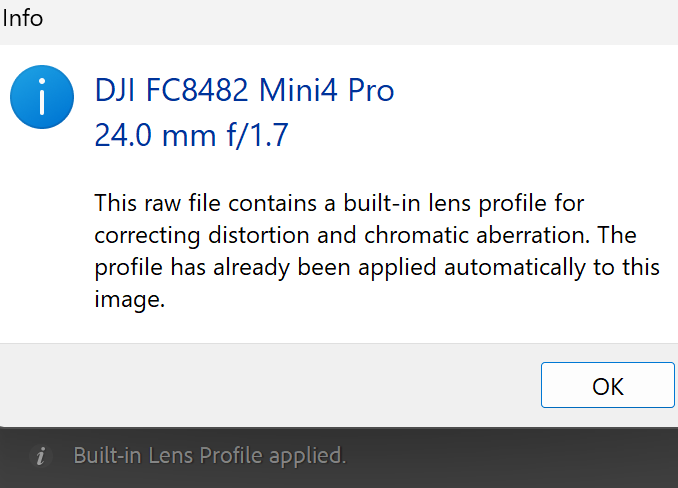
Lightroom Classic uses a lens profile integrated into the DJI Mini 4 Pro DNG file to correct distortion and chromatic aberrations in images captured by the Mini 4 Pro. This cannot be disabled in Lightroom:
The DNG file of the Mini 5 Pro, on the other hand, does not contain an integrated lens profile and apparently does not need one. Either the optics of the Mini 5 Pro have already been corrected to such an extent that digital distortion correction is no longer necessary, or (much more likely!) the correction of the DNG file is instead already performed in the Mini 5 Pro by the more powerful CPU that is likely integrated there.
The size of the DNG files is also interesting: the filesize of the Mini 5 Pro is 71 MB, while the Mini 4 Pro file is as large as 96 MB.
However, the size of a DNG file only provides limited information about image quality. Much depends on the efficiency of the compression algorithms. For example, the CR3 RAW files from my Canon EOS R5 Mark II are only between approximately 45 and 60 MB in size, depending on the ISO setting and subject. As a general rule, files become larger with increasing noise at higher ISO values and more details in the scene. Noise in particular cannot be compressed effectively.
Image adjustment
Using identical development settings, the Mini 5 Pro’s image appears slightly darker and warmer than that of the Mini 4 Pro. This is likely partially due to the slightly wider aperture of the Mini 4 Pro. To make the following examples easier to compare, I therefore adjusted the development settings for the Mini 4 Pro image slightly to achieve the best possible match:
Compared to the Mini 5 Pro settings, I increased the color temperature by 300 °C and the tint by 10, and reduced the exposure by 0.4 EV. Here is the result in a direct comparison:
So both images now look quite comparable in terms of brightness and color, at least in the overview.
Comparison of details
So it’s time to go into the details. How does the image sharpness compare in direct comparison?
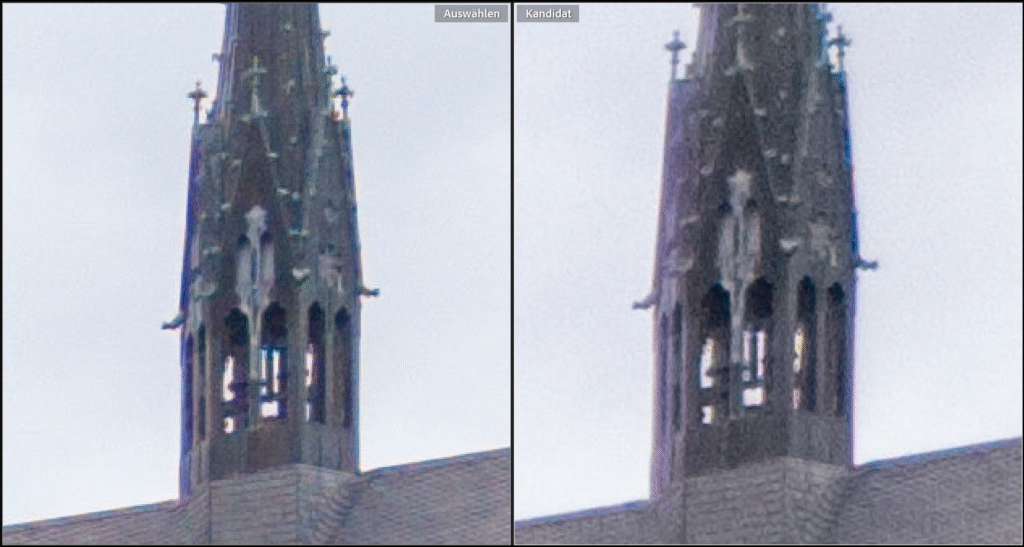
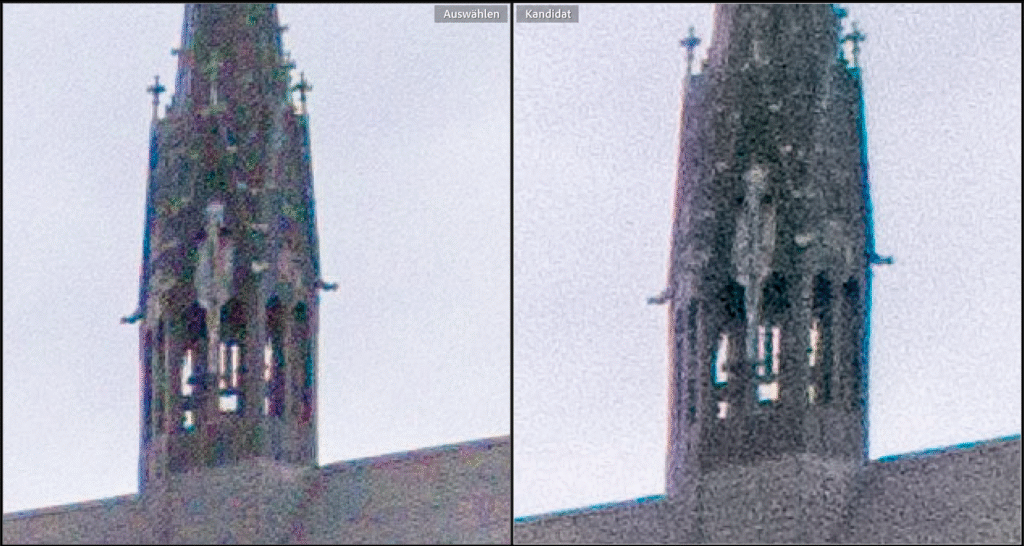
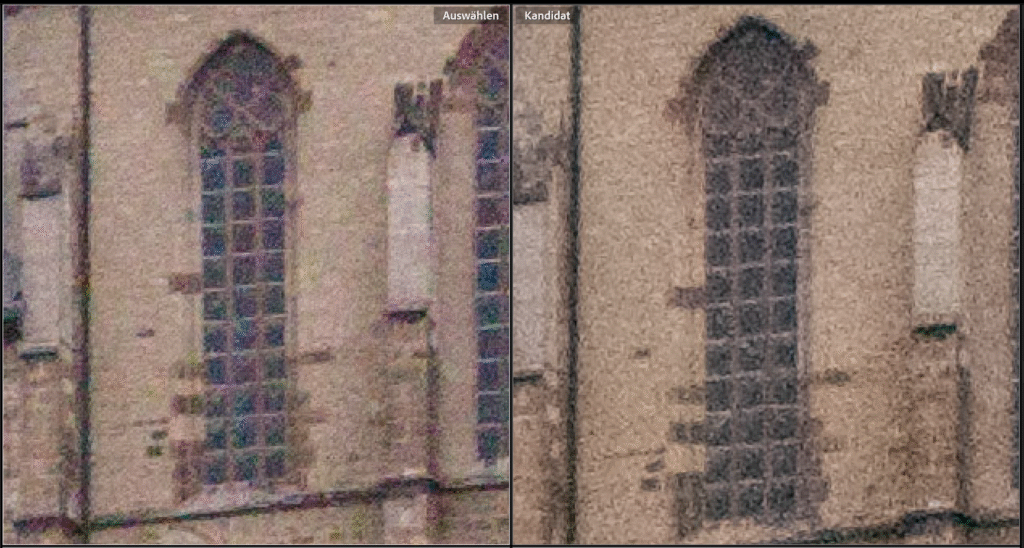
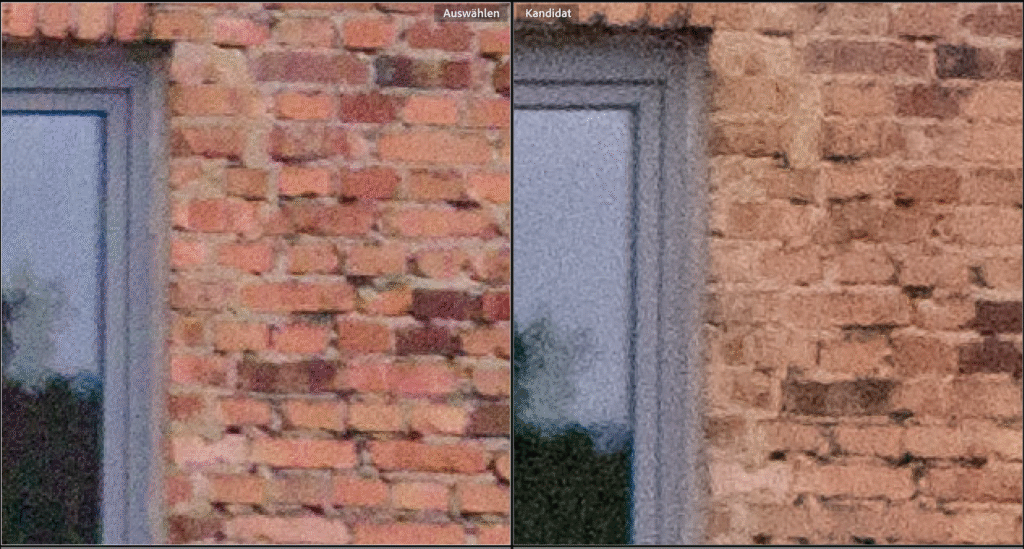
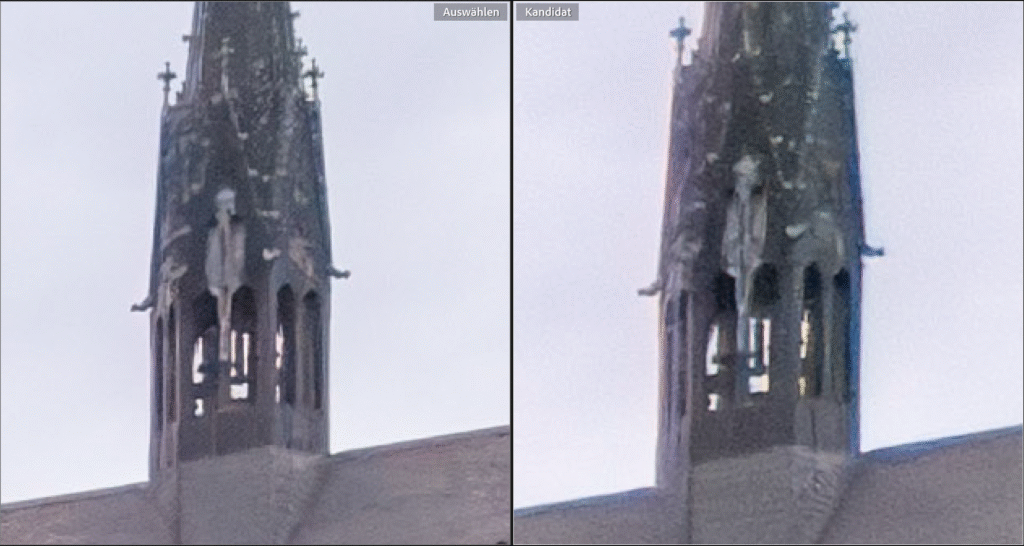
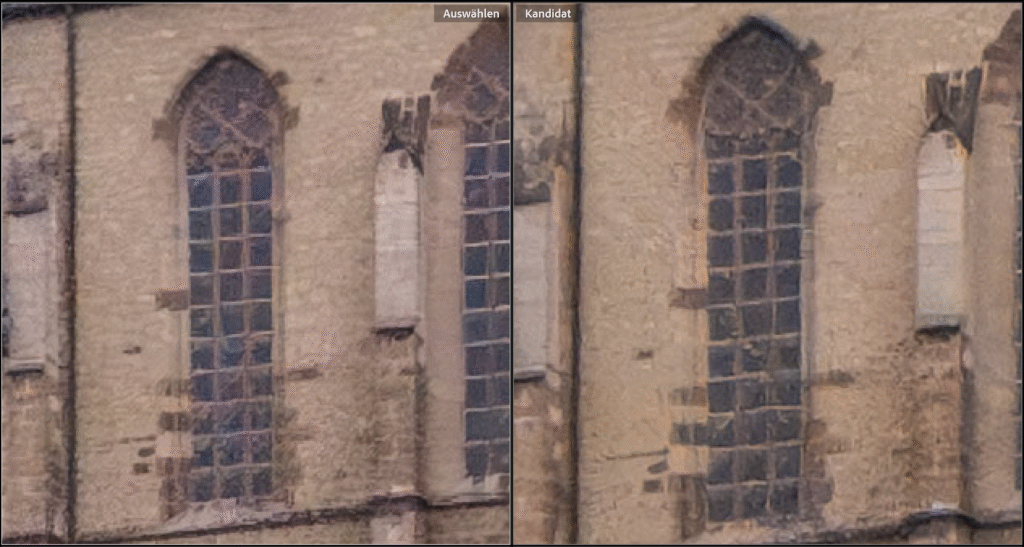
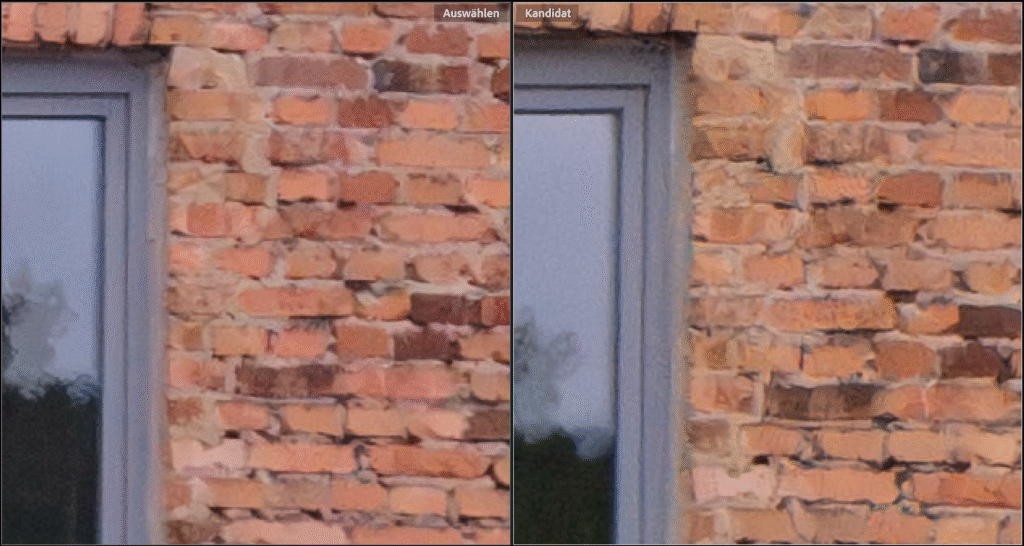
To do this, I compared several sections of the images above. To make the differences clearly visible even on small mobile displays, I enlarged the sections to 400% in Lightroom’s compare view. As before, the image from the Mini 5 Pro is on the left and the image from the Mini 4 Pro is on the right:
As can be seen in the three comparison images, the images on the left taken with the Mini 5 Pro are actually all slightly sharper, higher in contrast, and lower in noise than those taken with the Mini 5 Pro. However, the difference is not very large and is only clearly visible at this high magnification.
Dynamic range
Sharpness is only one criterion for the quality of a lens/sensor combination. The dynamic range of a sensor, i.e., its ability to differentiate between very bright and very dark parts of a scene in an image, is also very important. The darker the areas in the subject become, the lower the signal-to-noise ratio of the sensor pixels in question and the stronger the image noise becomes. Here, I expected a visible improvement with the Mini 5 Pro due to its larger sensor and larger individual pixels.
Basics
In very bright areas of an image, the sensor pixels will at some point become saturated, or “fully charged,” so to speak. Any additional photons will then have no effect. It is like a full barrel that overflows at some point. Correcting overexposure in digital sensors in post-processing is therefore only possible to a very limited extent.
The situation is different in dark areas. Here, depending on the quality of the sensor, extensive corrections are still possible. For this reason, particular attention should be paid to the bright, relevant parts of the subject during exposure (ETTR - Expose to the right) in order to make optimal use of the sensor’s dynamic range.
However, the darker the areas in the subject become, the lower the signal-to-noise ratio of the relevant sensor pixels and the greater the image noise. Here, I expected a visible improvement with the Mini 5 Pro due to the larger sensor and larger individual pixels.
To visualize the differences, I took test shots with both drones that were underexposed by 2 2/3 f-stops. To do this, I reduced the exposure time to 1/1250 while keeping all other settings the same. The DNG files created in this way initially appear very dark in Lightroom when using the same development settings as for the correctly exposed images shown above:
When they are brightened by 2.66 f-stops each using the exposure slider in Lightroom, they initially look in the overview as they did in the correctly exposed shots above:
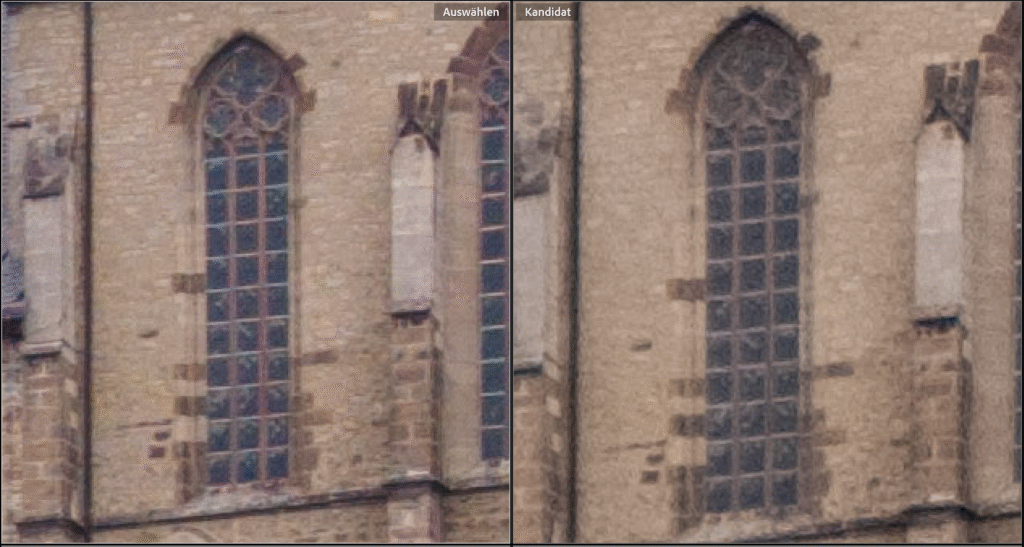
Below, I am presenting the same crops shown above, again at 400% magnification, for direct comparison. As before, the left crop shows the crops from the Mini 5 Pro, while the right crops show those from the Mini 4 Pro:
As expected, both images now show significant noise. In a direct comparison, however, I think the Mini 5 Pro performs better again, capturing more detail. It is noticeable, however, that the Mini 5 Pro has significantly more color noise than the Mini 4 Pro. This is particularly evident in the church window, for example.
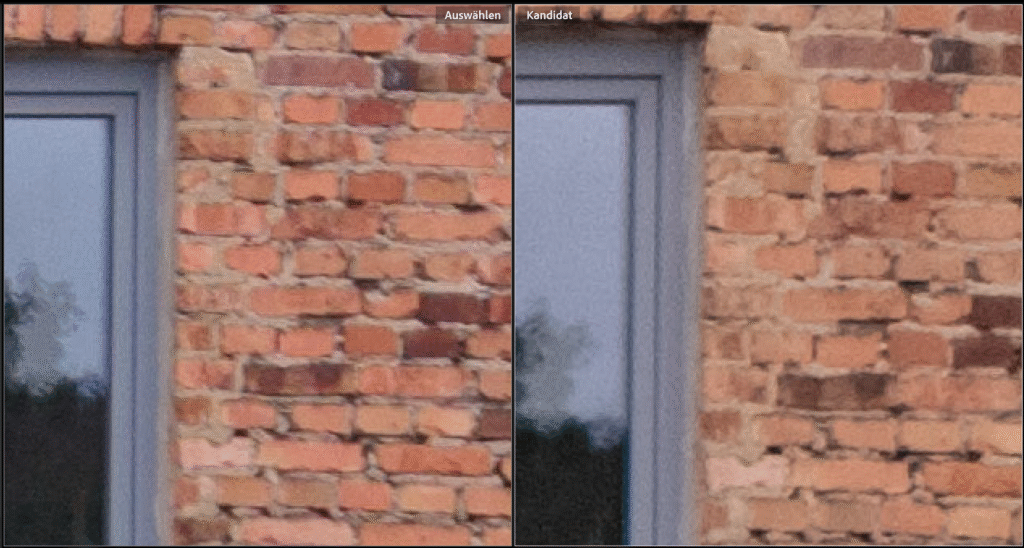
However, the reason for this seems to be that the Mini 4 Pro aggressively removes color noise internally, resulting in all images showing significantly less color detail. This can be seen very clearly in the last image taken with the Mini 4 Pro, in which all the tiles have almost the same color. The Mini 5 Pro continues to show the different red/orange/brown tones that are present.
In the above comparisons, it is also worth noting that due to the higher lens aperture of the Mini 4 Pro , the exposure of the underexposed Mini 4 Pro file in Lightroom only had to be increased by 2.26 EV, while that of the Mini 5 Pro had to be increased by as much as 2.66 EV. Despite the stronger adjustment, the Mini 5 Pro exhibits better noise performance.
Although color noise is indeed more pronounced with the Mini 5 Pro, the images capture the actual colors of the subject much better. With the Mini 4 Pro, the colors are severely bleached. In this comparison, I much prefer the color representation of the Mini 5 Pro. Furthermore, color noise can be removed relatively well in post-processing.
AI denoising
But we live in the age of AI. For some time now, Adobe Lightroom offers an integrated noise reduction feature with AI algorithms. I was curious to see what could be done with the noisy images above. So I reworked the underexposed drone images with the default setting of 50 using the Detail | Denoise menu item in the Develop menu:
Here you can see the denoised crops:
Once again, it’s amazing what AI can still get out of noisy images. In a direct comparison, however, I still like the results from the Mini 5 Pro a little better. In particular, the masonry around the church window and also in the last example shows more details with the Mini 5 Pro, while the structures are more blurred with the Mini 4 Pro, sometimes with noticeable artifacts.
Note on my workflow
cI would like to expressly point out that what is written here refers to my own workflow with Adobe Lightroom Classic.
Other RAW converters may produce different results. However, I think it is unlikely that there will be fundamental differences from my results. For those who would like to try it out for themselves, I have made the DNG files used in this comparison available for download in a ZIP file so that you can do your own tests:
Additional DNG test files - including those from the Mini 3 Pro, Air 3s, iPhone 15 Pro, and my Canon EOS R5 Mark II - can be found at the end of my article on the Air 3s. Unfortunately, despite the same motif, direct comparison with the Mini 4/5 Pro images shown here is difficult because the weather was significantly better and the light was much harsher at the time.
Resumée
As good as the images taken with the Mini 4 Pro are when using the correct technique and post-processing, the images taken with the Mini 5 Pro are even better. In particular, the dynamic range has improved thanks to the larger sensor. However, the differences are not huge and are actually only visible at high magnifications. The AI noise reduction also enables a significant improvement in the development result for both cameras.
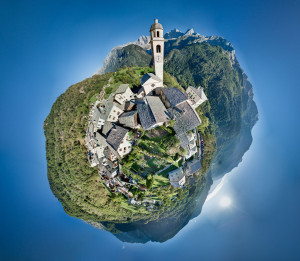
But the Mini 5 Pro also offers several additional features over the Mini 4 Pro, which I have already described in detail in my previous report, “DJI Mini 5 Pro – Photo Quality”. I would particularly like to mention the free panorama mode, which I have already used frequently and enjoyed using on its big sister, the DJI Air 3s.
Nevertheless, the Mini 4 Pro remains a wonderfull drone that I have used frequently and enjoyed using so far. But as is often the case, the better is the enemy of the good - so I upgraded to the Mini 5 Pro.
Hi, I reviewed the raw files. The bottom half of the Mini 5 Pro image frame is noticeably blurry. I don’t think this is due to the large sensor’s depth of field difference. It’s probably an optically flawed copy.
hmm, I took another look at my DNGs from the Mini 5 Pro and can’t confirm that. Except for the extreme corners, I am satisfied with the quality of the images so far, and I can’t detect any reduction in sharpness in the lower half of the images. Even good full-frame lenses with a 24mm focal length, which cost far more than the entire drone in the Fly More Combo (e.g., my EF 24-70 f/2.8L II), show a loss of sharpness in the extreme corners when the aperture is wide open. I don’t think you can expect more from this sensor format and price range at the moment. In any case, the results are better than with the Mini 4 Pro. Of course, there is still room for improvement when you compare the image with that of a full-frame camera, which costs five times as much (but can’t fly 😉).
Detail loss at the corners is to be expected, but in your Mini 4-Mini 5 comparison DNG file, the close-up red bricks on the wall and roof details are quite clear at the bottom in the Mini 4, while in the Mini 5, the detail loss increases towards the bottom and especially to the left. It might be a focusing issue. I encountered a similar problem with the Mini 3 before. Sometimes it gave planar focusing problems in any direction. I returned it.
Hmm, I took another closer look at the photo. You’re right about the lower part; the bricks do appear blurrier. However, the lines of the clothesline in front are clearly sharp, so it could be a slightly tilted plane of focus with the lens tilted downwards. The house wall is only about 6-8 meters away, so the shallower depth of field of the bogger sensor at open aperture could already be noticeable there. In my other landscape shots taken with infinite focus so far, I haven’t noticed any focus problems or lens decentering. However, thank you for pointing this out. Due to the weather, I haven’t used the Mini 5 Pro in the meantime. When the weather improves, I will conduct more detailed tests.
Is it possible to download some DJI footage (MP4) from this site? For instance 4K @60fps. I am very interested in the quality, the size and the file editability. Thank you and best regards, Michael
Thank you. I agree that someAI-techniques for enlarging raise significant questions about the reality of the resulting photograph. However, I was using « Bicubic Smoother » which does not seem to pose such a problem. Again, when I uprezzed the 12 mpx image using Bicubic I could see little or no difference from the 50 mpx. in fact the uprezzed 12 mph image sometimes looked crisper with slightly more detail. And it is not as if the 50 mpx capture comes without cost: 50mpx captures with the mini 5 have very slightly lower dynamic range and poorer colour accordng to several sources, neither of which can be recovered in post-processing.I am, like you, trying to establish a best technique so this issue is very important to me. I very much respect your work, so I ask you: do you have experimental proof that 50 is actually better than 12 for the mini 5.? I am suggesting that what may seem obvious may not be supported empirically in this case. What do you think?
I have never tested upscaling myself in comparison to native resolution, as it seems physically illogical to me. The 12-megapixel resolution is captured with the same pixels as the 50-megapixel resolution, the only difference being that 4 pixels are already interconnected internally on the chip and processed as a single pixel. Since more area is available, this improves both noise performance and dynamic range. However, the same effect can also be achieved in post-processing. Incidentally, dpreview once made a very interesting video on this topic. Best regards, Gerd-Uwe
I agree it seems physically illogical at first glance . However the 50 mpx are not in a bayer sensor arrangement when looked at as a whole. So interpreting them as 50 separate pixels comes at a cost, notably poorer colour content nformation. The results you cite for bayer sensors are not entirely valid for quad bayer sensors. Anyway, if you try the experiments you will see the evidence with your own eyes.
I have done some testing of 12 vs 50 mps captures. I can provide details, but I found no consistent improvement using 50. I have been trying to get more pixels in a given area (rather than the usual, more pixels with more area). I want to get 300 ppi for 20x30 inch prints, of smallish areas shot vertically often.
Hello again, Jerome, 50 megapixels should be sufficient for a 20x30 inch print without any problems. I have already printed this size several times. However, due to the noise susceptibility and lower dynamic range of the small sensor compared to a system camera, it makes sense to post-process the DNG files intensively. I almost exclusively use 5x exposure series on the DJI drone, which I then merge into an HDR in Adobe Lightroom. This already significantly improves the noise and dynamic range. The rest can then be removed with Lightroom’s AI denoising if necessary. Best regards, Gerd-Uwe
My problem is more difficult than merely getting 50 Mpx. Getting more Mpx by simply increasing the area of the composition is easy. I want to compose a shot that is 12 Mpx, and then, for that same composition, get 50 Mpx (good pixels, not the faux quad bayer 50 Mpx). Long ago I did something similar with my D2Xs: in order to get more pixels for printing large: when I had a composition I really liked I shot it a second time with a 3-frame panorama using a larger focal length.. With the essentially single focal length of the mini 5 this is more difficult.
You can also increase the resolution of an image during post-processing by simply taking several shots in quick succession and then loading them as layers in Photoshop, as an example. Due to the inevitable minimal movement of the drone between shots, these individual images have a slight offset, so that individual details of the subject are mapped to different pixels. If you then align the layers in Photoshop, combine them into a smart object, and render them using the “median” option, the resolution is increased and noise is reduced. Current smartphones work in a similar way internally. I see, I’ll have to write an article about that sometime.
Thank you. If that « hyper resolution » approach works that would be wonderful. Unfortunately it does not seem to work. I tried it several times today with 20 frames shot n quick succession and tried two approaches to stacking and combining them (as the median and as layers with decreasing opacity after uprezzng) , in strict accordance with several web sources for hyper resolution techniques. Neither approach increased the perceptible detail to any significant degree, if at all. Both decreased the noise. The median approach actually made the image very slightly blurrier, which makes sense when you think about it. Both approaches permitted rather more sharpening which made comparisons difficult. However it was very obvious that neither approach increased the actual detail to any significant degree, if at all. Certainly nothing even close to what I can achieve by combing three frames shot with a larger focal length with my conventional camera. Have you achieved different results. If so, precisely how? Thank you again.
Hello Jim, combining multiple individual images into a single image has long been common practice in astrophotography (stacking). In fact, it serves in particular to reduce noise. In addition, with slightly offset images, individual pixels end up on differently colour-sensitive pixels, so that colour noise, which is often very disturbing with Quad-Bayer sensors, is also reduced. The combined images naturally have the same resolution, but appear sharper due to the reduced grey and colour noise. However, there are also problems with stacking. Corrected wide-angle lenses have a relatively longer focal length and magnification at the edges to compensate for the otherwise unavoidable barrel distortion. Only fisheye lenses do not have this. If you then shift the image by one pixel in the centre, for example, the edge shifts by two pixels. Congruent stacking is then no longer possible and the images become blurred towards the edges. In addition, the optical quality of the Mini 5 Pro’s small lens is naturally limited. Whatever you do, you can try to get the best out of it with post-processing techniques, but you will never achieve the quality of a system camera with a good fixed focal length (which costs many times more than the Mini 5 Pro). I compared my EOS R5 and my iPhone 15 Pro in my article ‘DJI Mini 4 Pro - photo quality in comparison’. Best regards, Gerd-Uwe
Thank you for your informative reply. It confirms my experience that hyper resolution techniques do not work with the mini 5 to increase resolution, although they can be used to reduce noise. I am looking forward to reading your post comparing iPhone to regular camera. I should say here that I really appreciate your analyses. You are the only person I know doing serious investigations of drone photography.
Hi Jerome, the native resolution of the sensor of the Mini 5 Pro is 50mpx. But unlike conventional sensors for still cameras, this sensor uses the Quad Bayer format. In 12mpix mode, 4 pixels of the same color are then interconnected within the chip, so that it then seems to be a 12mpix chip.
I always use the highest available resolution; even my old Canon EOS 5D already had 12 megapixels 20 years ago. That resolution has not been enough for me for a long time. I publish my pictures in calendars in formats up to DIN A2 and produce large prints. But I think that you get the same result as in 12mpx mode anyway if you simply downscale the 50mpx image to 1/4 during post-processing. In this case, too, the four individual high-res pixels are added together, which also results in less noise. Downscaling reduces noise very effectively.
Thank you for your very interesting article. I too would appreciate a comparison between the 12 and the 50 max modes. I have done some testing myself, shooting vertical low altitude shots, and the difference seems to vary. Sometimes 50 max is very slightly better when viewed at 100% and sharpened (it can benefit from more sharpening and increased clarity). However sometimes the 12 max appears better. All shots in excellent light, at 100 iso and speeds of 1/1000 or faster. Puzzling. I would also be very interested in seeing a study of how to increase the total pixels in a given area using free panorama., that is not just getting more pixels by shooting a bigger area. my website is http://www.jalamont.ca. I share your interest in high quality drone photography.
Hello Jerome, I don’t think it makes sense to test the 12-megapixel mode separately. Since the 12 megapixels on the sensor are simply calculated by combining 4 pixels of the 50-megapixel sensor, you can achieve the same result by simply reducing the resolution to 25% in post-processing. Of course, the 12-megapixel images look better in 100% view than the 50-megapixel images in 100%. However, it is important to keep in mind that the 50-megapixel image is four times larger. For comparison, you would have to view the 50-megapixel image at 25%, and then you will no longer see any difference between the two. Best regards, Gerd-Uwe
Yes, I agree that converting a 50 Mpx capture to 12 will give better noise characteristics and so on. Similarly, and perhaps surprisingly, uprezzing a mini 5’s 12 Mpx to 50 Mpx will give a result that is very often indistinguishable from a 50 Mpx quad bayer capture. In fact the 50 Mpx capture can be worse, with poorer colour, lower local contrast, and lower dynamic range. What I do not understand is the conditions that make captures at 50 Mpx worse than 12 and when better.
If you use AI to enlarge a 12-megapixel image to 50 megapixels, it may look sharper than a ative 50-megapixel image, but the visible sharpness has nothing to do with the original subject. Instead, the AI invents additional pixels that fit well. I recommend reading my article AI denoising - fact or fake? on this topic. Although it deals with AI denoising, what is described there also applies to enlargement. Feel free to try it out for yourself: Take a picture of a newspaper page from a distance with 12 and 50 megapixels, enlarge the 12-megapixel image to 50 megapixels, and compare the two 50-megapixel images with each other. The enlarged image may appear sharper, but the one taken with 50 megapixels will be easier to read. You have to decide for yourself whether you want fact or fake 😉
This website uses cookies to improve your experience. We'll assume you're ok with this, but you can opt-out if you wish. Cookie settingsAcceptread more...
Privacy & Cookies Policy
Privacy Overview
This website uses cookies to improve your experience while you navigate through the website. Out of these cookies, the cookies that are categorized as necessary are stored on your browser as they are essential for the working of basic functionalities of the website. We also use third-party cookies that help us analyze and understand how you use this website. These cookies will be stored in your browser only with your consent. You also have the option to opt-out of these cookies. But opting out of some of these cookies may have an effect on your browsing experience.
Necessary cookies are absolutely essential for the website to function properly. This category only includes cookies that ensures basic functionalities and security features of the website. These cookies do not store any personal information.
Any cookies that may not be particularly necessary for the website to function and is used specifically to collect user personal data via analytics, ads, other embedded contents are termed as non-necessary cookies.


Hi, I reviewed the raw files. The bottom half of the Mini 5 Pro image frame is noticeably blurry. I don’t think this is due to the large sensor’s depth of field difference. It’s probably an optically flawed copy.
Hello Ulaş,
hmm, I took another look at my DNGs from the Mini 5 Pro and can’t confirm that. Except for the extreme corners, I am satisfied with the quality of the images so far, and I can’t detect any reduction in sharpness in the lower half of the images. Even good full-frame lenses with a 24mm focal length, which cost far more than the entire drone in the Fly More Combo (e.g., my EF 24-70 f/2.8L II), show a loss of sharpness in the extreme corners when the aperture is wide open. I don’t think you can expect more from this sensor format and price range at the moment. In any case, the results are better than with the Mini 4 Pro. Of course, there is still room for improvement when you compare the image with that of a full-frame camera, which costs five times as much (but can’t fly 😉).
Detail loss at the corners is to be expected, but in your Mini 4-Mini 5 comparison DNG file, the close-up red bricks on the wall and roof details are quite clear at the bottom in the Mini 4, while in the Mini 5, the detail loss increases towards the bottom and especially to the left. It might be a focusing issue. I encountered a similar problem with the Mini 3 before. Sometimes it gave planar focusing problems in any direction. I returned it.
Hmm, I took another closer look at the photo. You’re right about the lower part; the bricks do appear blurrier. However, the lines of the clothesline in front are clearly sharp, so it could be a slightly tilted plane of focus with the lens tilted downwards. The house wall is only about 6-8 meters away, so the shallower depth of field of the bogger sensor at open aperture could already be noticeable there. In my other landscape shots taken with infinite focus so far, I haven’t noticed any focus problems or lens decentering. However, thank you for pointing this out. Due to the weather, I haven’t used the Mini 5 Pro in the meantime. When the weather improves, I will conduct more detailed tests.
Thanks for the reply. Do you know a source where I can find some MP4 footage to investigate de characteristics?
Unfortunately, I don’t have a source for that either — as I said, I’m mainly just interested in photography.
Is it possible to download some DJI footage (MP4) from this site? For instance 4K @60fps. I am very interested in the quality, the size and the file editability. Thank you and best regards, Michael
Hi Michael,
I actually only use the drone for photography, so I can’t provide any usefull video material, sorry.
How can I download the DNG files? I am asked to enter a password for the sftp host. Thank you.
Hi Bill,
thanks for letting me know. A link was incorrect, from now on the download should work.
Thank you very much! It worked 🙂
you are confused with GB and MB 🙂
Ooops, you’re right, thanks for pointing that out, I’ve corrected it
Thank you. I agree that someAI-techniques for enlarging raise significant questions about the reality of the resulting photograph. However, I was using « Bicubic Smoother » which does not seem to pose such a problem. Again, when I uprezzed the 12 mpx image using Bicubic I could see little or no difference from the 50 mpx. in fact the uprezzed 12 mph image sometimes looked crisper with slightly more detail. And it is not as if the 50 mpx capture comes without cost: 50mpx captures with the mini 5 have very slightly lower dynamic range and poorer colour accordng to several sources, neither of which can be recovered in post-processing.I am, like you, trying to establish a best technique so this issue is very important to me. I very much respect your work, so I ask you: do you have experimental proof that 50 is actually better than 12 for the mini 5.? I am suggesting that what may seem obvious may not be supported empirically in this case. What do you think?
I have never tested upscaling myself in comparison to native resolution, as it seems physically illogical to me. The 12-megapixel resolution is captured with the same pixels as the 50-megapixel resolution, the only difference being that 4 pixels are already interconnected internally on the chip and processed as a single pixel. Since more area is available, this improves both noise performance and dynamic range. However, the same effect can also be achieved in post-processing. Incidentally, dpreview once made a very interesting video on this topic.
Best regards,
Gerd-Uwe
I agree it seems physically illogical at first glance . However the 50 mpx are not in a bayer sensor arrangement when looked at as a whole. So interpreting them as 50 separate pixels comes at a cost, notably poorer colour content nformation. The results you cite for bayer sensors are not entirely valid for quad bayer sensors. Anyway, if you try the experiments you will see the evidence with your own eyes.
Good work, tank you!
A low light comparison would have been wonderful. IMHO better than simulating avail light by doing adjustments.
I have done some testing of 12 vs 50 mps captures. I can provide details, but I found no consistent improvement using 50. I have been trying to get more pixels in a given area (rather than the usual, more pixels with more area). I want to get 300 ppi for 20x30 inch prints, of smallish areas shot vertically often.
Hello again, Jerome,
50 megapixels should be sufficient for a 20x30 inch print without any problems. I have already printed this size several times. However, due to the noise susceptibility and lower dynamic range of the small sensor compared to a system camera, it makes sense to post-process the DNG files intensively. I almost exclusively use 5x exposure series on the DJI drone, which I then merge into an HDR in Adobe Lightroom. This already significantly improves the noise and dynamic range. The rest can then be removed with Lightroom’s AI denoising if necessary.
Best regards,
Gerd-Uwe
My problem is more difficult than merely getting 50 Mpx. Getting more Mpx by simply increasing the area of the composition is easy. I want to compose a shot that is 12 Mpx, and then, for that same composition, get 50 Mpx (good pixels, not the faux quad bayer 50 Mpx). Long ago I did something similar with my D2Xs: in order to get more pixels for printing large: when I had a composition I really liked I shot it a second time with a 3-frame panorama using a larger focal length.. With the essentially single focal length of the mini 5 this is more difficult.
You can also increase the resolution of an image during post-processing by simply taking several shots in quick succession and then loading them as layers in Photoshop, as an example. Due to the inevitable minimal movement of the drone between shots, these individual images have a slight offset, so that individual details of the subject are mapped to different pixels. If you then align the layers in Photoshop, combine them into a smart object, and render them using the “median” option, the resolution is increased and noise is reduced. Current smartphones work in a similar way internally. I see, I’ll have to write an article about that sometime.
Thank you. If that « hyper resolution » approach works that would be wonderful. Unfortunately it does not seem to work. I tried it several times today with 20 frames shot n quick succession and tried two approaches to stacking and combining them (as the median and as layers with decreasing opacity after uprezzng) , in strict accordance with several web sources for hyper resolution techniques. Neither approach increased the perceptible detail to any significant degree, if at all. Both decreased the noise. The median approach actually made the image very slightly blurrier, which makes sense when you think about it. Both approaches permitted rather more sharpening which made comparisons difficult. However it was very obvious that neither approach increased the actual detail to any significant degree, if at all. Certainly nothing even close to what I can achieve by combing three frames shot with a larger focal length with my conventional camera. Have you achieved different results. If so, precisely how? Thank you again.
Hello Jim,
combining multiple individual images into a single image has long been common practice in astrophotography (stacking). In fact, it serves in particular to reduce noise. In addition, with slightly offset images, individual pixels end up on differently colour-sensitive pixels, so that colour noise, which is often very disturbing with Quad-Bayer sensors, is also reduced. The combined images naturally have the same resolution, but appear sharper due to the reduced grey and colour noise. However, there are also problems with stacking. Corrected wide-angle lenses have a relatively longer focal length and magnification at the edges to compensate for the otherwise unavoidable barrel distortion. Only fisheye lenses do not have this. If you then shift the image by one pixel in the centre, for example, the edge shifts by two pixels. Congruent stacking is then no longer possible and the images become blurred towards the edges. In addition, the optical quality of the Mini 5 Pro’s small lens is naturally limited. Whatever you do, you can try to get the best out of it with post-processing techniques, but you will never achieve the quality of a system camera with a good fixed focal length (which costs many times more than the Mini 5 Pro). I compared my EOS R5 and my iPhone 15 Pro in my article ‘DJI Mini 4 Pro - photo quality in comparison’.
Best regards,
Gerd-Uwe
Thank you for your informative reply. It confirms my experience that hyper resolution techniques do not work with the mini 5 to increase resolution, although they can be used to reduce noise. I am looking forward to reading your post comparing iPhone to regular camera. I should say here that I really appreciate your analyses. You are the only person I know doing serious investigations of drone photography.
Hi,
Thank you for this comparison.
Maybe you should have compared photos taken at 12mpx too as it’s the native resolution of both sensors ?
Hi Jerome,
the native resolution of the sensor of the Mini 5 Pro is 50mpx. But unlike conventional sensors for still cameras, this sensor uses the Quad Bayer format. In 12mpix mode, 4 pixels of the same color are then interconnected within the chip, so that it then seems to be a 12mpix chip.
I always use the highest available resolution; even my old Canon EOS 5D already had 12 megapixels 20 years ago. That resolution has not been enough for me for a long time. I publish my pictures in calendars in formats up to DIN A2 and produce large prints. But I think that you get the same result as in 12mpx mode anyway if you simply downscale the 50mpx image to 1/4 during post-processing. In this case, too, the four individual high-res pixels are added together, which also results in less noise. Downscaling reduces noise very effectively.
Thank you for your very interesting article. I too would appreciate a comparison between the 12 and the 50 max modes. I have done some testing myself, shooting vertical low altitude shots, and the difference seems to vary. Sometimes 50 max is very slightly better when viewed at 100% and sharpened (it can benefit from more sharpening and increased clarity). However sometimes the 12 max appears better. All shots in excellent light, at 100 iso and speeds of 1/1000 or faster. Puzzling. I would also be very interested in seeing a study of how to increase the total pixels in a given area using free panorama., that is not just getting more pixels by shooting a bigger area. my website is http://www.jalamont.ca. I share your interest in high quality drone photography.
Hello Jerome,
I don’t think it makes sense to test the 12-megapixel mode separately. Since the 12 megapixels on the sensor are simply calculated by combining 4 pixels of the 50-megapixel sensor, you can achieve the same result by simply reducing the resolution to 25% in post-processing. Of course, the 12-megapixel images look better in 100% view than the 50-megapixel images in 100%. However, it is important to keep in mind that the 50-megapixel image is four times larger. For comparison, you would have to view the 50-megapixel image at 25%, and then you will no longer see any difference between the two.
Best regards,
Gerd-Uwe
Yes, I agree that converting a 50 Mpx capture to 12 will give better noise characteristics and so on. Similarly, and perhaps surprisingly, uprezzing a mini 5’s 12 Mpx to 50 Mpx will give a result that is very often indistinguishable from a 50 Mpx quad bayer capture. In fact the 50 Mpx capture can be worse, with poorer colour, lower local contrast, and lower dynamic range. What I do not understand is the conditions that make captures at 50 Mpx worse than 12 and when better.
If you use AI to enlarge a 12-megapixel image to 50 megapixels, it may look sharper than a ative 50-megapixel image, but the visible sharpness has nothing to do with the original subject. Instead, the AI invents additional pixels that fit well. I recommend reading my article AI denoising - fact or fake? on this topic. Although it deals with AI denoising, what is described there also applies to enlargement. Feel free to try it out for yourself: Take a picture of a newspaper page from a distance with 12 and 50 megapixels, enlarge the 12-megapixel image to 50 megapixels, and compare the two 50-megapixel images with each other. The enlarged image may appear sharper, but the one taken with 50 megapixels will be easier to read. You have to decide for yourself whether you want fact or fake 😉